| Info | ||
|---|---|---|
| ||
This user guide is subject to change as development of the new submission platform BMDW data upload service is enhanced with new features. This manual is for the staging environment for registries organisations to upload their test their xml format data file uploadsXML data files. |
Purpose
This document describes the manual upload method of an PGP encrypted XML file through the new submission platform. As part of continuous effort to streamline and enhance functionality for our registry users, BMDW have been developing the new data submission services in line with the file format transition from .Dot20 to XML. The automatic upload method via a REST API [1] will become available later as well as the corresponding manual.
...
- Only organisations that have an ION (listing organisations) will be able to upload
- The usernames are your email address that you have requested to be added in our database as Data Uploaders
- Every organisation that is listing only donors or only cord blood units is allowed to have two dedicated accounts. If an organisation is listing both donors and cord blood units, they are allowed to have a maximum of four accounts. Multiple accounts of one organisation share one workspaceWorkspace, but every user has its own login details.
- The platform is organised in so called 'workspacesWorkspaces'. This workspace Workspace is a private space for each organisation where files can be uploaded and processing reports become available.
- If your organisation submits data on behalf of other registries then as an uploading organisation you will only see one workspace Workspace where you can upload files for other registry(ies) that you are affiliated with.
- Uploaded files should follow the XML guidelines as described in the BMDW Data submission information on the BMDW public access space.
...
PLEASE NOTE: This platform is still under development. Therefore, you may notice outages, changes to your data, or even find some functions broken and giving errors. These potentially issues are either due to new functional deployments taking place or their being a bug in the software. If you do come across any bugs or defects please do report these as part of any feedback you may have by sending an email to support@bmdw.org.
The premise of giving our registries listing organisations access to the test site is to allow them to familiarise themselves in advance of this being deployed to production and also start to implement and test their XML files and provide us feedback on any functions that they might wish to enhance or see added to the system.
...
- As a new user, you should have received a welcome email that includes a link to set your password.
- Click on the link and choose your own password, confirm this password and click on the OK button.
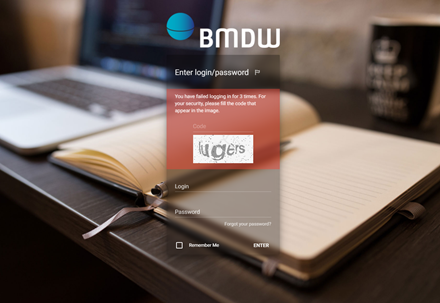
- Go to https://staging-dataupload.wmda.info/ to login (Figure 1) If you just have set your password, the system should return you automatically to the login page.
- Within the login page you can optionally change your language by clicking on the flag just besides 'Enter login/password':

- You can also save a bookmark in your browser, e.g. for the BMDW Data upload service, so that you are immediately directed to the login page rather than having to enter the URL.
- Enter your email address and your password.
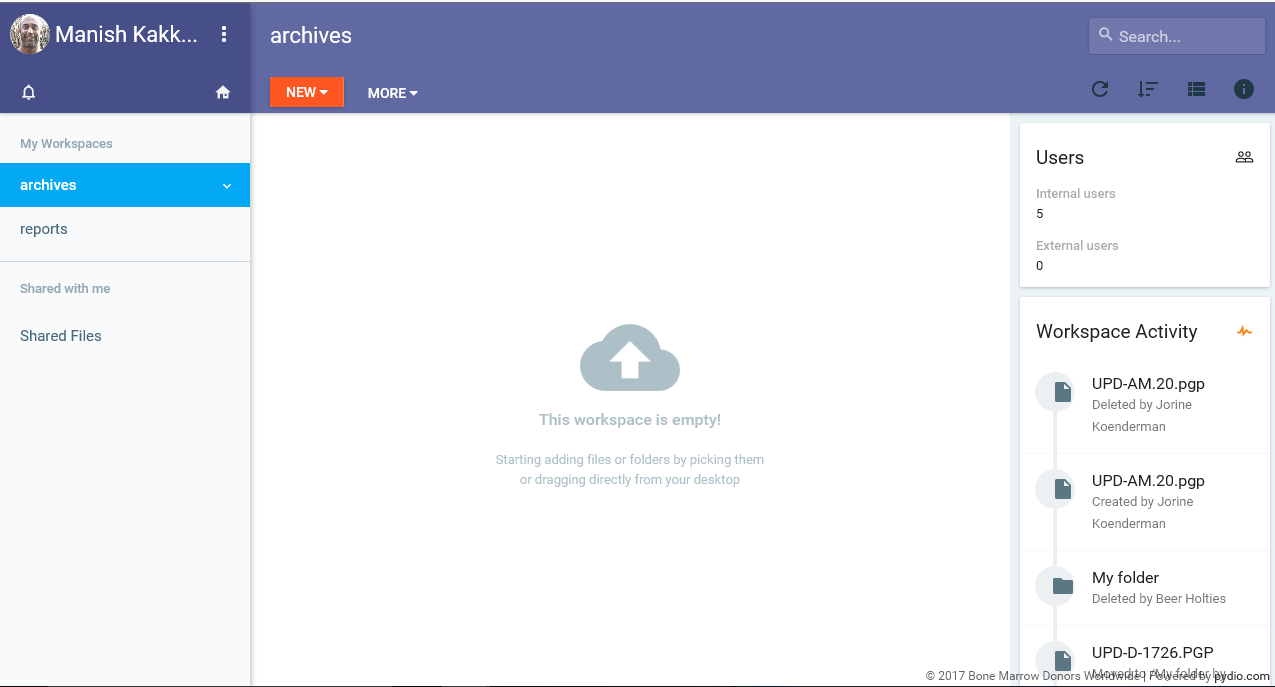
- The system defaults to your personalized workspaceWorkspace, where you will find your organisation workspace Workspace and all other folders like notification and archived folder.
...
- To do this, click on your home page on the settings button.
- A drop-down menu will appear and then click on 'My Account'.
- In the next window, click on the button 'change password' in the left bottom corner
- A new smaller window will open. Fill out your old password and your new chosen password and click on OK.
Tip: If you haven’t changed your password for a long time, we recommend that you do so to ensure that your profile is secure. We recommend that you change your password every 6 months.
...
If you attempt to login more than 3 times with incorrect credential credentials the system for security reasons will ask you to enter a code that appears in an image as shown in Figure 3b.
| Imagefloat | ||
|---|---|---|
| ||
|
Logging off
...
from the
...
service
To close and exit click on the Settings button next to your name on the top left side (Figure 4). This should give you a drop-down menu with 'log out'. Click on 'Log out' and you will be redirected to the login screen.
...
- Your name: On the top left corner. This is the name of the user that logged into the system
- Notification indicator: This is the bell that will highlight if you have any new notifications around the status of your uploaded file
- Setting button: This is the menu for functions like - Logout and Updating account details
- Search box
- My workspaceWorkspace: Your own workspace Workspace named with the ION of your organisation. In conjunction with your workspace Workspace you also see two separate folders called Archives and Reports. For further details on the purpose of these folders please see section xxx
- Recent history of submissions in the middle main pane
PLEASE NOTE: On the left hand side you can see the workspace Workspace for your registry that you have access to. Most organisations will have access to just one space even if you are submitting data on behalf of other registries.
| Imagefloat | ||
|---|---|---|
| ||
|

...
When you login for the first time, the Workspace will be empty (Figure 6).
| Imagefloat | ||
|---|---|---|
| ||
|
Upload a file
If you wish to upload a new PGP encrypted XML file into your workspace Workspace in order for BMDW to process the file, please follow the next steps:
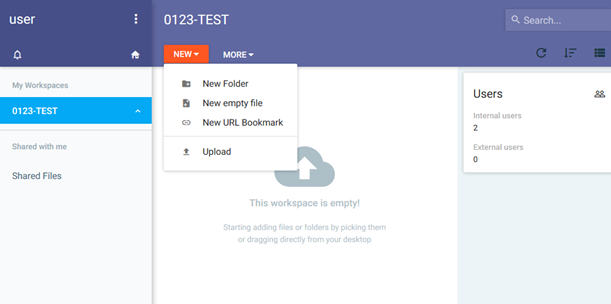
- Click on the Workspace of your organisation.
- Within your Workspace click on the red tab with 'New' and then on the 'Upload' icon at the bottom of the drop-down menu (Figure 7).
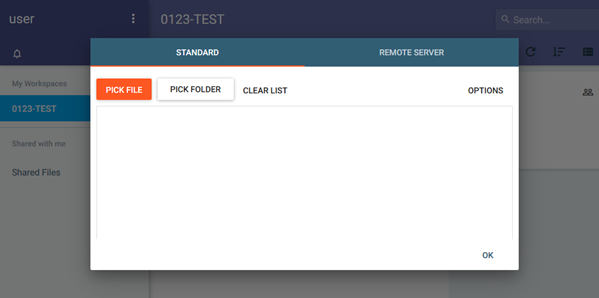
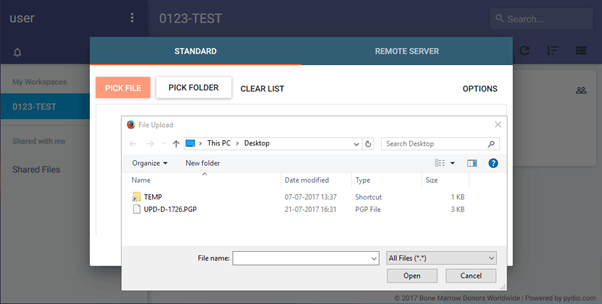
- A new screen will open where you can select your file for upload (Figure 8a).
- Click on the red button with 'Pick File'.
- A browser window will open and you can select the file on your computer you would like to upload. Click on Open.
- The file becomes then visible in the browser window and when it is the correct file, click on OK to upload the file to your workspaceWorkspace.
An alternative method to upload your file to your Workspace is by dragging your file from your desktop to the main middle pane of your Workspace
- Once the upload of the file is completed, you receive a message.
- The file is now ready to be picked-up by the BMDW system for further processing. When the file is picked-up by the processing pipeline, a copy of the file is stored in your archives folder. All messages concerning the processing of your file can be found in the Reports folder. The copy of the file and the file with messages have a filename related to the name of the original file in combination with the upload time and user
...
Please notePLEASE NOTE: The time to upload your file to the system depends on the file size and your internet upload speed.
...
| Imagefloat | ||
|---|---|---|
| ||
|
| Imagefloat | ||
|---|---|---|
| ||
|
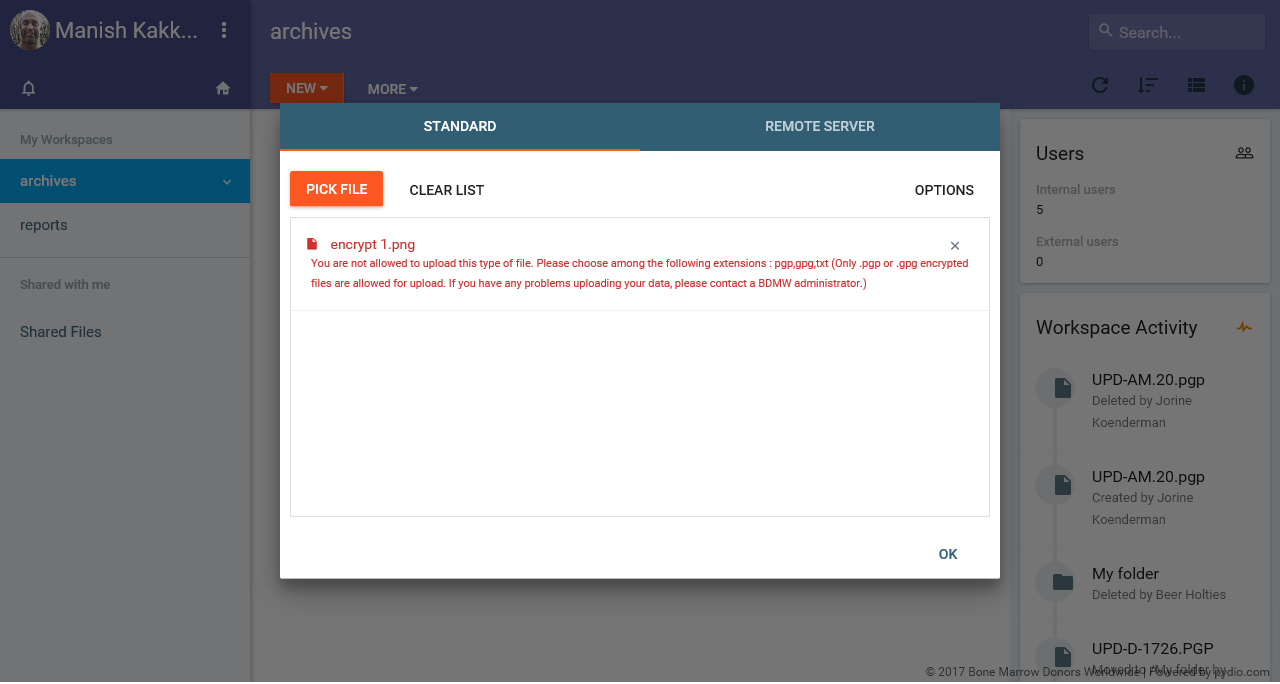
You You are only allowed to upload files that are PgP encrypted. If you try and upload files that are non PgP the system will give you an upload error as shown in figure 8b.
| Imagefloat | ||
|---|---|---|
| ||
|
...
| Imagefloat | ||
|---|---|---|
| ||
|
...
Once the processing pipeline picked-up the file, it will start with initial validations in a sequence. The sequence is: Decrypting the file > Unzipping the file > XML file structure validation > Data content validation > HLA validation. Only once all of these validations have been completed will , the system will provide registry all the users from the organisation a notification and a report that will indicate the outcome of the file processing. Processing messages are generated and stored in a file in your reports Reports folder. All messages are collected in one file for each file you uploaded to the system.
...