Introduction
The World Marrow Donor Association (WMDA) places great importance on the health and safety of donors. To ensure the continued success of the global donor network, the WMDA requires its members to report and investigate any serious events or adverse reactions (S(P)EARs). The WMDA has been collecting this data since 2003 and has provided an online reporting tool for this purpose.
For help with the SPEAR online reporting tool, you can find answers to common questions in the user guide. If you have technical difficulties and cannot find a solution in the guide, you can ask a question using the question box at the bottom of the document or reach out to the WMDA office at sear-spear@wmda.info. You can access the SPEAR online reporting tool by clicking here.
SPEAR 2.0 continued updates
Since April 4th 2022 the current SPEAR reporting tool is in use. This is the first version of the SPEAR tool built by the WMDA IT team. It will continue to receive updates and therefore the content of this user guide is subject to change. Please check back regularly if you are encountering issues you've not encountered before and bear with us while we work on optimizing the SPEAR reporting process.
Have a question on the new features on want to report an issue? Please use the question panel at the bottom of this page.
Other useful documentation and external links
- Access the SPEAR online reporting tool
- Common Terminology Criteria for Adverse Events (CTCAE) v5.0
- Educational webinar on SPEAR reporting (March 2020)
- Examples of SEAR/SPEAR reports
- International Statistical Classification of Diseases and Related Health Problems 10th Revision
- Notify Library
- WMDA Imputability Assessment Tool
- Operating of the SPEAR Committee
- Standard Operating Procedure for reporting SEAR/SPEAR
Content of this user guide
This user guide is designed to assist new and existing users in navigating and utilizing the SPEAR reporting tool effectively. Its comprehensive coverage of all the features and functions of the platform will help you get the most out of SPEAR, making it easier for you create, submit and edit reports. Whether you are a beginner or an advanced user, this guide will provide you with a complete understanding of the SPEAR reporting tool, ensuring that you have the information you need to use it to its fullest potential.
List of content
Getting started
Accessing the SPEAR reporting tool
To access the SPEAR reporting tool, simply type "https://spear.wmda.info" into your browser's address bar. To make it easier to get to the login page, you can save a bookmark in your browser.
If this is your first time accessing the SPEAR tool, you will need to create a password. Click on the "Forgot Password" button marked in red in figure 1. Fill out your email address (be careful, it's case-sensitive) on the password reset page in figure 2 and click the "Send Password Reset Email" button. You'll receive an email with a link to set a new password. Note that the password reset link will expire after 2 hours, so if you don't use it in time, you'll need to start the process again.
Setting and resetting your password
- Step 1: Click on the 'Forgot Password' button on the SPEAR login screen (figure 1).
- Step 2: In the next screen, enter your e-mail address and click on the 'Send Reset Password Email' button.
Password reset link expires
Please note: the link to reset your password expires in 2 hours. If you don't use it within that time, you must request a new password again by following the steps 1-2.
Step 3: Click on the link in the e-mail you received from the system.
- Step 4: Choose a new password, confirm your new password and click on the reset password button.
- Step 5: Go back to the login screen and enter your e-mail address and your new password.

Figure 1: SPEAR login panel
Switching roles
Every time you login to the SPEAR reporting tool, you select the role you initially want to access the tool with. If you have multiple roles available to you (e.g. you are a SPEAR reporter and a SPEAR committee member or you are a SPEAR reporter for multiple organisations), then you can easily switch roles without logging out.
- Step 1: Login to the SPEAR reporting with your username and password (see above).
- Step 2: Click on the three dots next to your name on the top right side of the page (figure 2). A menu will appear that has the Switch Role option (figure 3).
- Step 3: Click this Switch Role option (figure 3) and you will be redirected to a page where you can select the roles available to you.
- Step 4:Select the role you want and click the Select button. To confirm the role switch, a message will appear "Successfully switched role to XX at YY". You can now use the SPEAR reporting tool in the role you selected. Click on the SPEAR logo at the left top corner of the page to go to the dashboard overview.

Figure 2: Access menu to switch roles

Figure 3: Select switch roles
Logging off
To close and exit the application click on the three dots next to your name on the top right side of the page (figure 4). A menu will appear that has the Logout option (figure 5). After logging out of the system, you will be redirected to the login screen.
Figure 4: Access menu to log out

Figure 5: Select log out
Actions within the SPEAR reporting tool
The SPEAR tool is used for three main goals: 1) as a platform for reporters to submit possible SPEAR cases, 2) as a tool for the SPEAR committee to assess and review reports that are submitted and 3) to provide a central current database of adverse events and reactions for data analysis and research purposes. This is why there are a variety of roles available within the platform. The role you have determines the amount of data you can view via the tool and the actions you can carry out.
Drafting a report (reporter)
- Step 1: Login to the SPEAR online reporting tool with your username and password. Don't have a username and password yet? Please see below at the FAQ: "How do I register as a SPEAR reporter?"
- Step 2: Choose the role of reporter with the correct organisation when you login to draft reports
- Step 3: Click Create new report at the top of the page under Report list to start a new draft
Step 4: Start your new draft report by entering the Type of report first. Once you've selected the correct type of report, the rest of the tabs will become filled with questions based on the type of report you selected.
Change the report type
You can always change the Type of report by going back to the first tab (Type of report). If you change the type of report selected, different follow-up questions might appear. Answers previously given can be automatically erased if they no longer are part of the question list belonging to the new Type of report you selected.
Adding an attachment to your report (reporters)
- Step 1: If you haven't done so yet, start by selecting a Type of report at the Type of report tab first
- Step 2: Go to the Finalisation tab
- Step 3: Scroll down to "Upload any documents.."
Step 4: Click the paperclip icon to select the files to upload, you can select multiple files from the same folder at once by using CTRL + click or by dragging your cursor
File types and sizes
Please note: only file with xlsx, .xls, .docx, .doc .pdf, .jpeg, .png, .gif, .tiff, .bmp, .txt extensions are accepted. Each file uploaded may not exceed 10mb. The maximum number of attachments may not exceed 5.
Step 5: After selecting the files you wish to upload, you must check the checkbox underneath the file overview to state that you are not uploading any personal information, such as names, dates of births or any other identifying information belonging to donors, patients or staff.
For every file you upload, you have to check the checkbox stating that the files you are uploading do not contain any personal information. Personal data are any information which are related to an identified or identifiable natural person. The data subjects are identifiable if they can be directly or indirectly identified, especially by reference to an identifier such as a name, an identification number, location data, etc. In practice, these also include all data which are or can be assigned to a person in any kind of way. For example, the telephone, credit card or personnel number of a person, account data, number plate, appearance, customer number or address are all personal data. For more information on personal data according to the GDPR, please click here.
Submitting a report (reporters)
Once you've filled out all requested information in the report tabs, you are ready to submit the report. The last Submit tab provides an overview of all the information you've entered in this SPEAR report. If any mandatory information is missing, this will be indicated here. If there is any red text "This question is mandatory" then you must go back to the tab this question belongs to and provide an answer. If you don't do this, the report cannot be submitted. If the report overview page shows no request for mandatory information, then your report is ready to be submitted. Scroll down to the bottom of the page and click Submit report. Based on your reporter type, the report will then be sent directly to the WMDA or first to your affiliated parent organisation.
Receiving a report from an affiliated (child) organisation (reporters)
Adding additional information to a report (reporters)
Providing updates to a report that has already been reviewed by the committee (reporters)
Review process of the committee (committee member)
Download report overview (all users)
You can download an overview of all reports in the SPEAR system of your organisation. Two file formats are provided for download: .csv (Comma Separated Value) file and .json (Javascript Object Notation) file. For regular use, we recommend choosing the .csv file for download as it is easily converted to an Excel file. In case you want to use the SPEAR data for IT applications: JSON is supported by all the programming languages like Java, Net (C#), PHP, etc.
JSON is a data exchange format that stands for JavaScript Object Notation with the extension .json. JSON is known as a light-weight data format type and is favored for its human readability and nesting features. It is often used in conjunction with APIs and data configuration.
CSV is a data storage format that stands for Comma Separated Values with the extension .csv. CSV files store data values (plain text) in a list format separated by commas. Notably, CSV files tend to be smaller in size and can be opened in text editors.
Please follow the steps below to download an overview of reports:
- Step 1: When you are logged in to the correct role in SPEAR, scroll to the bottom of the page to find the Export reports button (figure 6)
- Step 2: In the pop up window, select if you want to download all reports or only the reports of a certain status (e.g. reviewed by committee) (figure 7).
- Step 3: In the pop up window, select the file format you'd like to download (figure 7)
- Step 3: Click download. You will be sent back to the dashboard report overview where you can see the progress of the download.
Download might take a long time
Currently downloading a .csv file will take a long time. Please note that it feature does work, it will just require a long wait time. Please go grab a cup of coffee and check back in a few minutes if the download is complete
Converting a .CSV file to an .xslx (Excel) file:
- This two minute video explains how to open a .csv file in Microsoft Excel so you can use the data as a regular Excel file.

Figure 6: Export reports button

Figure 7: Select JSON or CSV download
Print a report (all users)
When you click the View option to open a report and view its details, a button will appear at the top of the page: "Print report".
Frequently Asked Questions (FAQ)
GENERAL
The WMDA follows the EU definitions of a serious adverse event or reaction:
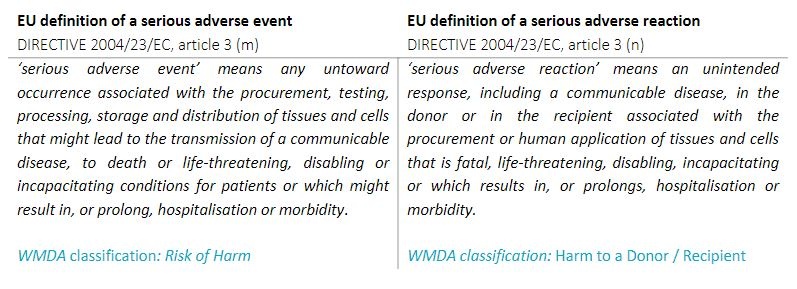
Definition serious adverse reaction (SAR):
An unintended response, including a communicable disease, in the donor or in the recipient associated with the procurement or human application of tissues and cells that is fatal, life threatening, disabling, incapacitating or which results in, or prolongs, hospitalisation or morbidity.
Definition serious adverse event (SAE):
Any untoward occurrence associated with the procurement, storage and distrubution of tissues and cells that might lead to the transmission of a communicable disease, to death or life-greatening, disabling or incapacitating conditions for donors or patients or which might result in, or prolong, hospitalisation or morbidity.
Criteria for serious adverse event (SAE):
- The event (could have) led to inappropriate use of tissues or cells
- The event (could have) resulted in loss of the complete or significant quantity of irreplaceable cells
- The event (could have ) led to a serious adverse reaction (grade 2, 3 or 4)
- The event (could have) led to misidentification or an unintended switch of cells
- The event (could have) led to (an unforeseen) transmission of disease from donor to recipient
USING THE SPEAR REPORTING TOOL
SPEAR REPORTING 101
CASE STUDIES
to be updated
Ask a question on SPEAR reporting
Do you have questions on how to use the SPEAR reporting tool or do you want to report an issue? Please use the button below.