Introduction
The World Marrow Donor Association (WMDA) places great importance on the health and safety of donors. To ensure the continued success of the global donor network, the WMDA requires its members to report and investigate any serious events or adverse reactions (S(P)EARs). The WMDA has been collecting this data since 2003 and has provided an online reporting tool for this purpose.
For help with the SPEAR online reporting tool, you can find answers to common questions in the user guide. If you have technical difficulties and cannot find a solution in the guide, you can ask a question using the question box at the bottom of the document or reach out to the WMDA office at sear-spear@wmda.info. You can access the SPEAR online reporting tool by clicking here.
| Tip | ||
|---|---|---|
| ||
In 2022, the WMDA IT infrastructure incorporated the SPEAR reporting tool. A dedicated IT team developed an in-house solution, which was released in April of that year. Since then, it has undergone updates to enhance the reporting experience. The user guide is subject to change as a result of ongoing improvements. We appreciate your patience while we work on improve the reporting experience for all users. To report issues or ask questions not covered in this guide, please use the question panel below or email us at sear-spear@wmda.info. |
| Info | ||
|---|---|---|
| ||
Useful documentation:
External links: |
Content of this guide
This user guide is
...
Questions are divided into the following subjects:
GENERAL
| Expand | ||
|---|---|---|
| ||
When you go to the SPEAR reporting tool login page you will find the login module where you can enter your email address and password. Click on “forgot password?” button underneath the Password field. Enter your email address in the designated field and press the “Submit” button. You will then receive a link to reset your password. If you haven't received the email with a reset link for your password within 24 hours (please check your spam folder too), please contact the WMDA office at sear-spear@wmda.info |
...
designed to assist new and existing users in navigating and utilizing the SPEAR reporting tool effectively. Its comprehensive coverage of all the features and functions of the platform will help you get the most out of SPEAR, making it easier for you create, submit and edit reports. Whether you are a beginner or an advanced user, this guide will provide you with a complete understanding of the SPEAR reporting tool, ensuring that you have the information you need to use it to its fullest potential.
List of content
| Table of Contents |
|---|
Important to remember
- You can click the WMDA SPEAR reporting tool logo on the top left of your screen to go back to the reports overview
- If you have an incident that requires quick dissemination as a rapid alert in our community, please contact the WMDA office directly by sending an e-mail at sear-spear@wmda.info and by phone on: +31 (0)88 505 7900.
- Data submitted via the SPEAR reporting tool must be limited to only the data elements that are required for reporting. SPEAR reporters recognize the importance of protecting donor and patient privacy and will not share identifiable data to maintain the confidence and trust of donors, patients and regulators.
- When using the tool, you agree to the WMDA Terms of Use and Privacy Policy
1. Getting started
Accessing the SPEAR reporting tool
To access the SPEAR reporting tool, type "https://spear.wmda.info" into your browser's address bar. To make it easier to get to the login page, you can save a bookmark in your browser.
If this is your first time accessing the SPEAR tool, you will need to ensure you have multi-factor authentication (MFA) set up with WMDA.
Step 1: verify your existing MFA access
- Do you already have an active Search & Match user account with MFA access set up? Then you do not need to take any action and can access SPEAR immediately.
- Do you not have an account set up with WMDA (e.g. for Search & Match) that uses MFA? Please setup your new user account including MFA guide: https://share.wmda.info/x/yAl6
Note: once you completed setting up your MFA access through the WMDA Portal , confirm that your MFA credentials allows you access to https://spear.wmda.info/
If you get stuck, please consult the MFA user guide (https://share.wmda.info/x/yAl6G). If you can’t resolve the issue, you can contact the WMDA support team by sending an email to support@wmda.info. Please include the URL, what you are trying to do and a screenshot of the error.
Step 2: logging in with MFA
If you have multiple roles available to you (e.g. you are a SPEAR reporter and a SPEAR committee member or you are a SPEAR reporter for multiple organisations) then every time you login to the SPEAR reporting tool you have to select the role you initially want to access the tool with.
| Info | ||
|---|---|---|
| ||
Many users will only have 1 role (reporter) assigned to them. If this is you, you will not see the role selection panel after login, but instead you will automatically be directed to your report overview. You can skip this section of the user guide. |
- Step 1: Login to the SPEAR reporting with your MFA (see above).
- Step 2: If you have multiple roles available to you, you will now see a "role selection" panel below the login fields (figure 2)
- Step 3: Click on the role you wish to log in with at this time and click select. You are now directed to the report overview available to that role.
| Imagefloat | ||
|---|---|---|
| ||
|

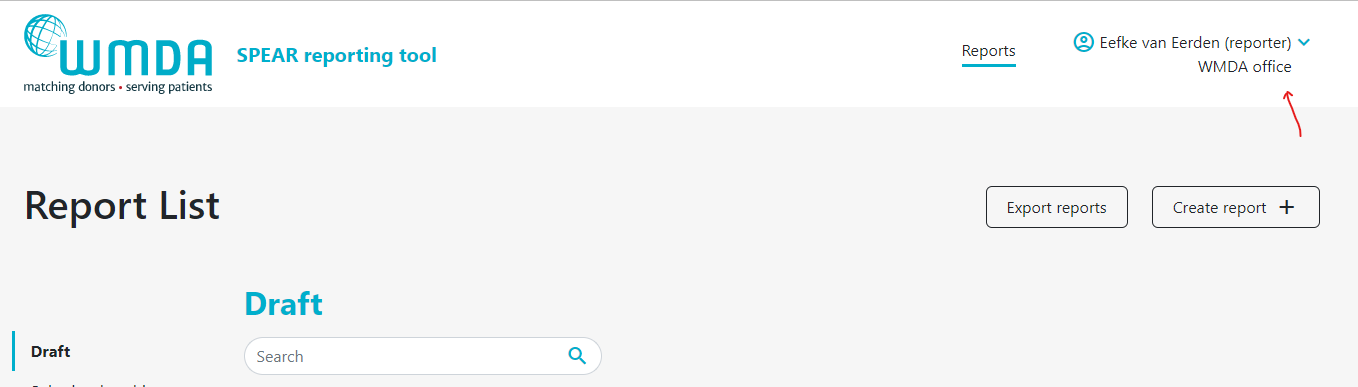
1.3 Switching between roles (when logged in)
If you have multiple roles available to you, you can easily switch roles without logging out. The steps below explain how.
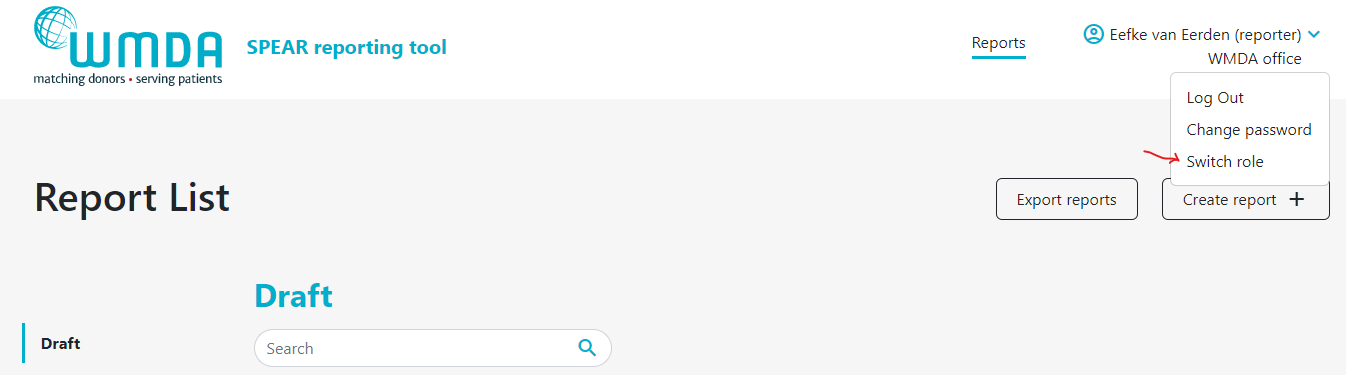
- Step 1: At the top of the page, on the right, you find your personal menu (figure 3). Click on your name to expand it.
- Step 2: Click this Switch Role option (figure 4) and you will be redirected to a new page where you can select the roles available to you.
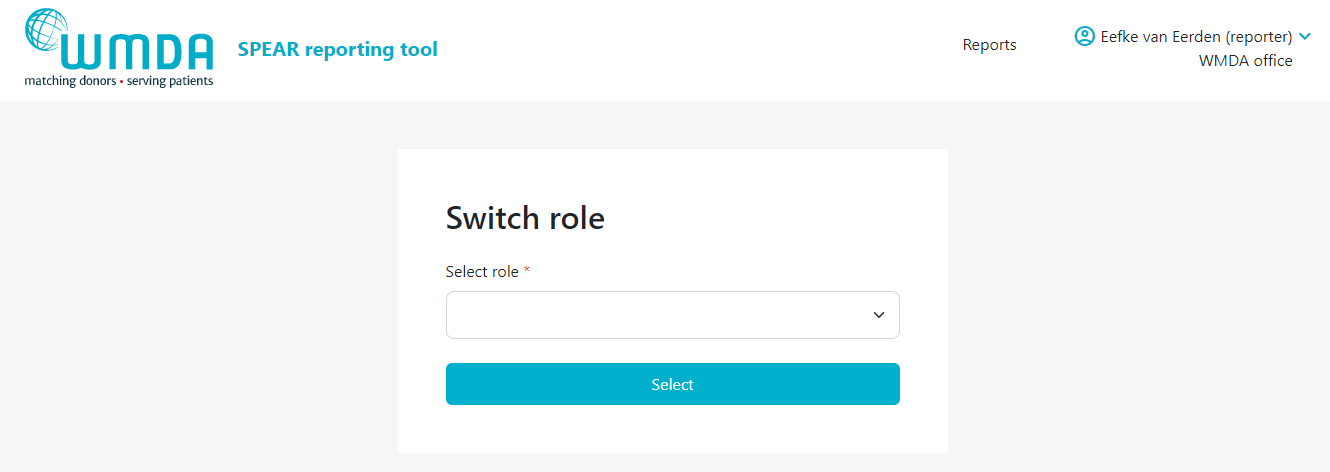
- Step 3: Confirm the selection of the role you want by clicking the Select button (figure 5). You will be automatically re-directed to the report overview where a message appears: "Successfully switched role to XX at YY". You can now use the SPEAR reporting tool in the role you selected.
| Imagefloat | ||
|---|---|---|
| ||
|
| Imagefloat | ||
|---|---|---|
| ||
|
| Imagefloat | ||
|---|---|---|
| ||
|
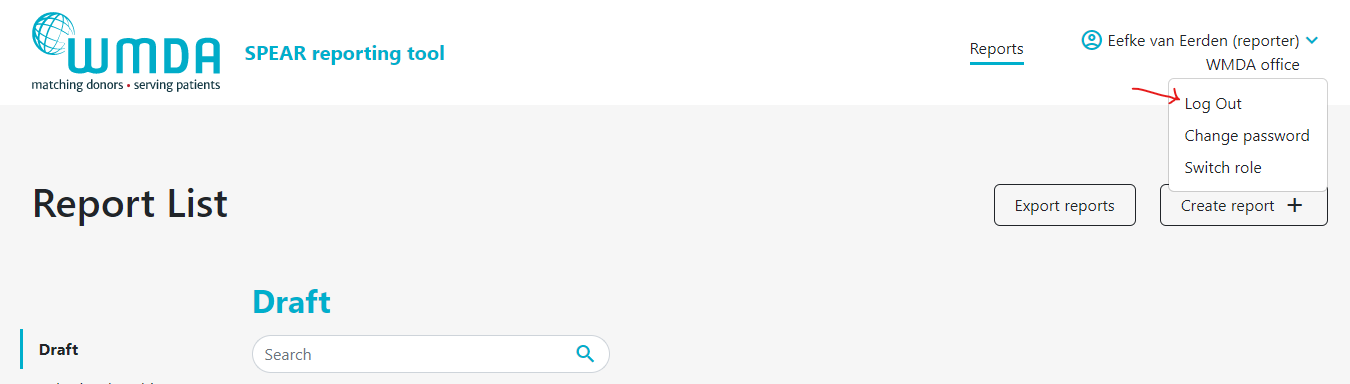
1.4 Logging off
To close and exit the application click on your personal menu at the top of the page (figure 3). A menu will appear that has the Logout option (figure 6). After logging out of the system, you will be redirected to the login screen.
| Imagefloat | ||
|---|---|---|
| ||
|
2. Actions within the SPEAR reporting tool
The SPEAR reporting tool is used for three main goals: 1) as a platform for reporters to submit possible SPEAR cases, 2) as a tool for the SPEAR committee to assess and review reports that are submitted and 3) to provide a central current database of adverse events and reactions for data analysis and research purposes. This is why there are a variety of roles available within the platform. The role you have (selected) determines the amount of data and detail of data you can view and/or edit.
2.1 Drafting a report (reporter)
- Step 1: Login to the SPEAR online reporting tool with your username and password (see chapter 1). Don't have an account yet? Please see below at the FAQ: "How do I register as a SPEAR reporter?"
- Step 2: Choose the role of reporter with the correct organisation when you login to create reports (see chapter 1.2)
- Step 3: Click the Create report button at the top of the page to start a new draft (figure 7).
- Step 4: Start your new draft report by entering the Type of report first. Once you've selected the correct type of report, the rest of the form fields (or tabs) will be filled with questions based on the type of report you selected. Depending on the type of report selected, fields are available or not and can be mandatory (or not).
| Note | ||
|---|---|---|
| ||
You can always change the Type of report by going back to the first tab (Type of report). If you change the type of report selected, different follow-up questions might appear. Answers previously given can be automatically erased if they no longer are part of the question list belonging to the new Type of report you selected. |
| Imagefloat | ||
|---|---|---|
| ||
|

2.2 Adding an attachment to your report (reporters)
- Step 1: Open the report you want to attach the file to by 1) opening an existing report or 2) creating a new draft report.
- Step 2: Go to the Finalisation tab (figure 8)
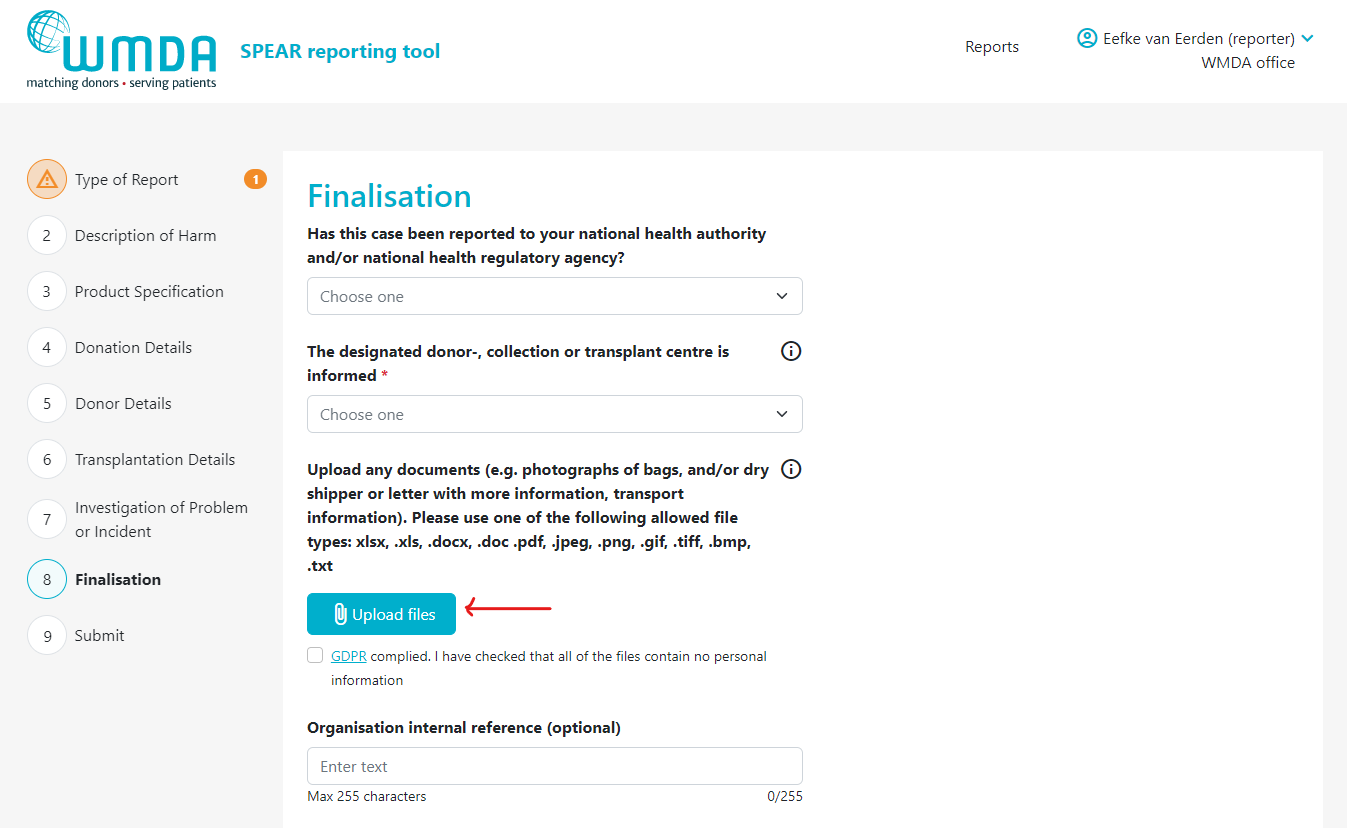
- Step 3: Locate the text "Upload any documents...." (figure 9)
Step 4: Click the Upload files button to select the files to upload from your computer. You can select multiple files from the same folder at once by using CTRL + click or by dragging your cursor
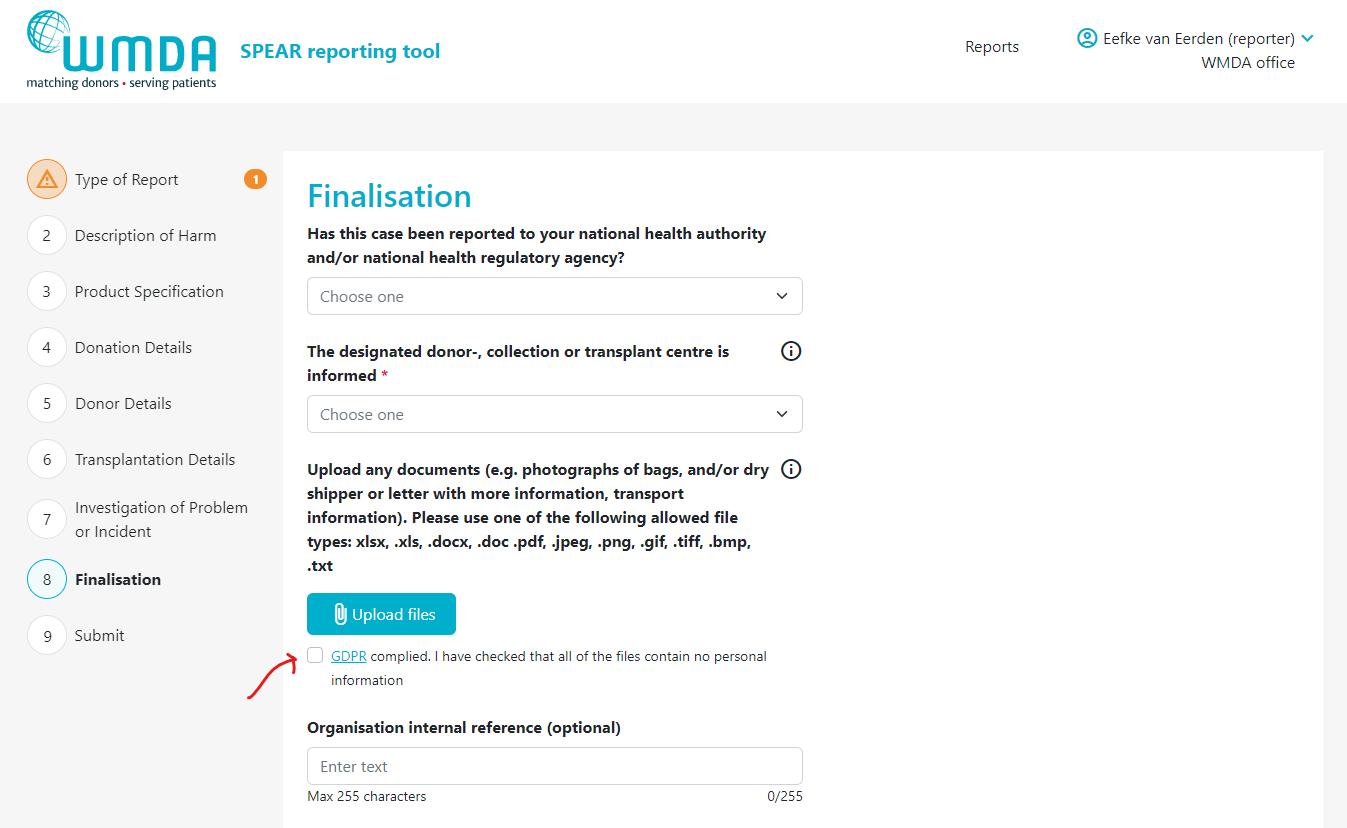
Step 5: After selecting the files to upload, you must check the checkbox (figure 10) underneath the file overview to state that you are not uploading any identifying personal information, such as names, dates of births or any other identifying information belonging to donors, patients or staff.
| Warning |
|---|
For every file you upload, you have to check the checkbox stating that the files you are uploading do not contain any personal information. Personal data are any information which are related to an identified or identifiable natural person. The data subjects are identifiable if they can be directly or indirectly identified, especially by reference to an identifier such as a name, an identification number, location data, etc. In practice, these also include all data which are or can be assigned to a person in any kind of way. For example, the telephone, credit card or personnel number of a person, account data, number plate, appearance, customer number or address are all personal data. For more information on personal data according to the GDPR, please click here. |
| Imagefloat | ||
|---|---|---|
| ||
|

| Imagefloat | ||
|---|---|---|
| ||
|
| Imagefloat | ||
|---|---|---|
| ||
|
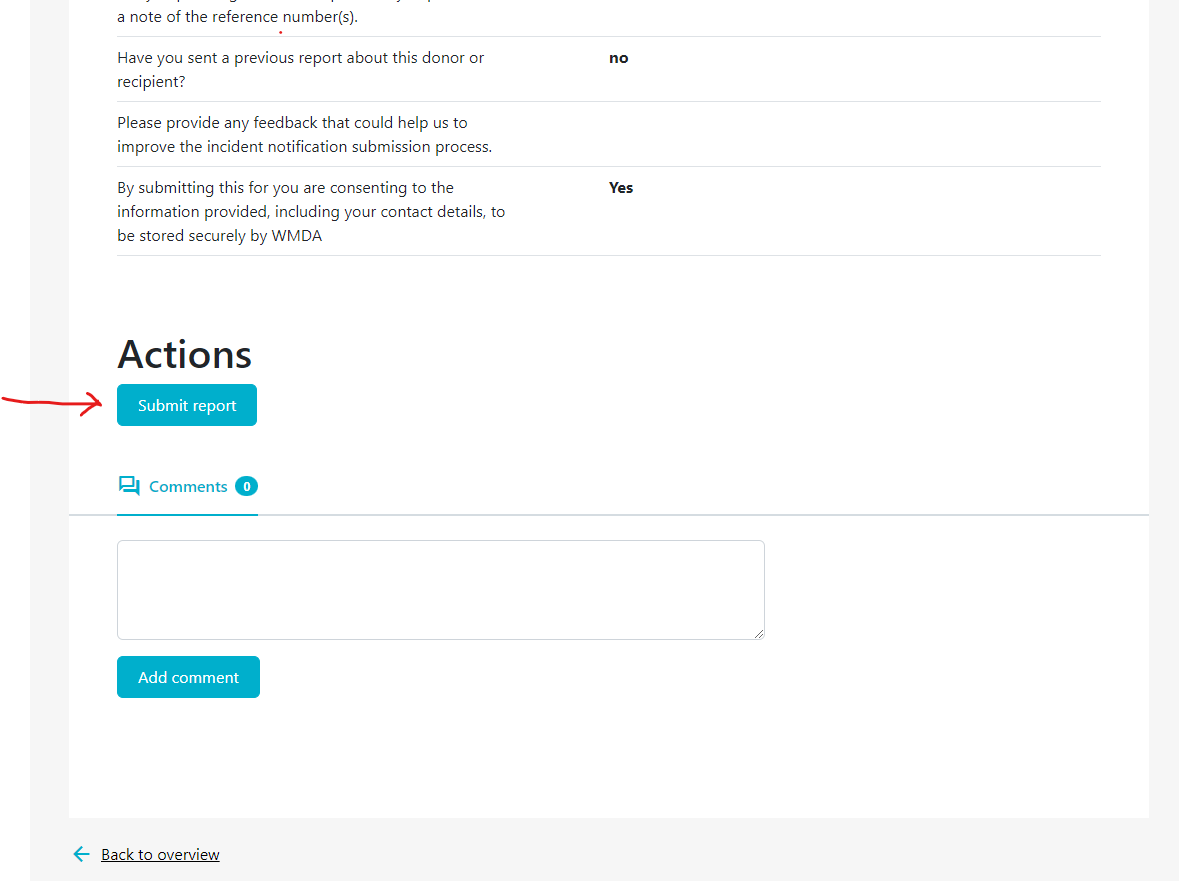
2.3 Submitting a complete report (reporters)
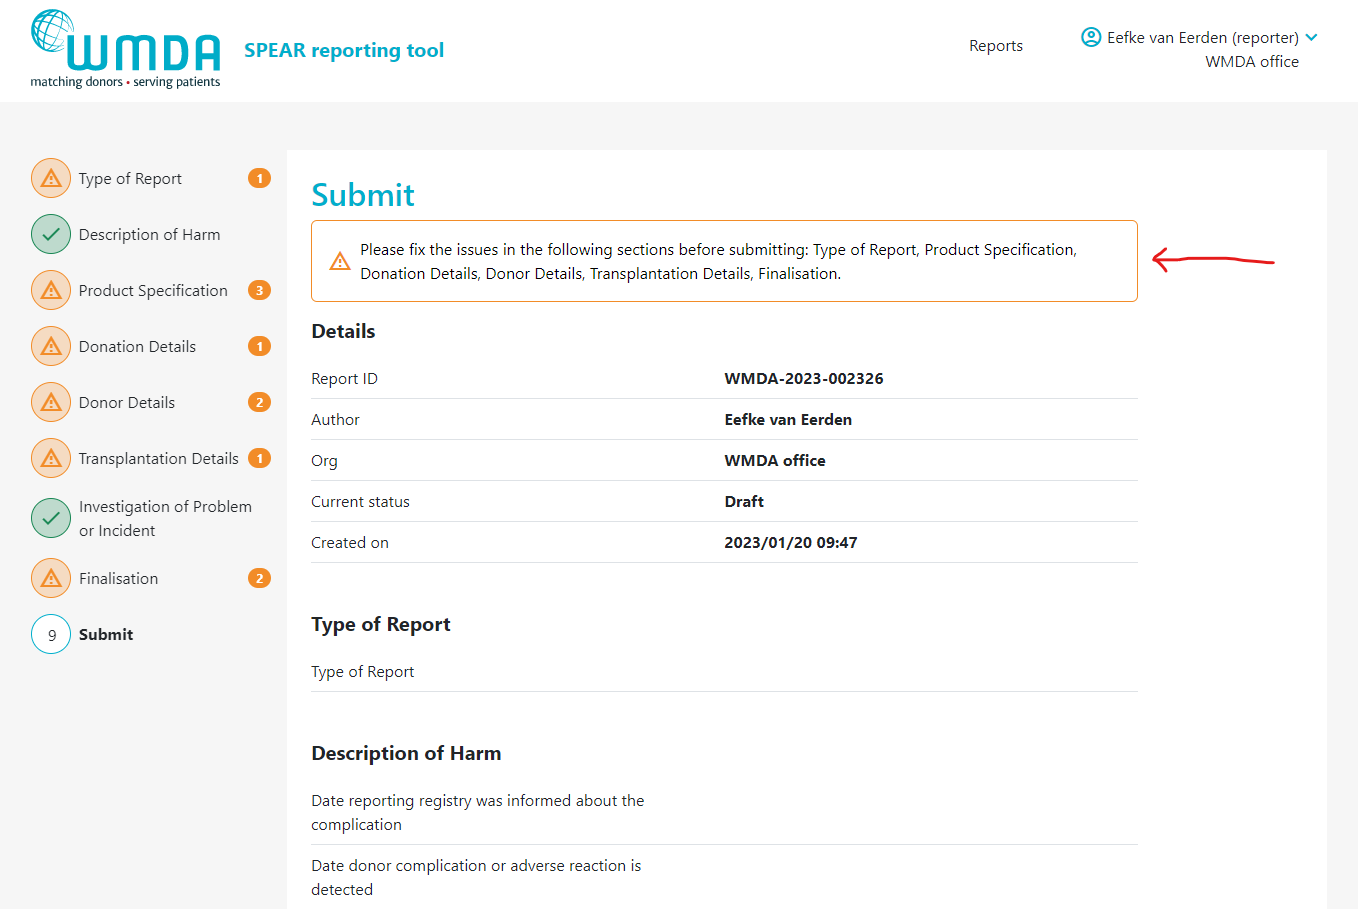
Once you've filled out all required information in the report, you are ready to submit it. Depending on if your organisation is affliated or not with a parent organisation (like a national donor registery), the report either goes directly to the WMDA or is submitted to the affilaited parent organisation first, before it is sent to WMDA. On the last tab of the SPEAR report, labeled "Submit", provides a summary of the report details. In case 1 or more mandatory field(s) is left empty, the report cannot be submitted. The Submit page will then display an error message at the top and request that you supply the missing mandatory details (figure 11). If no mandatory information is missing and you are pleased with the report as is, scroll down to the bottom of the page and click "Submit report."
| Imagefloat | ||
|---|---|---|
| ||
|
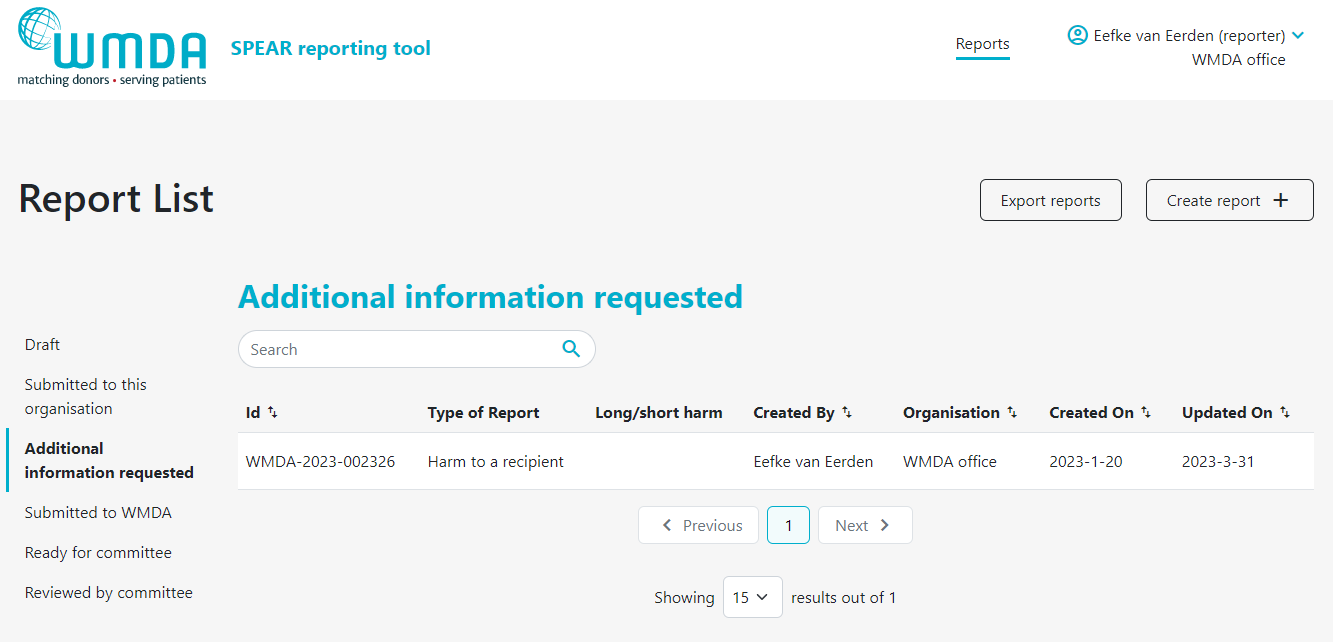
2.4 Receiving a report from an affiliated (child) organisation (reporters)
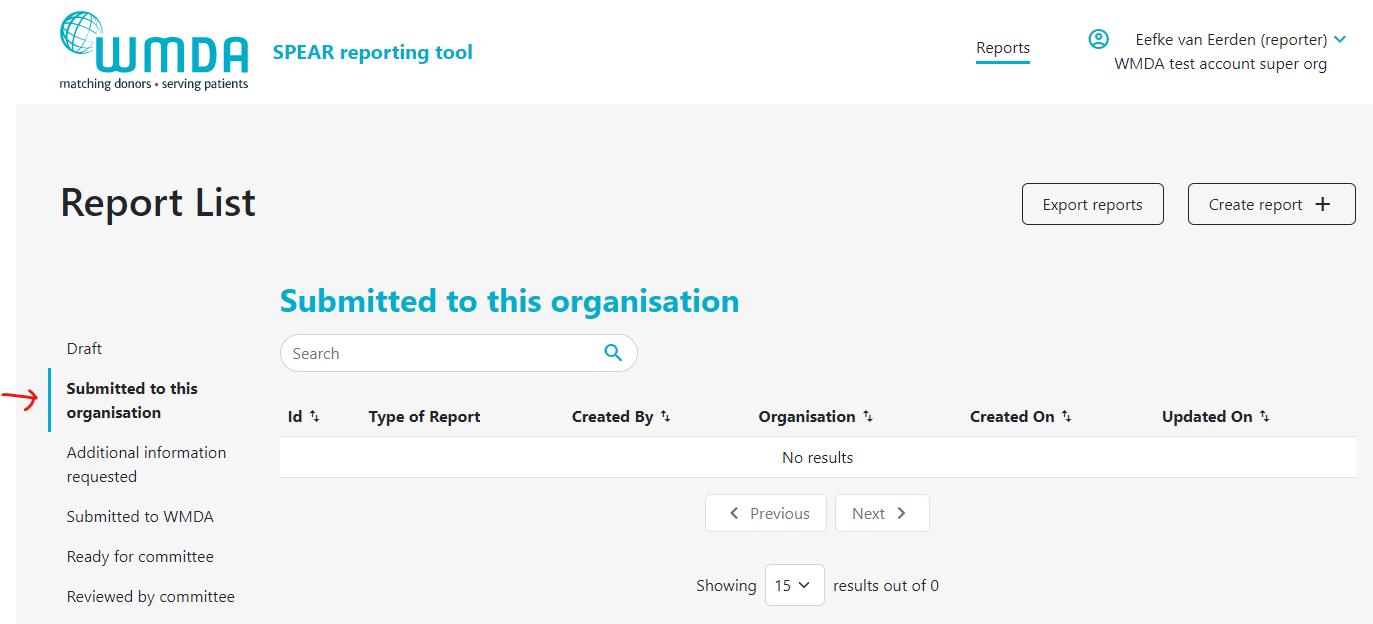
If your organisation has affiliated organisations, eg. a national donor registry with local transplant or collection centres, it could be that you receive reports from these organisations via the SPEAR tool. It is then your responsibility to review these reports and to submit them to the WMDA on their behalf. An overview is available in a table on your dashboard named "Submitted to this organisation" (figure 12). Please review the reports there in a timely manner. You can proceed to submit to the WMDA by opening the report to view its content and click the "submit to WMDA" button at the bottom of the page (figure 13).
| Imagefloat | ||
|---|---|---|
| ||
|
| Imagefloat | ||
|---|---|---|
| ||
|
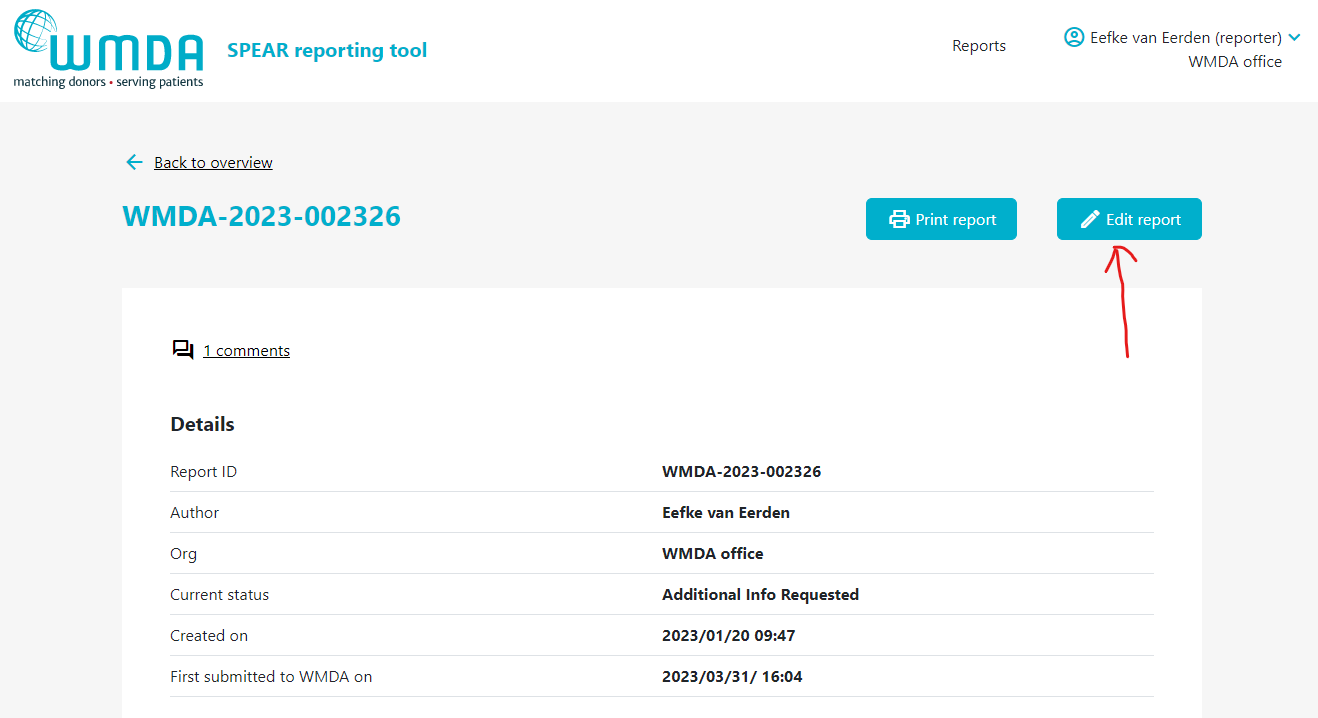
2.5 Adding additional information to a report (reporters)
If a report has been submitted, it could be that you wish to add additional information or that the SPEAR Committee has a follow-up question or a request for more details. To add information to an existing report, there are 2 options, 1) you add details via de comments section or 2) you edit the report to add the details to the report overview. Information added directly to the report (by editing) is the preferred to enter data corrections or additional information relevant to the assessment of the report. Comments are best used to communicate with the SPEAR Committee and answer any question that they might have.
- Step 1: Click on the report to open it (figure 14).
- Step 2: If editing is available, at the top of a page there is a Edit Report button (figure 15)
- Step 3: When finished editing, make sure you click the “Submit Report” Button to resubmit the report.
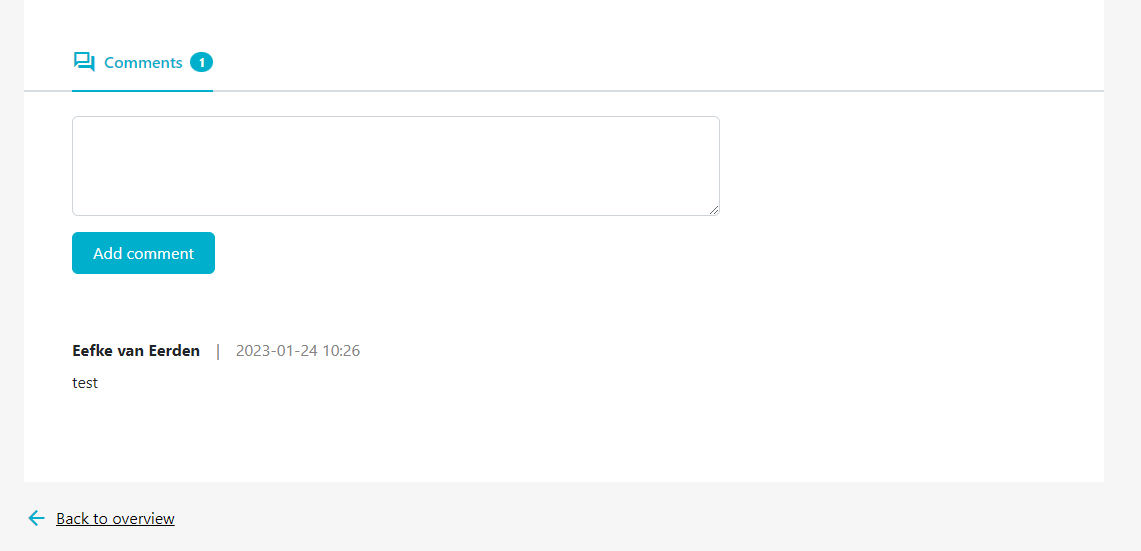
- Step 4: If you want to add a comment, scroll down to the bottom of the report page when viewing the report details to add your comments (figure 16).
| Imagefloat | ||
|---|---|---|
| ||
| Imagefloat | ||
|---|---|---|
| ||
| Imagefloat | ||
|---|---|---|
| ||
2.6 Providing updates to a report that has already been reviewed by the committee (reporters)
As long as a report has not been marked as "reviewed by committee", there is the possibility to add information via the SPEAR tool. You can click add comment or edit report to do so. If a report has already been reviewed, but you have crucial information to add, please email sear-spear@wmda.info to request to add the details to the report.
2.7 Review process of the committee (committee member)
The SPEAR committee is a group of medical experts from around the globe that have the responsibility to analyse and classify all SPEAR reports submitted to the WMDA. This group meets on a monthly basis to discuss notable reports. The committee may decide that a report requires additional information to be able to complete the assessment or classification of a report. If so, the reporter receives this question via comments on the report. Once a report is complete, the committee assesses the report determines the necessary follow up (if any). Once a report is reviewed by the committee, the review details are available to the reporter for viewing in the "Reviewed by Committee" table.
2.8 Download report overview (all users)
Users can download an overview of reports of their organisation via the SPEAR tool. Two file formats are provided for download: .csv (Comma Separated Value) file and .json (Javascript Object Notation) file. For regular use, we recommend choosing the .csv file for download as it is easily converted to an Excel file. In case you want to use the SPEAR data for IT applications: JSON is supported by all the programming languages like Java, Net (C#), PHP, etc.
JSON is a data exchange format that stands for JavaScript Object Notation with the extension .json. JSON is known as a light-weight data format type and is favored for its human readability and nesting features. It is often used in conjunction with APIs and data configuration.
CSV is a data storage format that stands for Comma Separated Values with the extension .csv. CSV files store data values (plain text) in a list format separated by commas. Notably, CSV files tend to be smaller in size and can be opened in text editors.
Please follow the steps below to download an overview of reports:
- Step 1: Click on the Export reports button at the top of the page (figure 17)
- Step 2: In the pop up window, select if you want to download all reports or only the reports of a certain status (e.g. reviewed by committee) (figure 18)
- Step 3: In the pop up window, select the file format you'd like to download (figure 18)
- Step 4: Click download. You will be sent back to the report overview where you can see the progress of the download.
| Warning | ||
|---|---|---|
| ||
Currently downloading a .csv file will take a long time if you have a lot of reports included in the overview. Please go grab a cup of coffee and check back in a few minutes if the download is complete. Once it's done, you will likely find it in your downloads folder on your computer. |
Converting a .CSV file to an .xslx (Excel) file:
- This two minute video explains how to open a .csv file in Microsoft Excel so you can use the data as a regular Excel file.
2.9 Print a report (all users)
When you click the View option to open a report and view its details, a button will appear at the top of the page: "Print report".
Anchor faq faq
3. Frequently Asked Questions (FAQ)
| faq | |
| faq |
GENERAL
| Expand | ||
|---|---|---|
| ||
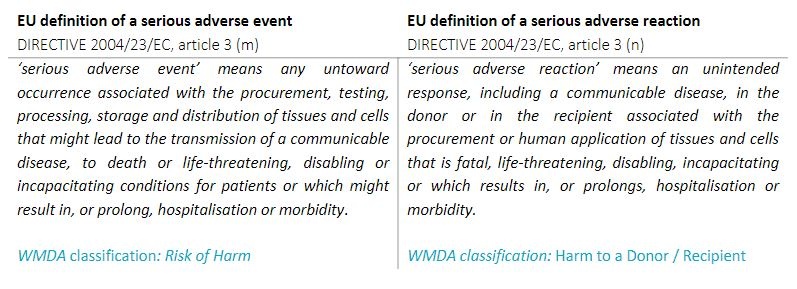
The WMDA follows the EU definitions of a serious adverse event or reaction:
Definition serious adverse reaction (SAR): An unintended response, including a communicable disease, in the donor or in the recipient associated with the procurement or human application of tissues and cells that is fatal, life threatening, disabling, incapacitating or which results in, or prolongs, hospitalisation or morbidity. Definition serious adverse event (SAE): Any untoward occurrence associated with the procurement, storage and distrubution of tissues and cells that might lead to the transmission of a communicable disease, to death or life-greatening, disabling or incapacitating conditions for donors or patients or which might result in, or prolong, hospitalisation or morbidity. Criteria for serious adverse event (SAE):
|
| Expand | ||
|---|---|---|
| ||
Donor, transplant or collection centres are affiliated with donor registries have the possibility to create reports and submit them to the reporting organisation/donor registry. The further handling of the report will go via the donor registry. The donor registry can approve and submit reports from submitting organisations as well as their own incident reports. When submitted, all reports are available to the WMDA office and the SPEAR Committee. The WMDA office team for SPEAR reporting consists of a medical advisor and a project coordinator. The medical advisor reviews all reported incidents at least once a week and checks for rapid alerts. If necessary, the medical advisor can request the reporting organization for additional information. If the report is approved by the medical advisor, it will be turned over to the SPEAR Committee. |
| Expand | ||
|---|---|---|
|
...
| |
To become a SPEAR reporter, you contact the WMDA office by e-mail: sear-spear@wmda.info In this email please provide us with the following information:
|
...
| Expand | |
|---|---|
|
...
| |
No, SPEAR accounts are intended for use by one person. A shared account would mean a shared password and this brings numerous security risks along with it. For example, if an employee leaves the organisation, they would still have access to highly sensitive SPEAR data because the username and password are known to them. Sharing passwords in any way, via email, post its, etc., should of course always be avoided at any cost as it creates the opportunity for an unwanted third party to gain access. We do not mind creating multiple accounts, it actually makes it easier to manage if someone leaves or joins your organisation. SPEAR users from the same organisation also all have access to the same report data (e.g. draft reports can be started by 1 user and finished by another). |
USING THE SPEAR REPORTING TOOL
SPEAR REPORTING 101
| Expand | ||
|---|---|---|
| ||
WMDA member organisations and their affiliated organisations are obliged to report to WMDA any unexpected donor and/or patient issue or product quality issue in a timely manner. If necessary, urgent measures can then be implemented to protect donors and/or patients, such as a recall of one or more defective batch(es) from the market or change in policies and procedures. Any adverse event or reaction, or risk thereof, that occurs during any step in the stem cell donation process can and should be reported in the SPEAR online reporting tool. This includes adverse events or reactions that occur to patients and donors, related and unrelated. |
| Expand | ||
|---|---|---|
| ||
The WMDA follows the Common Terminology Criteria for Adverse Events (CTCAE) guidance for severity assessment. For a quick overview of the possible adverse reaction severity grades to choose from, please use this page. |
| Expand | ||
|---|---|---|
| ||
The WMDA has developed an imputability assessment tool to help you determine the imputability grading most fitting with your adverse reaction report. |
| Expand | ||
|---|---|---|
| ||
Please make sure you use the correct ICD-10 code when prompted. You can refer to the ICD-10 database here. This will help us when we use the SPEAR data for short- or long-term analysis and to gain insight into possible trends. |
| Expand | ||
|---|---|---|
| ||
Please see page 15 in this publication by IQVIA for a summary of EMA information for approved indications for G-CSF products |
| Expand | ||
|---|---|---|
| ||
The aim of the Rapid Alert System is to transmit only those cases whose urgency and seriousness cannot permit any delay in transmission. For example, in case of recall or if there's a big risk for future donations or transfusions, a report can be submitted as a rapid alert. The rapid alert system ensures a timely, proportionate, accurate and consistent response to adverse occurrences arising from donation or transplantation which represent a significant threat to the international transplant community. This includes, but is not limited to:
If you have a rapid alert case to report, please submit it via the online reporting tool and contact the WMDA immediately by telephone (+31-(0)88 5057900) or e-mail at sear-spear@wmda.info If the report qualifies as a rapid alert and for dissemination to the international community, it will always be shared without any traceable information on the reporting agency, donor, patient or reporter. In addition, reporters should notify their competent authorities/health where incident has occurred. |
CASE STUDIES
to be updated
| Anchor | ||||
|---|---|---|---|---|
|
Do you have questions on how to use the SPEAR reporting tool or do you want to report an issue? Please use the button below.
| Questions List | ||||||||||||
|---|---|---|---|---|---|---|---|---|---|---|---|---|
|