Version 12.5
| Table of Contents |
|---|
Introduction
...
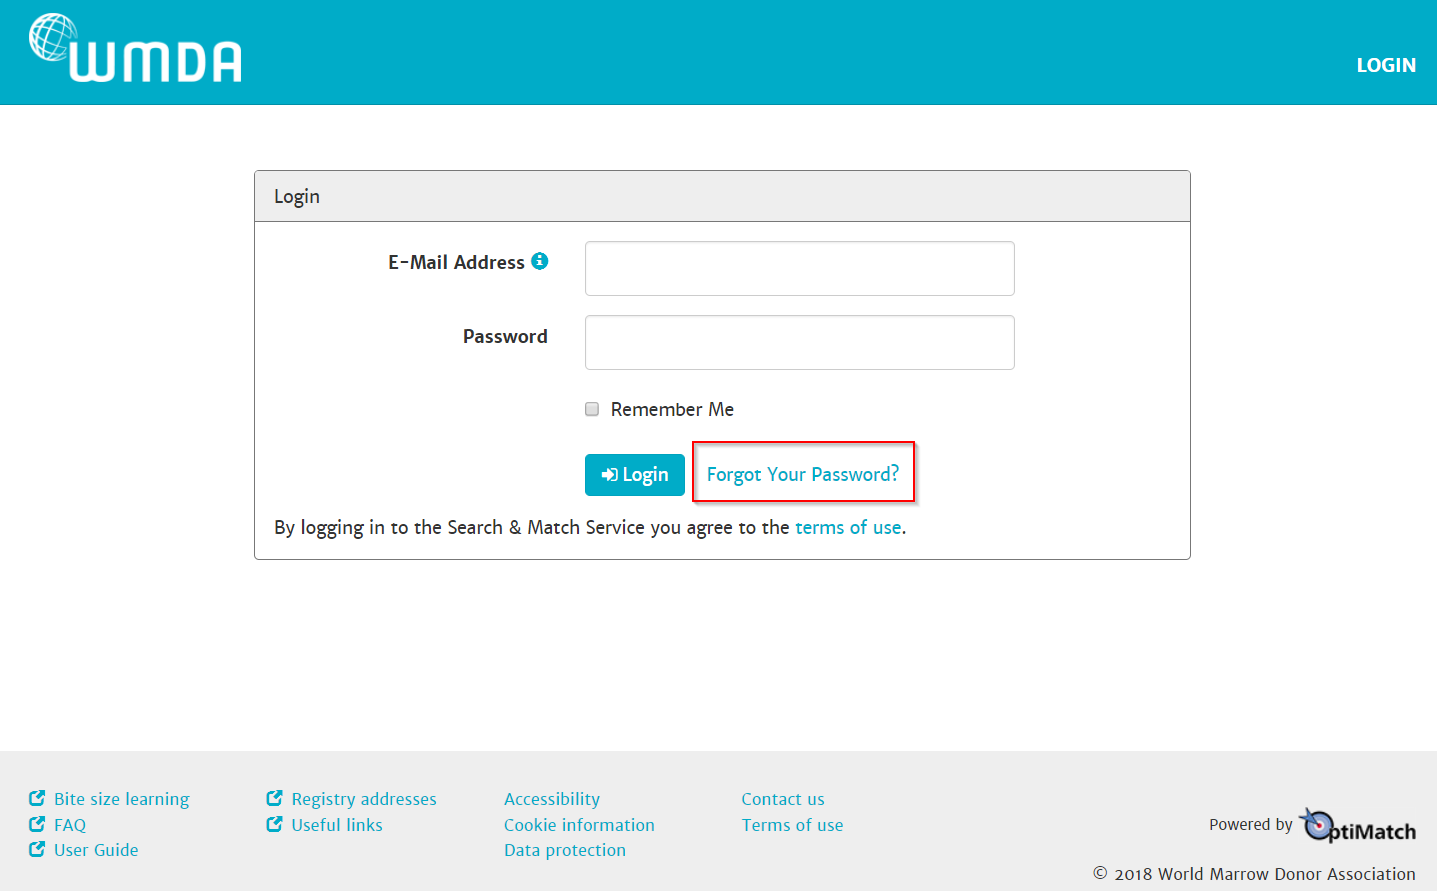
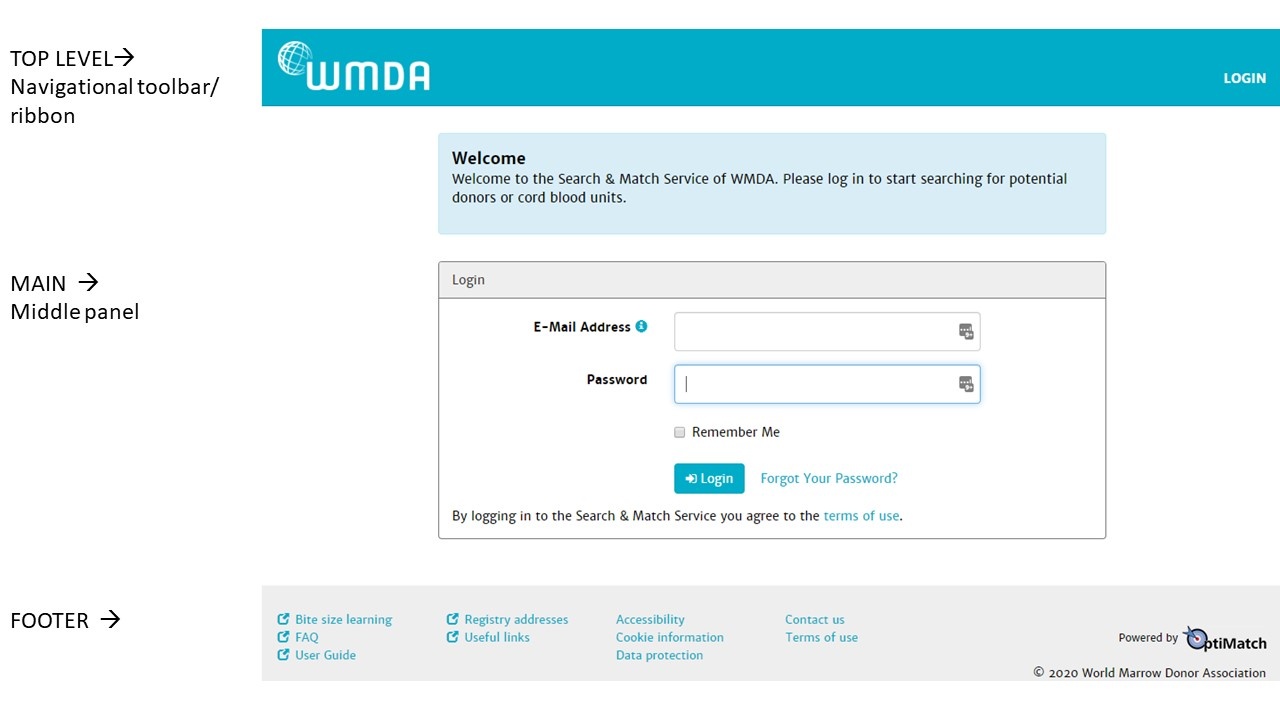
You can access the Search & Match Service via web address (or URL) by entering the address: https://search.wmda.infosearchmatchfesa.z6.web.core.windows.net/#/auth. You can save a bookmark in your browser, e.g. for the Search & Match Service, so that you are immediately directed to the login page.
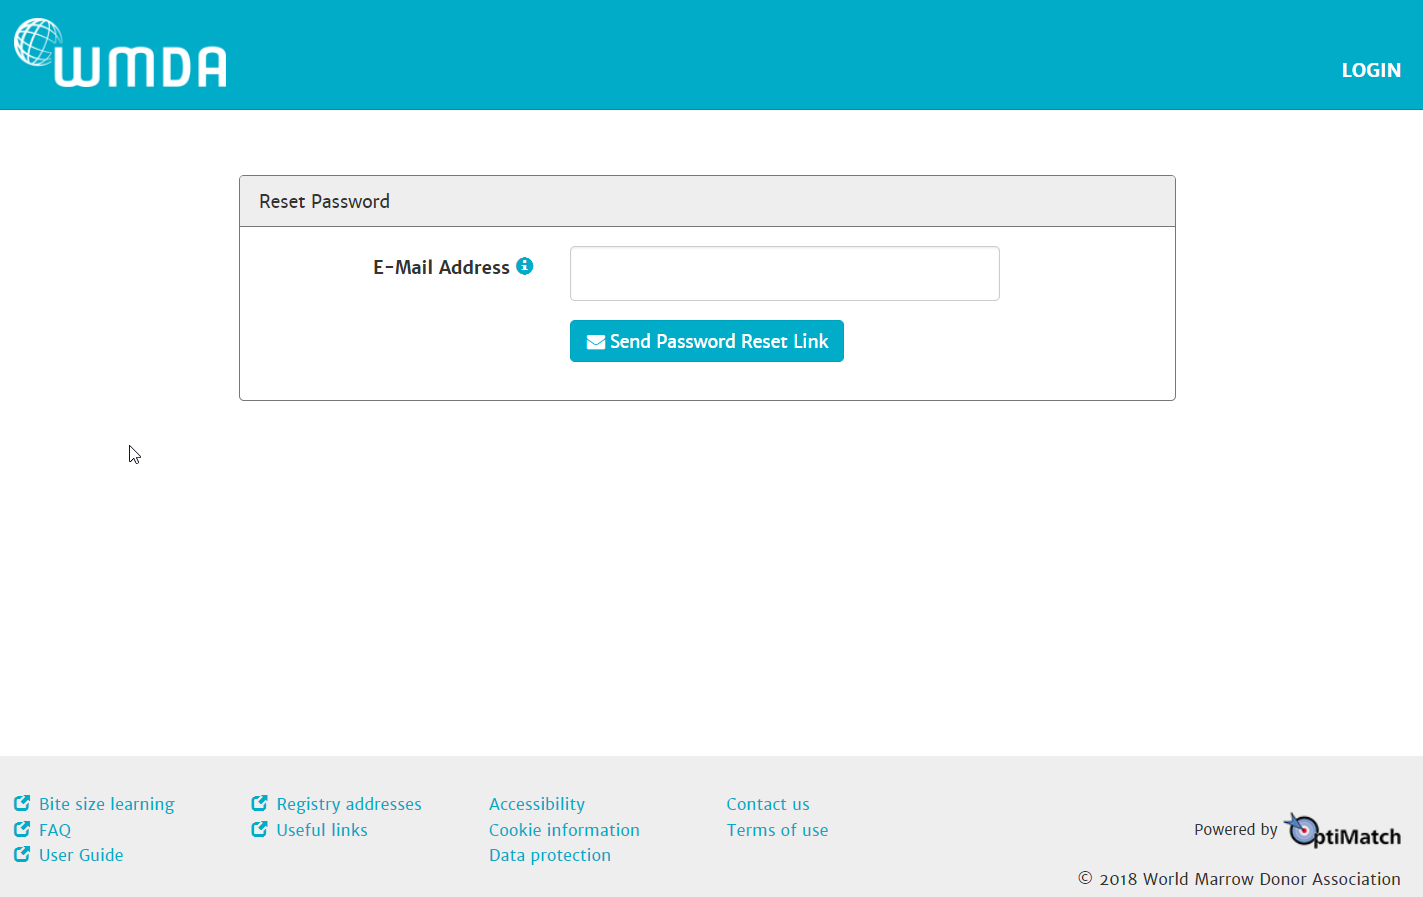
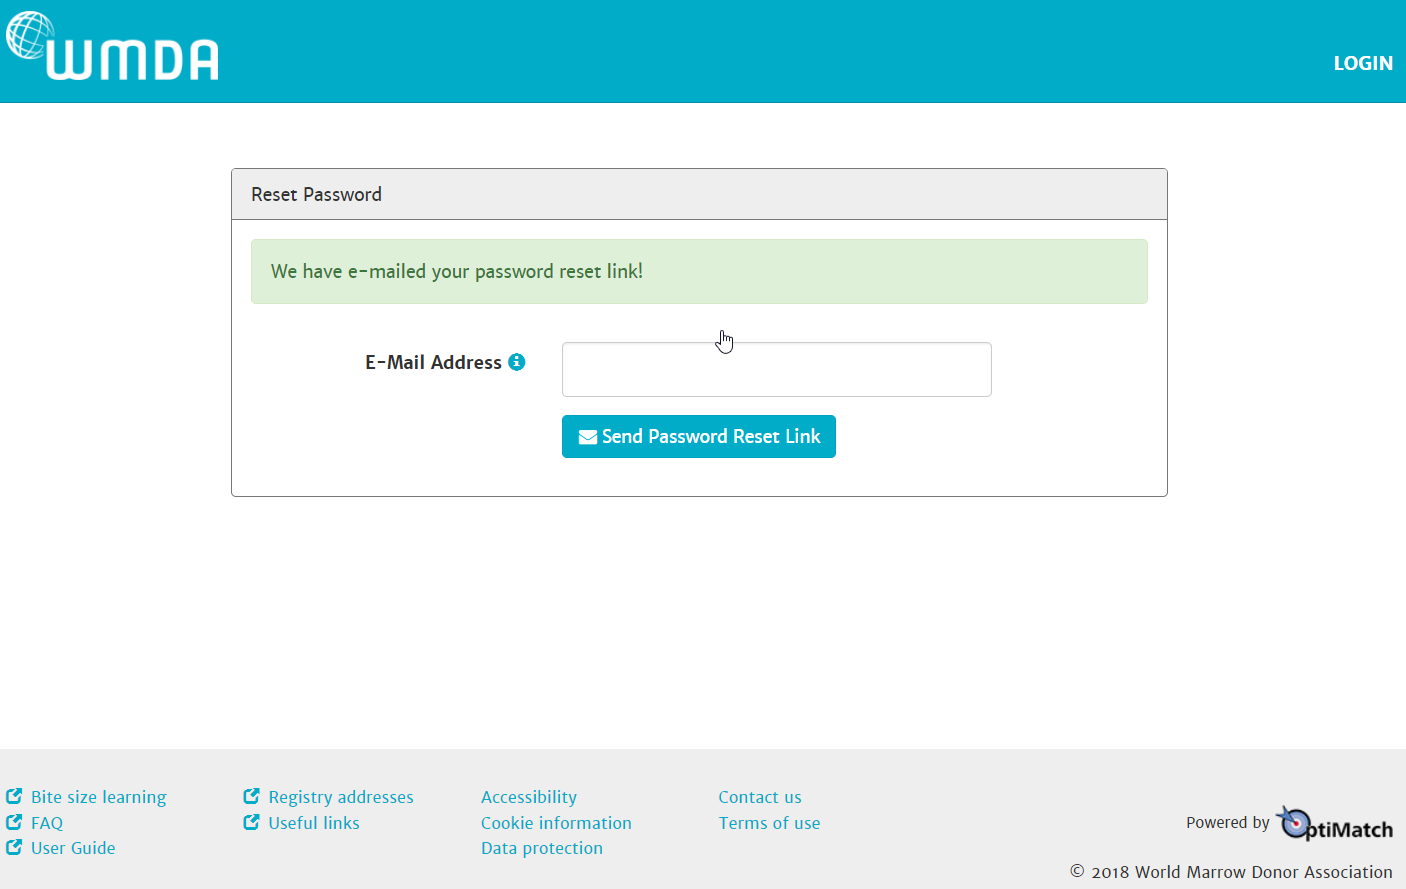
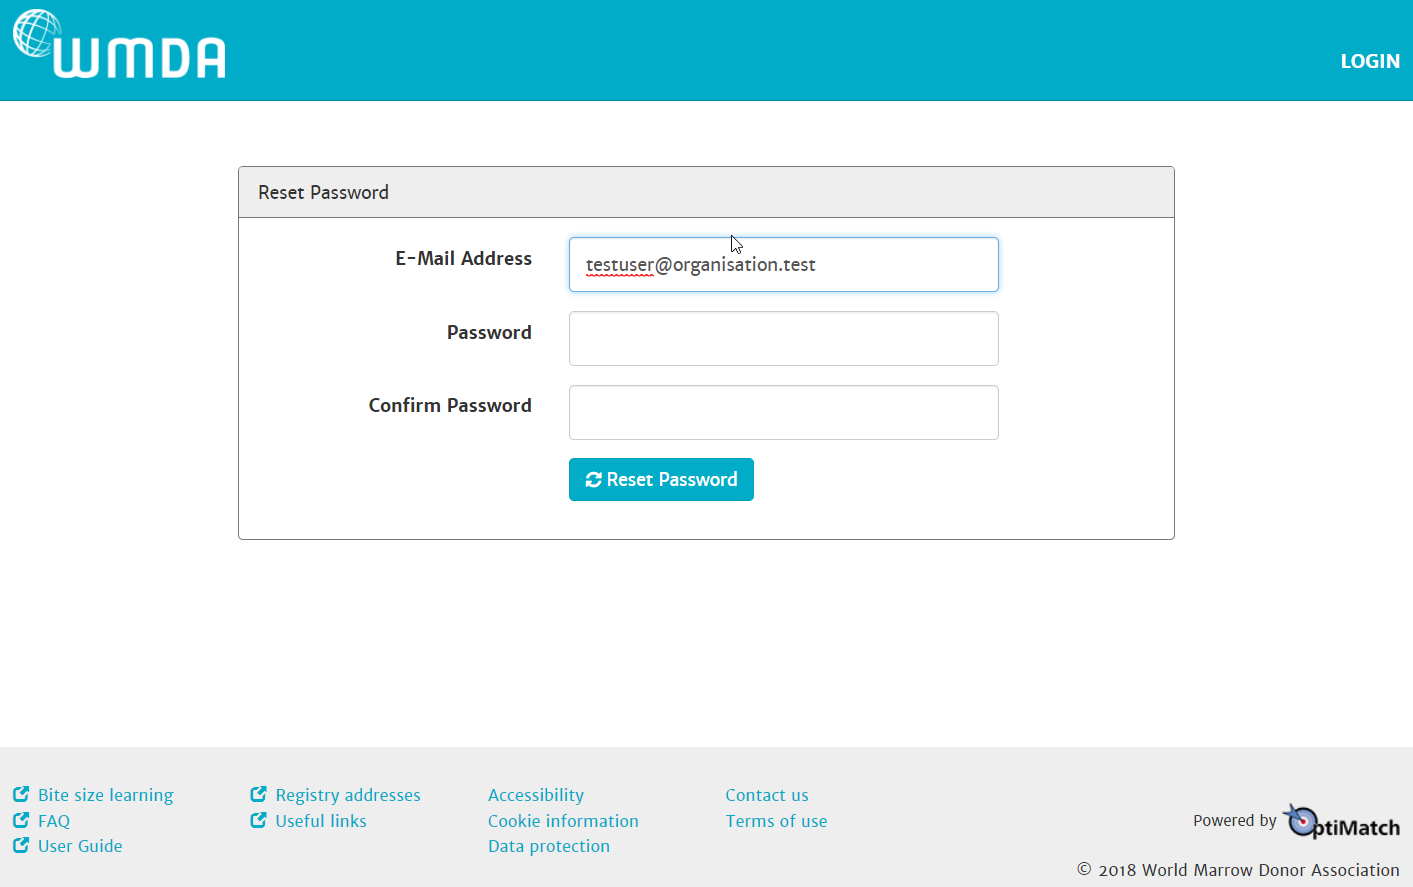
Click on the 'Forgot Your Password' as indicated with a red box in figure 1, fill out your e-mail address (this field is not case sensitive) on the reset password page of figure 2 and click on the 'Send Password Reset Link' button. You will then receive an e-mail with a link to set your new password.
| Imagefloat | ||
|---|---|---|
| ||
|
| Imagefloat | ||
|---|---|---|
| ||
| ||
Click on the link in the e-mail you received from the system. Choose your own password, confirm this password and click on the reset password button (figure 3).
| Imagefloat | ||||
|---|---|---|---|---|
| ||||
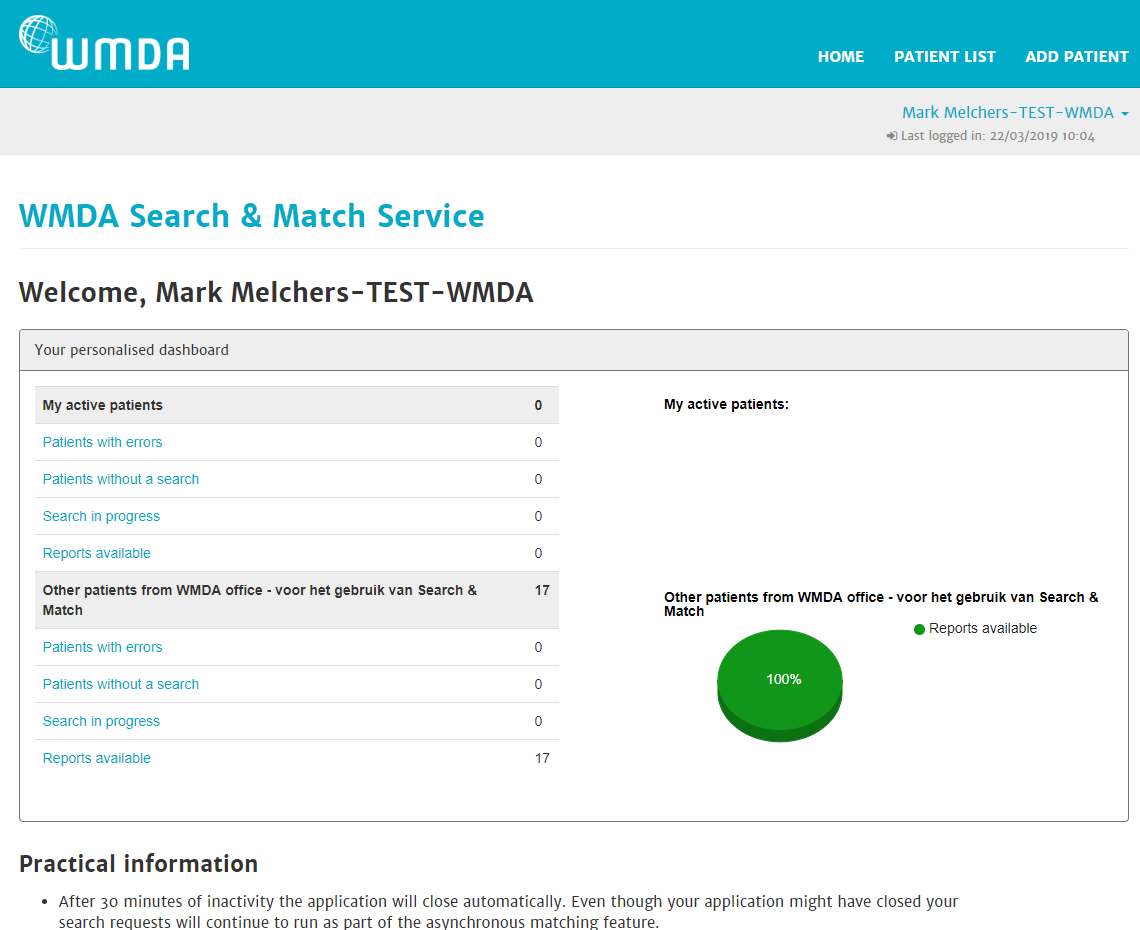
Return to the login page (figure 1) and login with your e-mail address and new password. The Search & Match Service ensures that the right credentials have been entered before granting access to the system. The system defaults to your personalised Search & Match Service homepage, where you will find your dashboard with information about searches and patients from you and your organisation. Furthermore, you will find some practical information, links to addresses of registries and cord blood banks and information about how to report feedback and problems.
...
Tip: If you haven’t changed your password for a long time, we recommend that you do so to ensure that your profile is secure. We recommend that you change your password every 6 months.
Changing your password
Follow the steps described above to access the system for the first time.
Step 1: Click on the link 'Forgot Your Password?' at the Search & Match Service login screen (figure 1).Step 2: In the next screen (figure 2), enter your e-mail address and click on the 'Send Reset Password Link' button.Step 3: Click on the link in the e-mail you received from the system.Step 4: Choose a new password, confirm your new password and click on the reset password button (figure 3).Step 5: Go back to the login screen and enter your e-mail address and your new password.
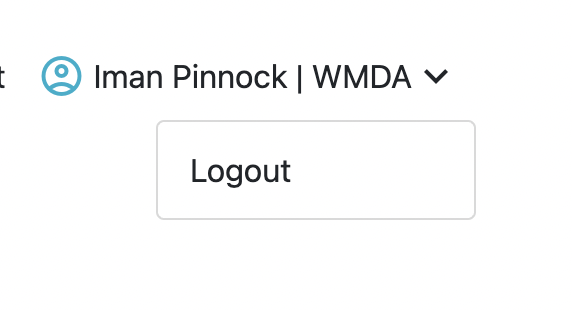
Logging off
To close and exit the application click on your name on the right site, just below the blue header left of the site page and a Logout button will appear (figure 4), once clicked, it will take you to the log out screen. After logging out of the system, you will be redirected to the login screen.
...
| Imagefloat | ||
|---|---|---|
| ||
|
Note: Please do not simply close your browser; otherwise your unsaved data may be lost.
System Overview
The system is made up of three main generic areas (figure 5):
Top level – Also referred to as the Navigational Toolbar or ribbon. This allows you to view and manage data within each of the sections.Main middle pane – The main pane within the system displays a summary view of the information contained on that page.Footer – These are useful links that provide you with additional information that will help with the search and matching process.
Currently no footer
| Imagefloat | ||
|---|---|---|
| ||
| ||
Navigational Toolbar
The Navigational Tool bar is displayed across the top of the screen. This toolbar is also referred to as ribbon in some instances. This toolbar displays links that take you to the specific section you wish to view/manage.
...
Listed below are the links/buttons and a short description:
Button | Description |
Logo | Clicking on the logo will open the WMDA website in a new browser window. |
Home | The ”Home” icon will return you to your own personal Homepage in the Search & Match Service. |
No functionality. | |
Create Add Patient | This opens a form that allows users to register the details for a new patient. |
| View Patient 1 | Allows the user to view the patients information. |
| Edit Patient 1 | Allows the user to edit/update the users information. |
Patient List | ListThis section lists all active and inactive patients. Within this section users are allowed to manage their own or organisational patients. |
| Search Results | Display all the patients with match probability, hla values, etc. |
User name/profile | This section contains now only the logout functionality. |
Logout | This action will sign you off and return you to the login page. |
Home
This section includes your personalised dashboard, which shows information about the number of active patients from you and your organisation. It also presents the numbers of patients with an error, patients without searches performed (only registered), searches that are still running and the search reports that are available. Furthermore, you will find on this page some practical information, links to the addresses of registries and cord blood banks and information how to report feedback and problems. (figure 6: personal homepage)
| Imagefloat | ||||
|---|---|---|---|---|
| ||||
Add patient
...
, update patient, view patient
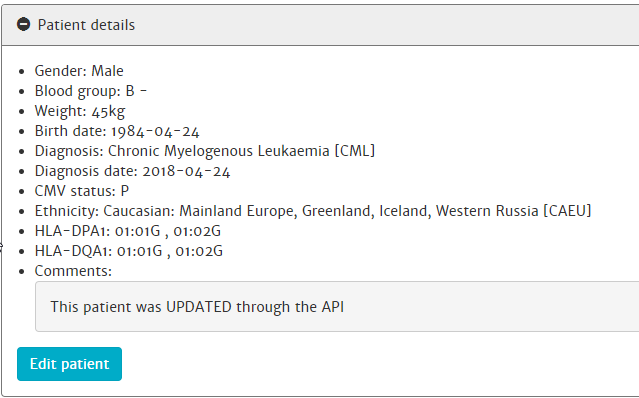
This section allows you to enter and register a patient that you wish to perform a donor/cord search for. You can register a patient manually or automatically through an API.
Register your patient automatically
WMDA has defined an API. If you have implemented this API, you can register your patients from your local system into the Search & Match Service without manually typing. Read here all details.
Register your patient manually
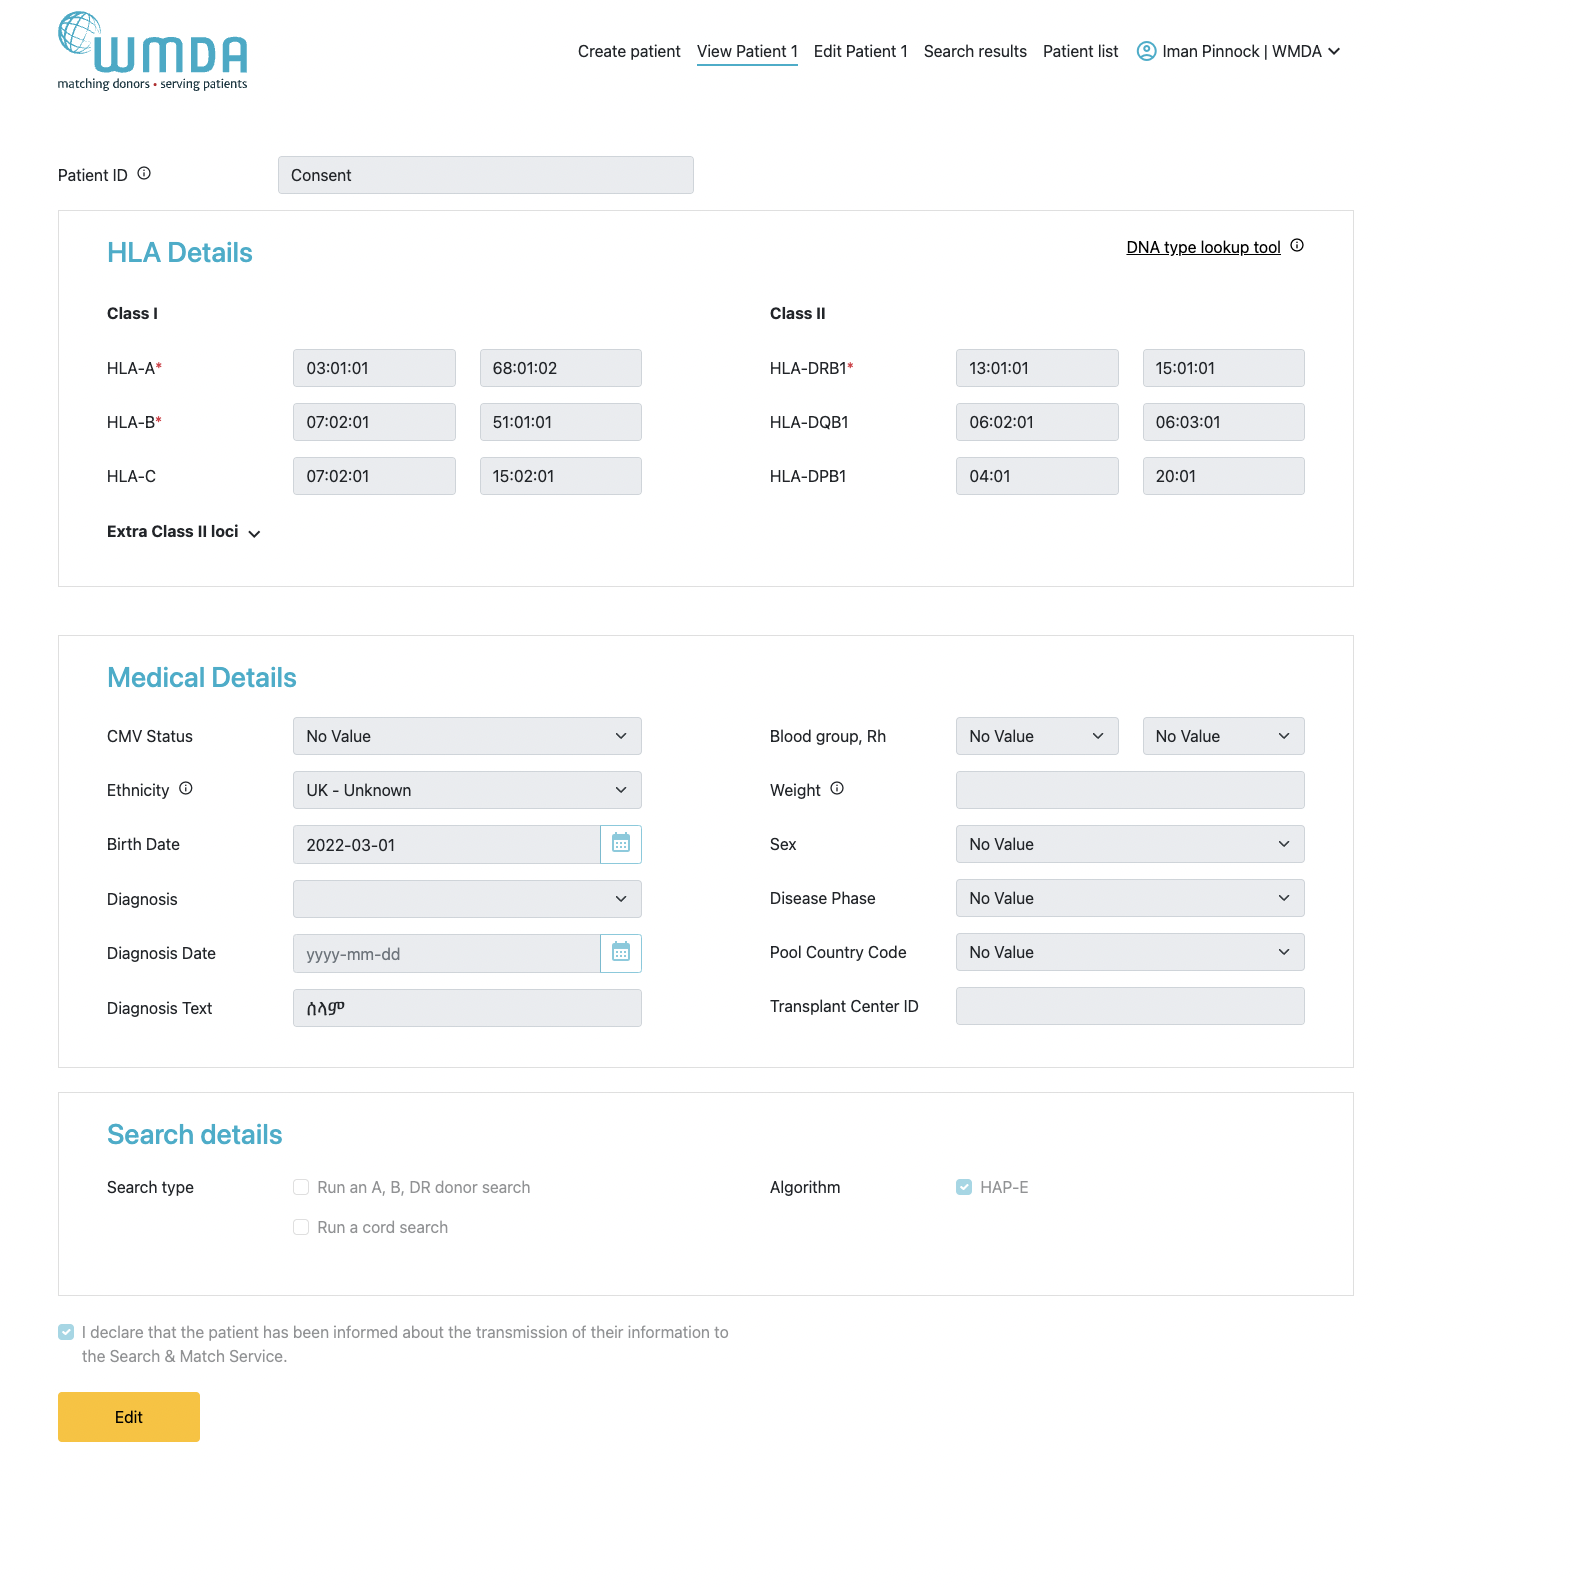
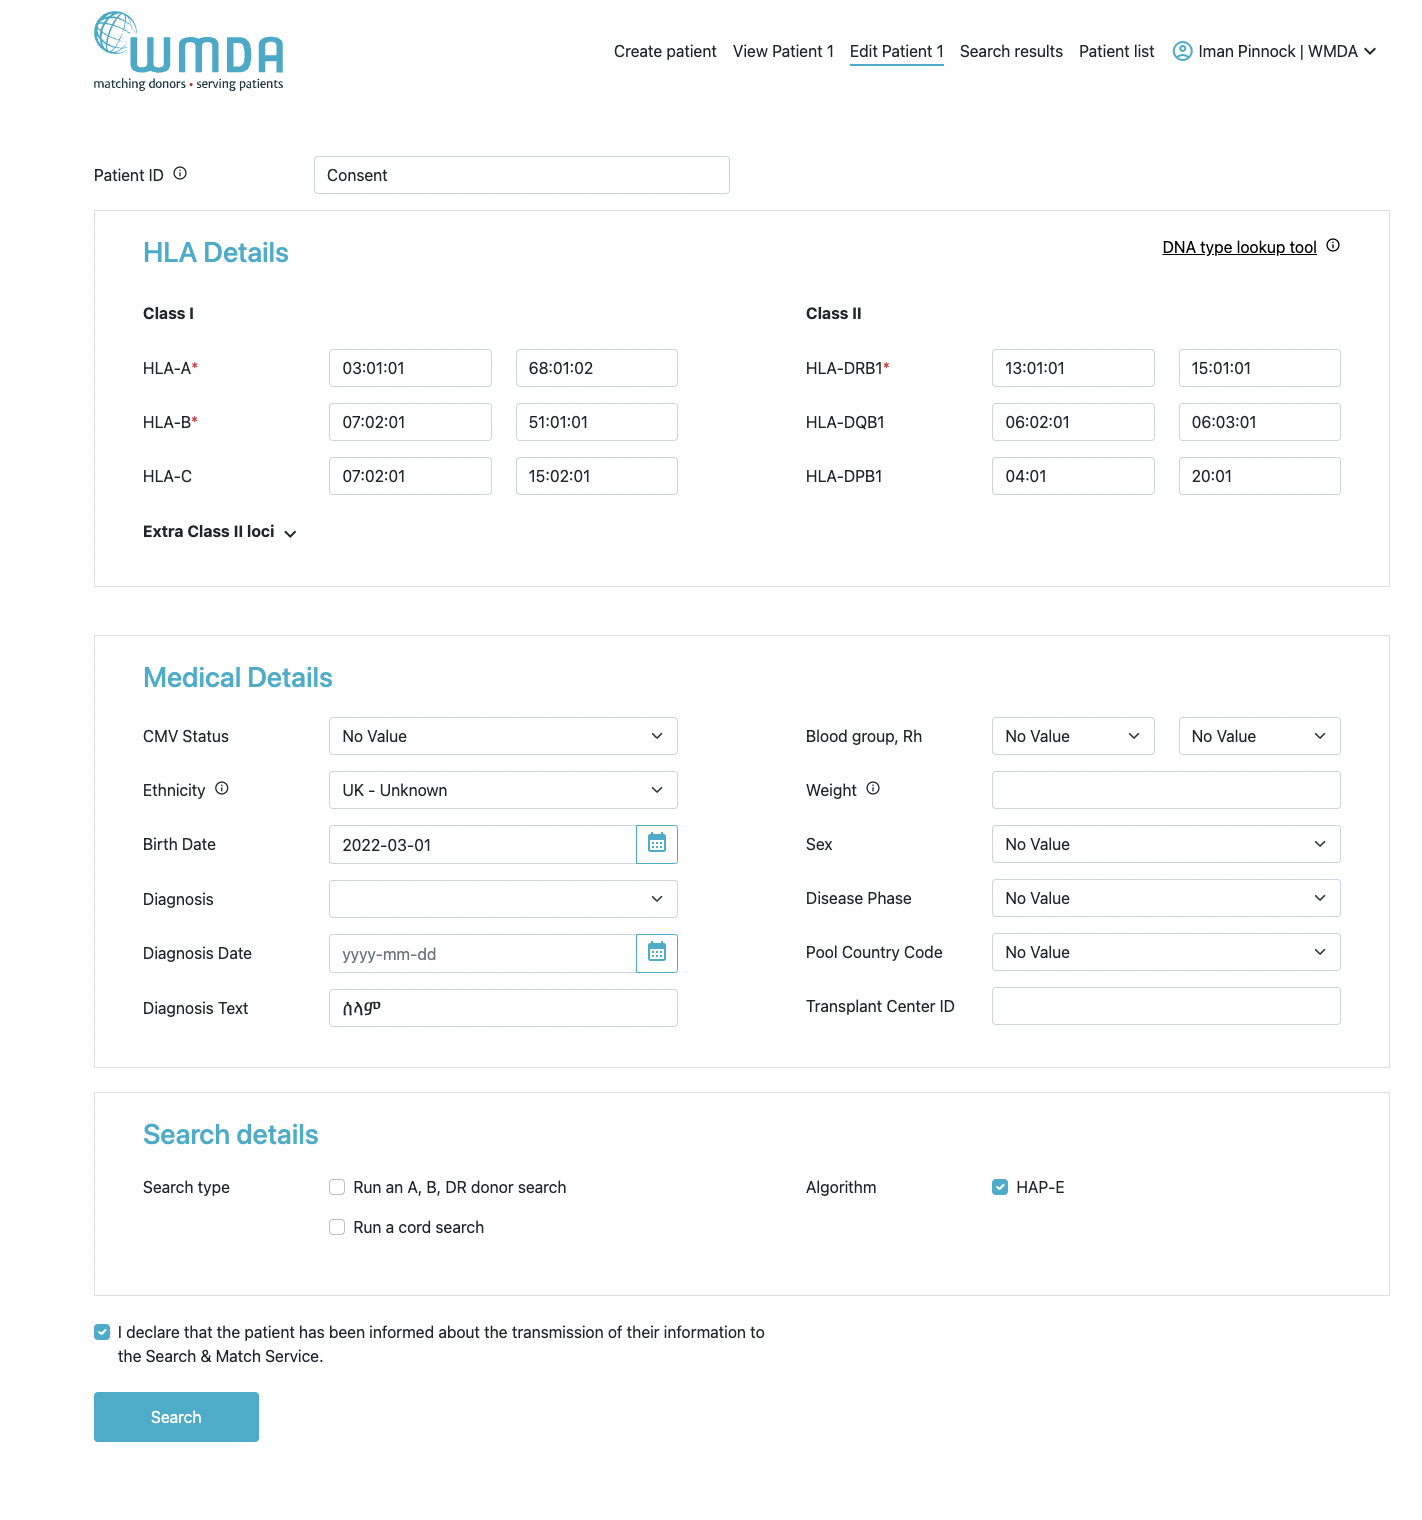
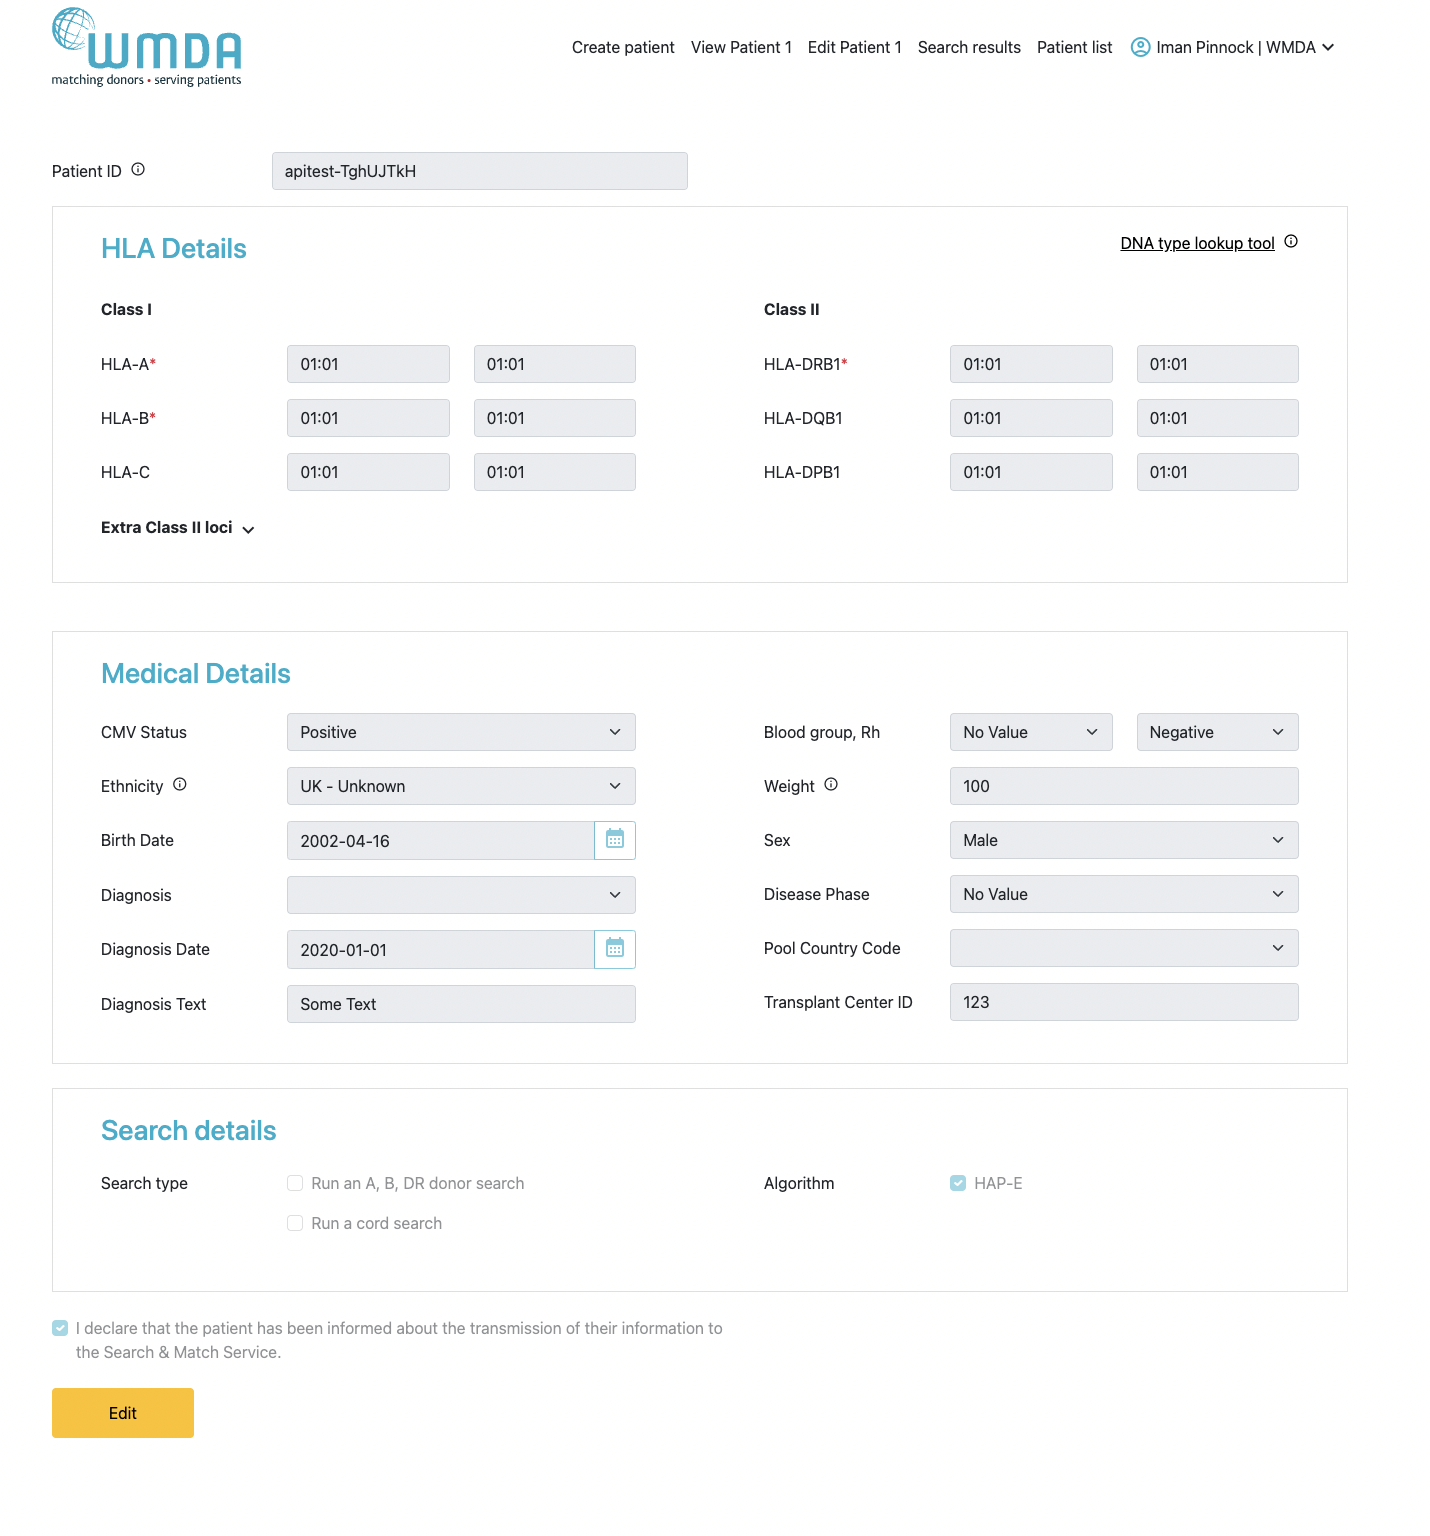
First click the "Add Create Patient" button. You will then receive a pop-up asking you whether the patient has consented to being entered on the list. When you do not have the patient's consent, please indicate this. You will then not be able to enter a patient ID or comments, but you will still be able to enter HLA and additional details and perform an anonymous search. The first form shown below in figure 7 is only used for entering new patient registrations, the second form is for updating existing patients. When entering data, make sure that the fields marked with a red asterisk (*) are completed as they are mandatory in order to perform a search. In some of the fields (CMV, blood group, ethnicity, diagnosis, gender) values can be selected from a pre-defined drop-down list.
...
| Imagefloat | ||
|---|---|---|
| ||
|
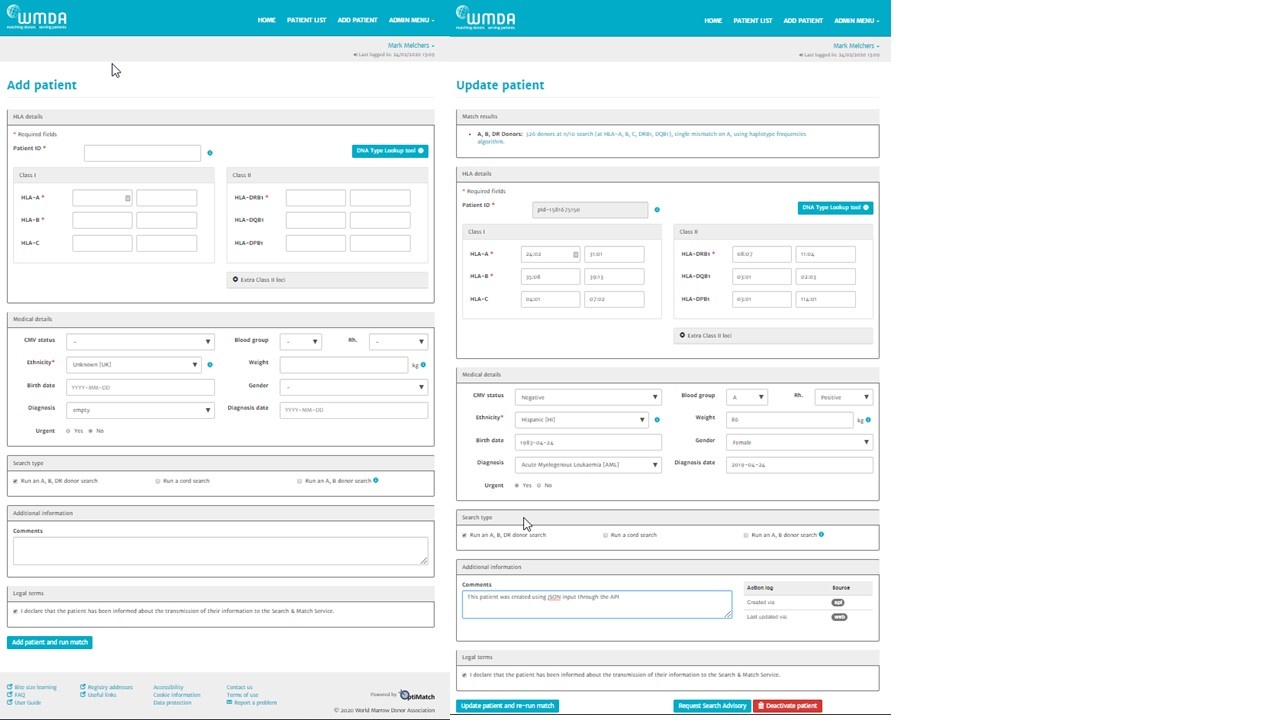
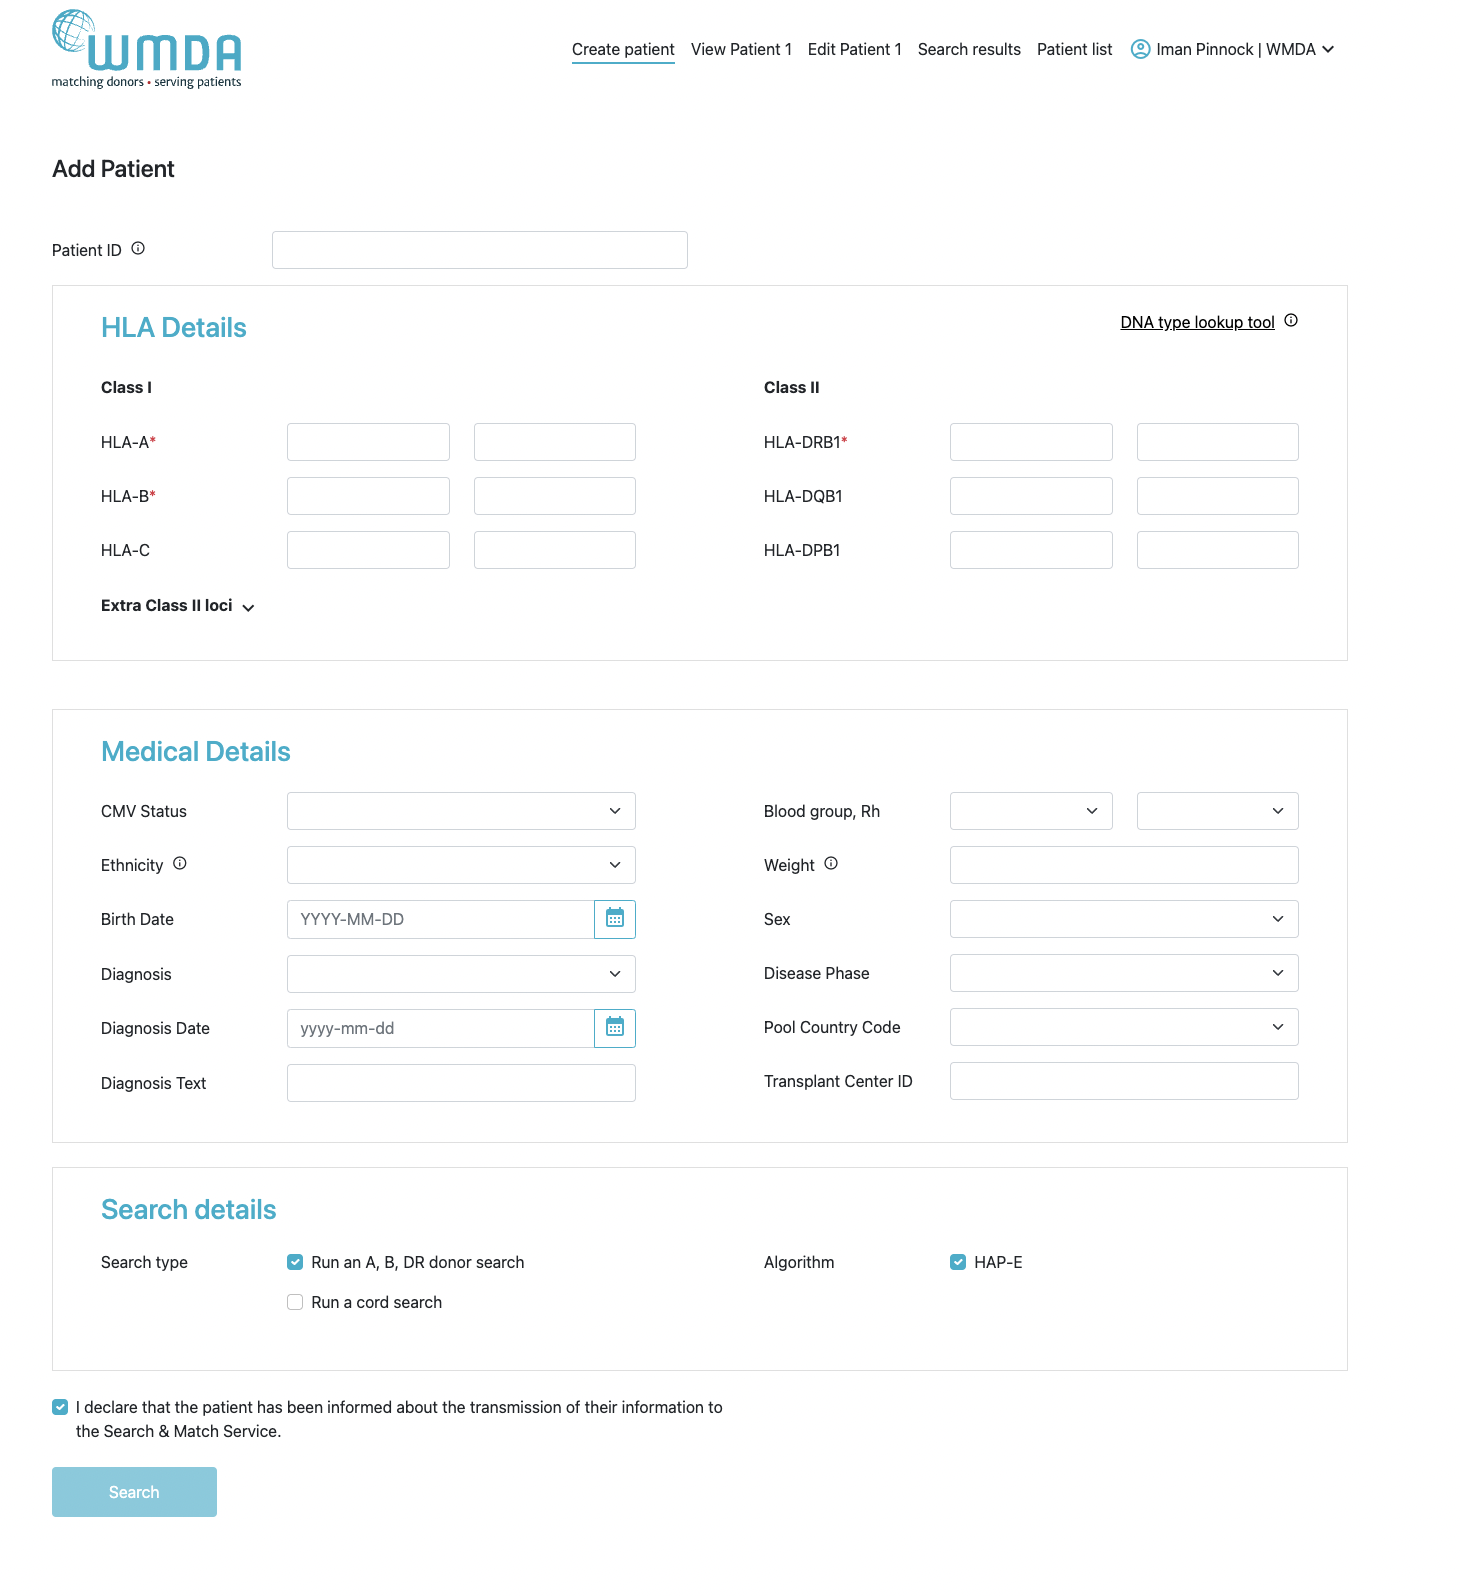
On saving a record, your entries will be checked immediately for plausibility and completeness. If a record is not plausible, an error or warning message will be displayed on the top of the page.
...
- The patient ID should be unique and the system will check for duplicates when you validate the data by clicking on the Add patient button. The patient ID cannot be changed when you update your patient (read only field).
- HLA should be entered with a colon (:) as separator.
- HLA strings can not be entered into the HLA fields; you can use the DNA Type Lookup Tool at the top right corner to lookup the corresponding NMDP code.
- Search determinants will be generated from the DNA values entered. The search determinants will be used for matching.
- Dates can be entered either by using the calendar or just by typing. When you enter the date manually, please ensure they conform to the ISO date format of YYYY-MM-DD which is also shown in light grey (mask) in the date fields. Date of birth can also be in the future.
- Use the tab key to move from field to field. When using the tab key on the HLA fields, the cursor will move as such that you can first enter both locus values, before moving to the next locus.
- After you are finished entering the patient's details, please click on the "Add patient and run match" button at the bottom of the page. This will trigger a validation of the entered data.
- If the system finds any issues they will be highlighted in RED at the top of the form stating the reasons for it not saving the data.
- If the system detects no problems, then the details entered are stored in the database and a match run is automatically triggered for the patient.
- For urgent recipients, the 'Urgent' checkbox can be set. This checkbox does not affect the speed of the match functionality, but may be used to manage the list of patients described in the previous section.
- Default, the system will start to run a 10/10 matched donor search. If you only want to register your patient, make sure that both check boxes for donor and cord search are set to no in the section search type. This prevents the triggering of a search
- If you did not enter HLA from your patient for all 5 loci; A, B, C, DRB1, DQB1, the system will not perform a 10/10 match run, but will downscale the match run to either 8/8 or 6/6 depending on the amount of HLA loci available from your patient.
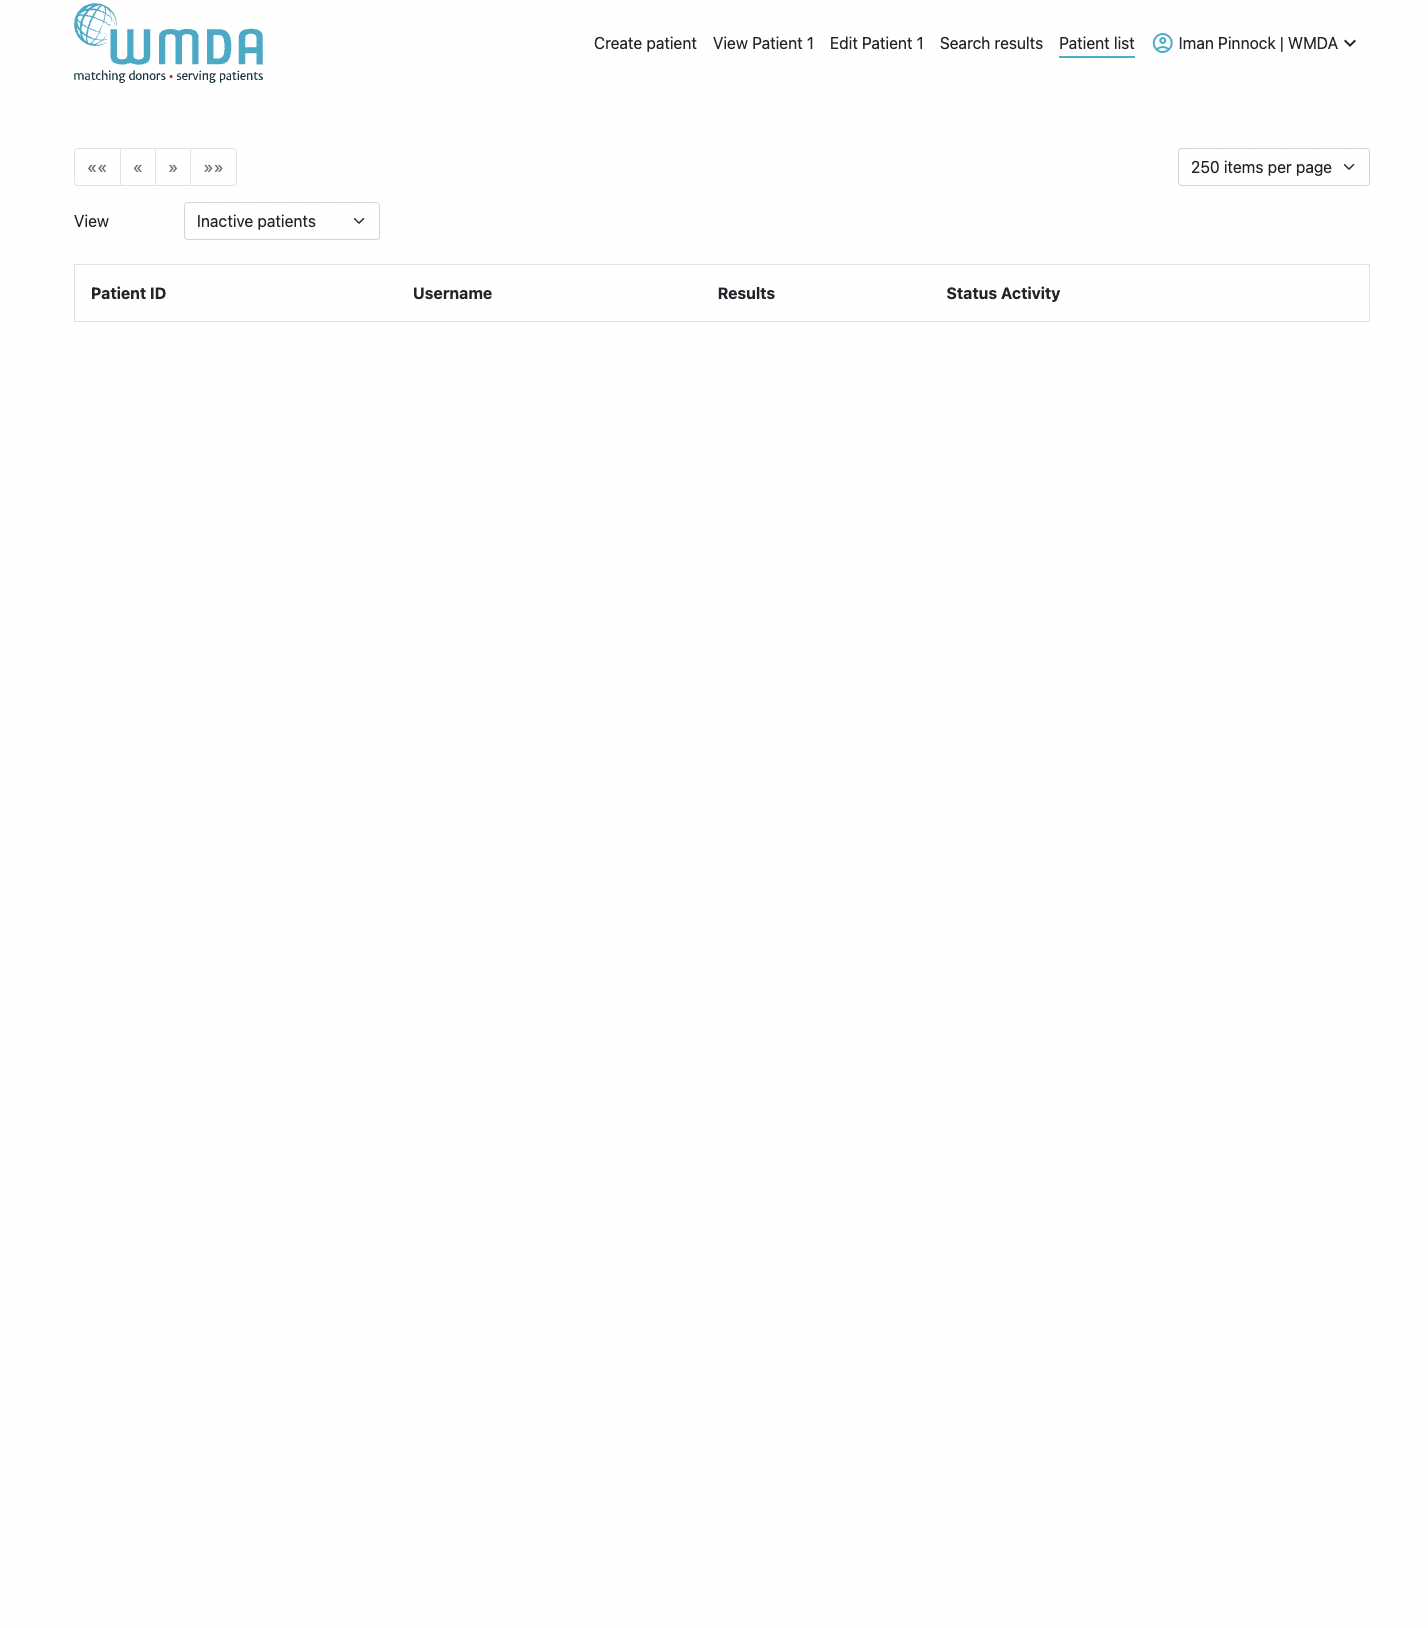
Patient List
This section allows users to manage their own and/or organisational patient list. The page is broken down into two sub categories:
My patientsMy organisation's patients
Within each category you can view a list of your own patients or a list of all patients from your organisation:
...
They each show a number in brackets representing the total number of patients in the corresponding list.
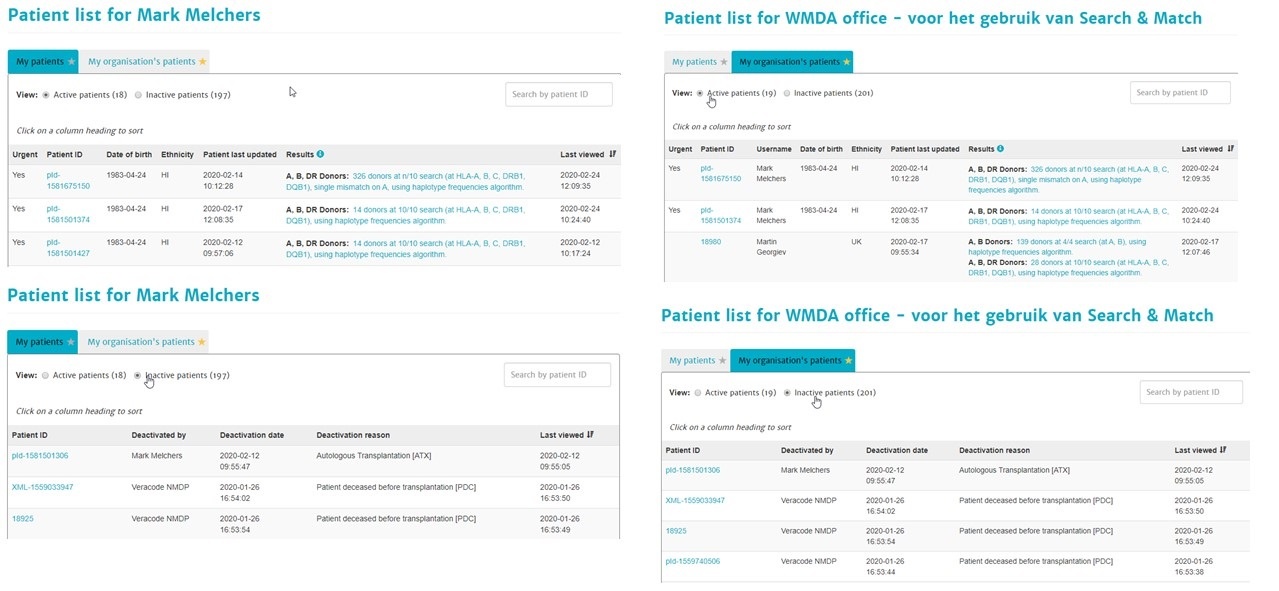
Figure 8 shows the differences between the views. Differences are shown by red boxes. The left top panel is the default view of the patient list page.patient list page of active and inactive patients, and the screen which is displayed once a patient has been selected and clicked on.
| Imagefloat | ||
|---|---|---|
| ||
|
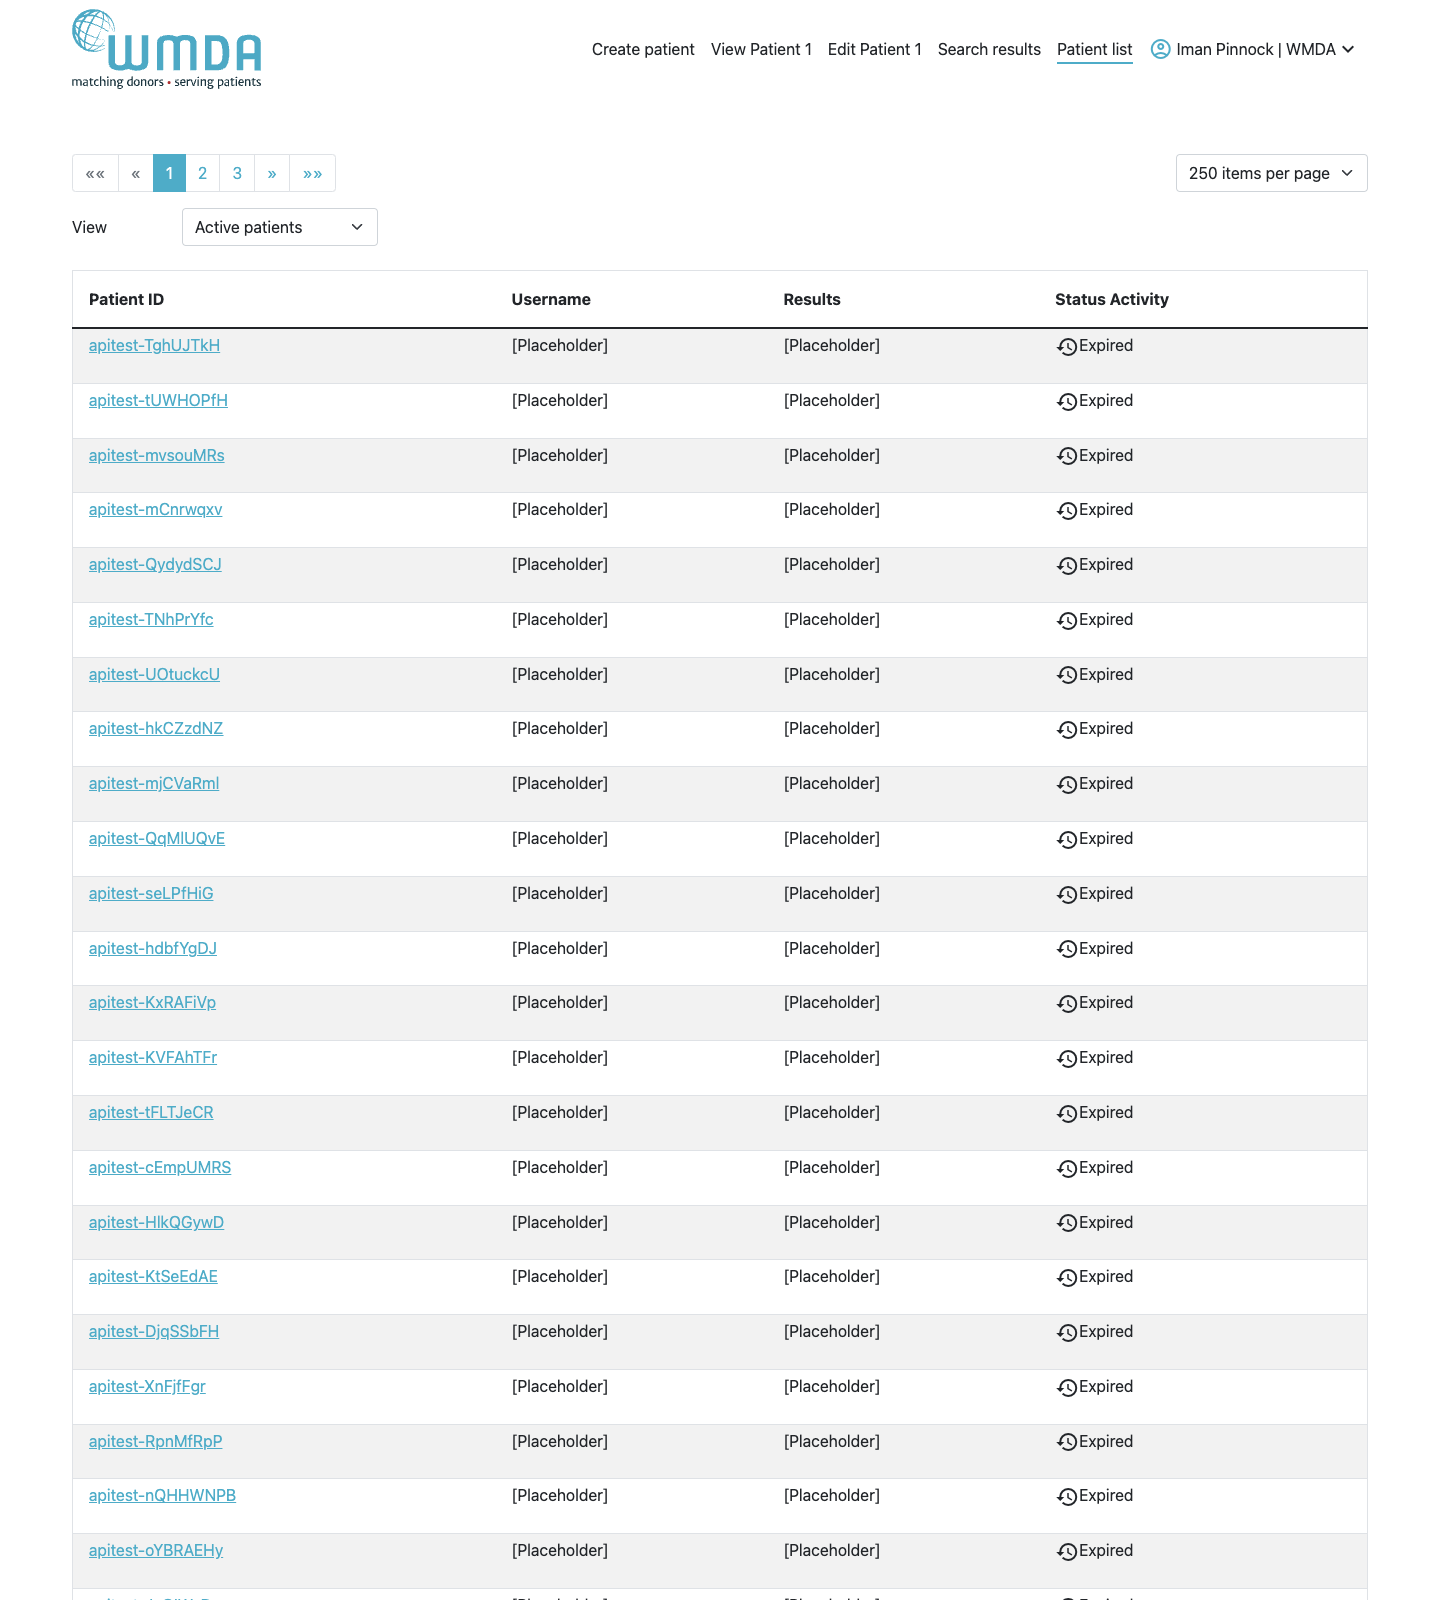
Within the patient list you can perform various other functions listed below:
Actions | Description |
|
|
|
|
Sorting using column headings | If you have a large number of patients, you can sort them using the following column headings: Active patients (figure 8 second row, left side panels):
Inactive patients (figure 8 second row, right side panels):
|
|
|

Within the table of listed Active patients you can manage your patients by performing the following actions listed below:
Actions | Description |
Patient ID Link | Clicking on the Patient ID link will open the update patient form to allow users to perform the following functions: Edit/Update patient details: Modify any details for the given patient, except the Patient ID. Request Search Advisory - You can request search advice from the WMDA HLA experts if you are facing a difficult search case. Deactivate patient – This will deactivate the patient record, remove the record from Optimatch and place them in the Inactive patient list. PLEASE NOTE: Update of any of the patients details such as HLA, will automatically trigger a new match run. This might change previous search results. Only if you remove all ticks in the search type block, no new match run is triggered, but any previous search results will be lost as well. |
(Search) Results Link | This shows you if a search is still in progress or if there are results available for review. If the search is still in progress, you see the following icon/text: You will see "A,B,DR Donors: Match run in progress..." if you are only running a donor search and additionally "Cords: Match run in progress..." if you are also running a cord search. The page will automatically refresh if the results are available. If you see the search results, you can click on these to go to the search results page.
Key points to remember: If you have triggered a search for the first time, then the system automatically performs a 10/10 donor match using the haplotype frequency algorithm. The system will downscale the match run to either 8/8 or 6/6, depending on the number of loci available of the patient. For cords, the default match run is a 8/10 cord match at allele level using the haplotype frequency algorithm. The number of donors/cords found is displayed for the type of match performed. If you have applied any filters (CMV or gender) to searches then the system will display the number of donors/cords against the type of match performed and filters applied. On screen filters are not saved to the search results in the patient list table. When you hover over the filter icon, you can see which filter(s) was applied.
|


Deactivate patient
The system automatically deactivates your active patients when you have not performed any activities with this patient for more than 6 weeks (last viewed report date > 6 weeks). These patients will be archived in your inactive patient list with reason for deactivation: "system deactivated".
Inactive patients are deleted from the system when the de-activated date is >12 months.
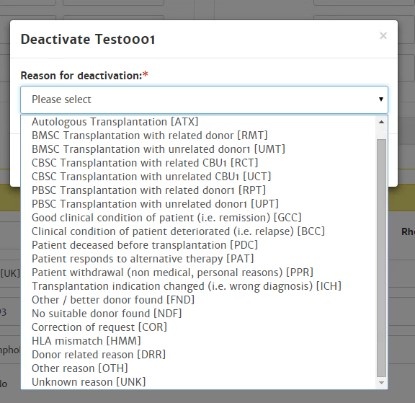
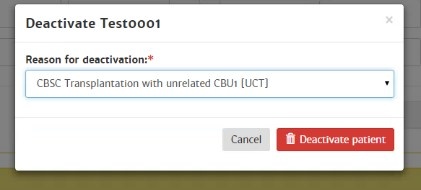
If you wish to manually deactivate a patient, you can click on the patient ID in the active patient list and in the update patient form you can click on "Deactivate patient". The system will now ask you to specify the reason for deactivation as shown in figure 11. After selecting the reason, you have to confirm the deactivation by clicking on the "Deactivate patient" button as shown in the second screen of figure 11.
| Imagefloat | ||
|---|---|---|
| ||
|
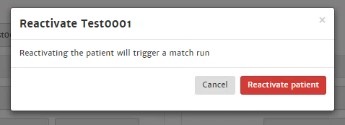
Reactivate patient
Within the table of listed inactive patients you can manage your patients by performing the following actions listed below:
|
|
|
|
Search results
Once the match process is completed, the number of matched donors/cords and short summary of the search will be presented in the column "Results" from the patient list. This link redirects you to the search results details. When a user clicks on the search results they are presented with a search results page consisting of the following parts:
Summary of resultsSearch settingsPatient details- Match results for (patient ID)
Registry code information- G/P-Code information
- NMDP Code information
...
| Imagefloat | ||
|---|---|---|
| ||
|
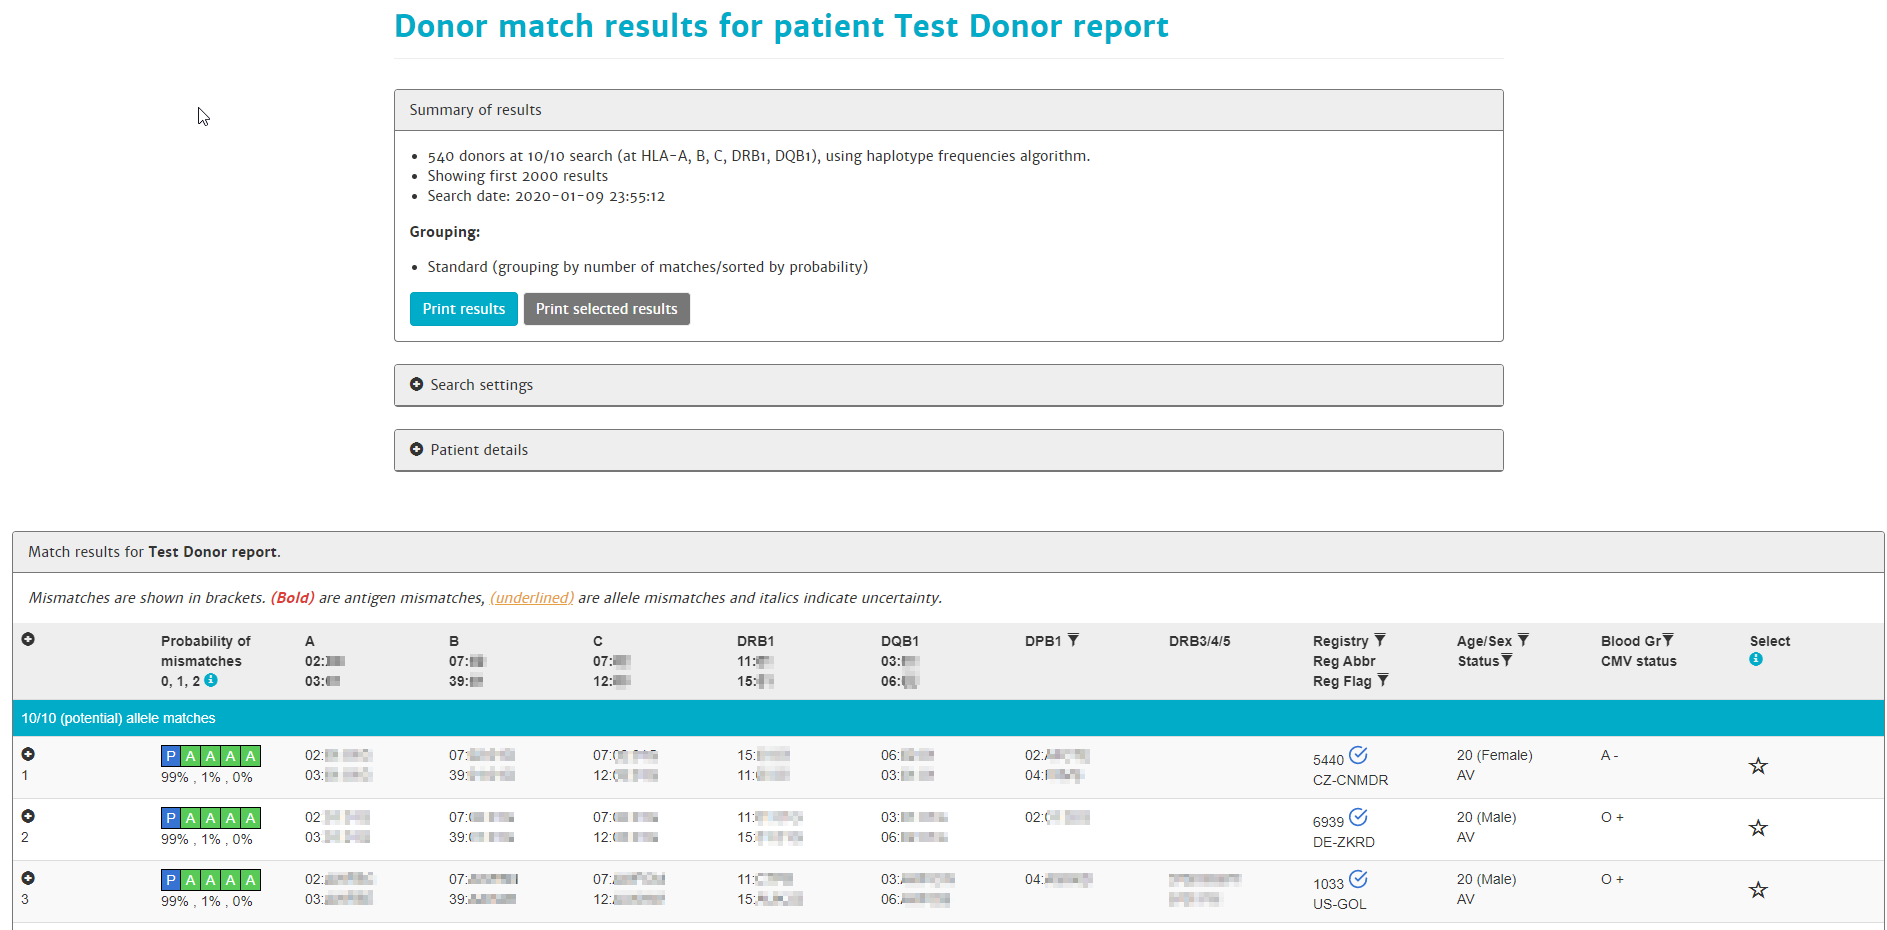
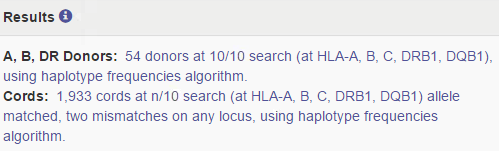
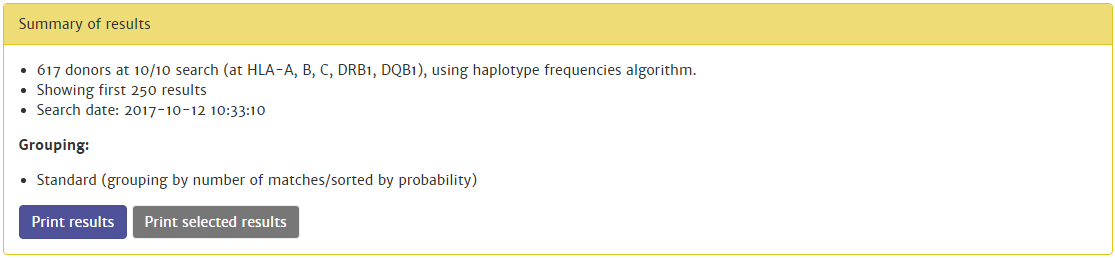
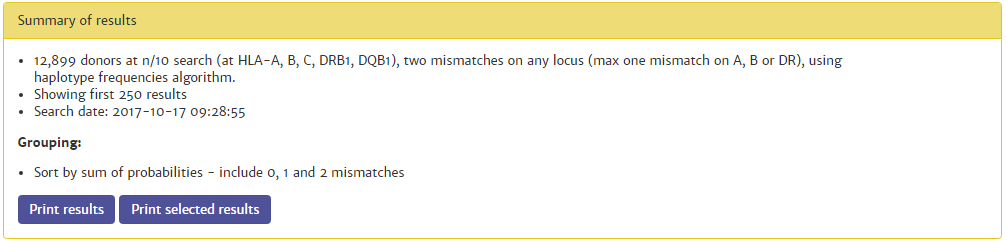
Summary of results
Within the search report the system displays in the upper section of the search report a summary string that’s used as part of the search results. As part of the search summary the system clearly states the search criteria which includes:
Number of donors/cords found at a specific match type and matching algorithmThe number of donors that are shown in the match results tableThe search date (date and time is in UTC)
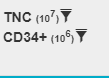
Optional: if filters are applied, these are also shown in the summary. Filters are divided into 2 categories: filter settings (CMV and gender) and on-screen filters (blood group, registry, age, TNC and CD34+ count (cords only)).
An example of the summary of results is shown in figure 13.
| Imagefloat | ||
|---|---|---|
| ||
| ||
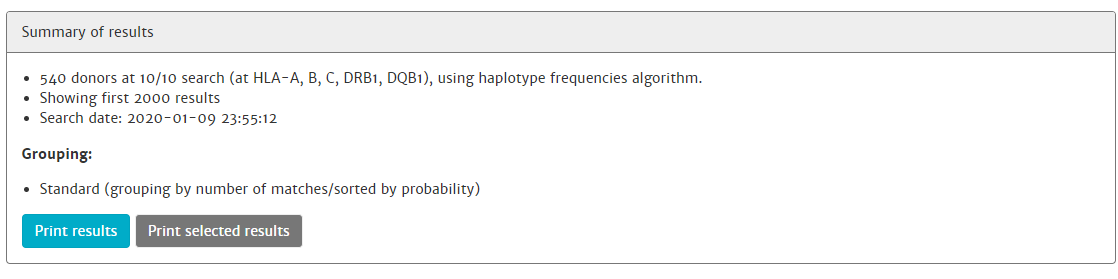
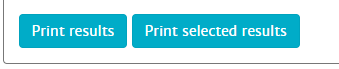
The summary of results also includes two Print buttons.
|
|
|
|
Search settings
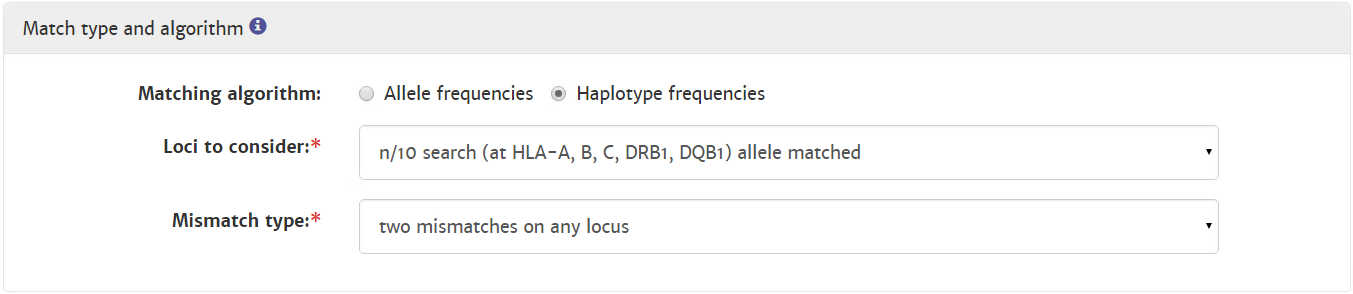
The search settings box (figure 14) consist of 3 or 4 parts:
Match type and algorithmGrouping/sorting (only visible when selecting haplotype frequencies and 1 or 2 mismatches; not shown before 'Run a mismatch search' has been performed.)FilterMaximum number of records (donors/cords)
By default, the search settings box is collapsed at the match results page.
| Imagefloat | ||||
|---|---|---|---|---|
| ||||
| ||||
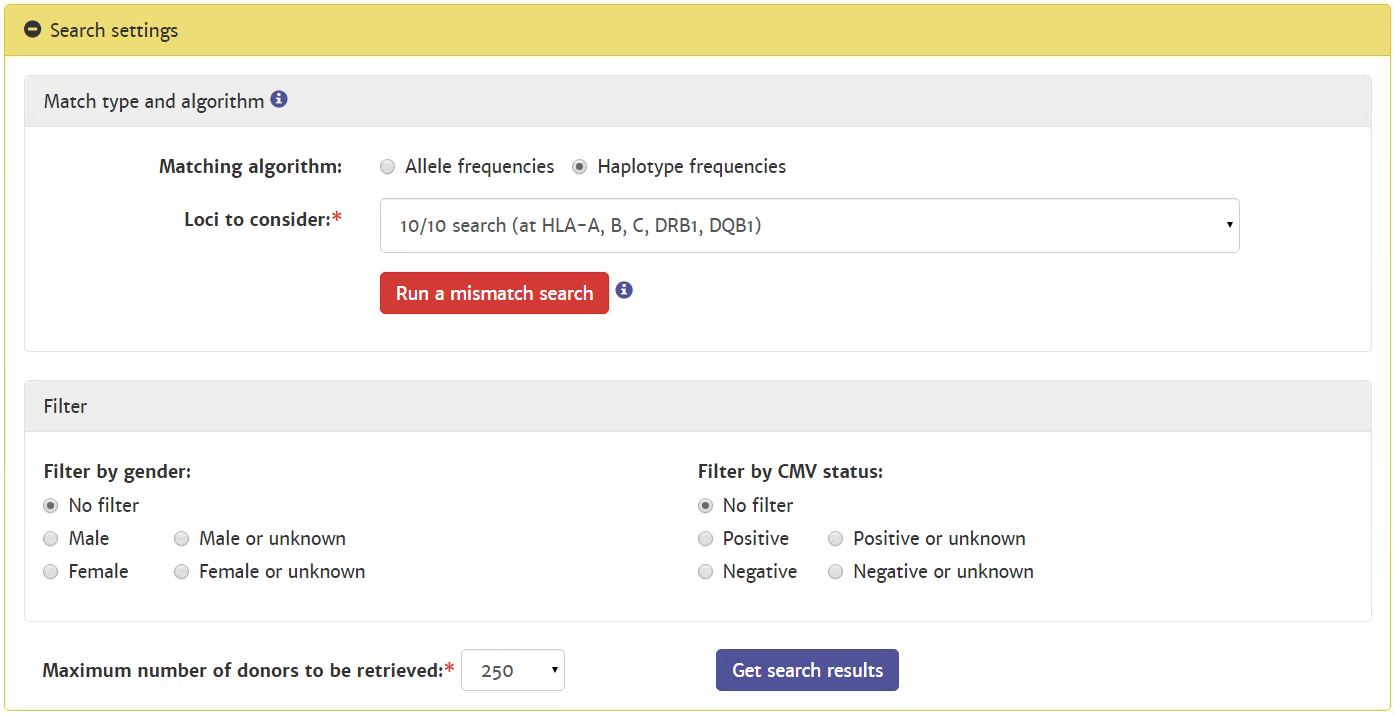
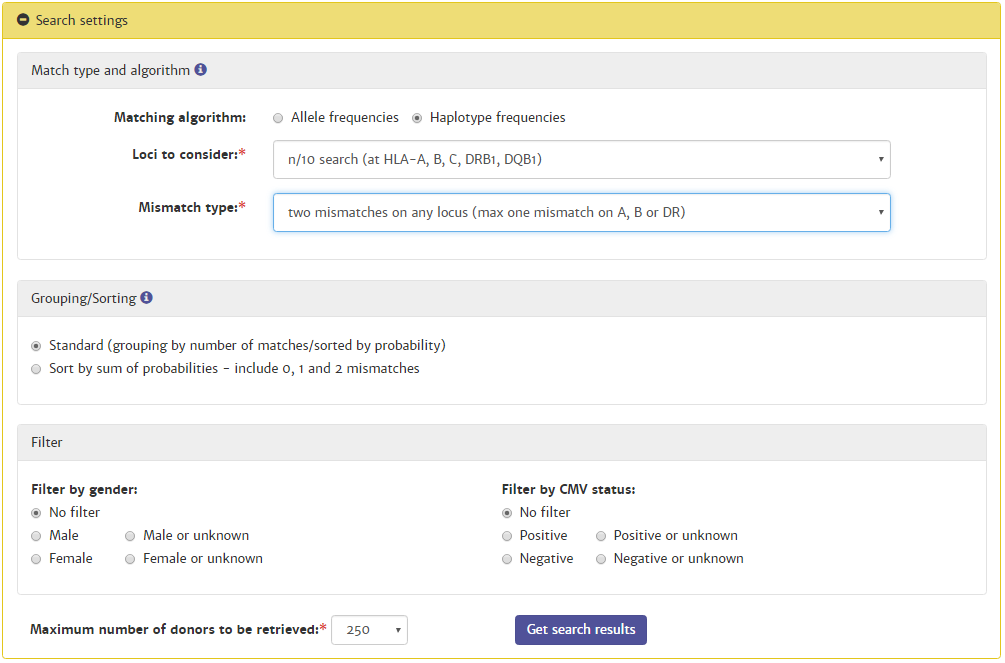
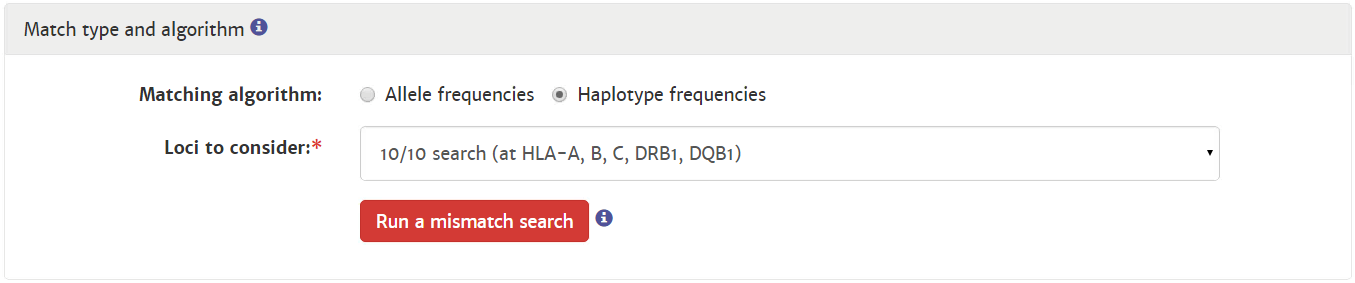
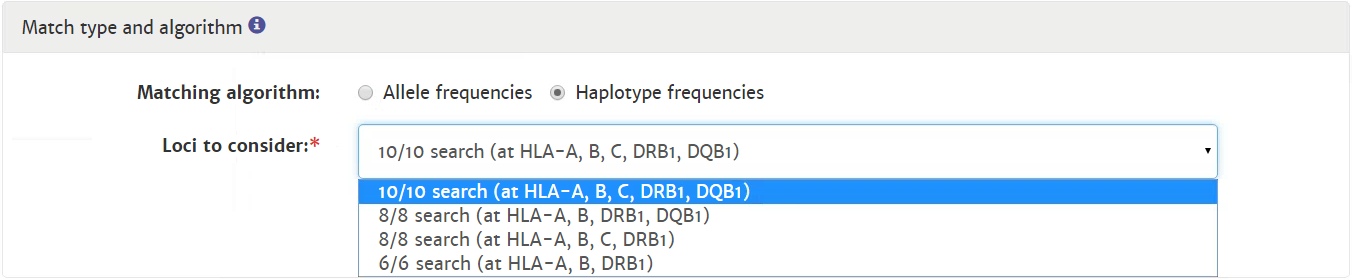
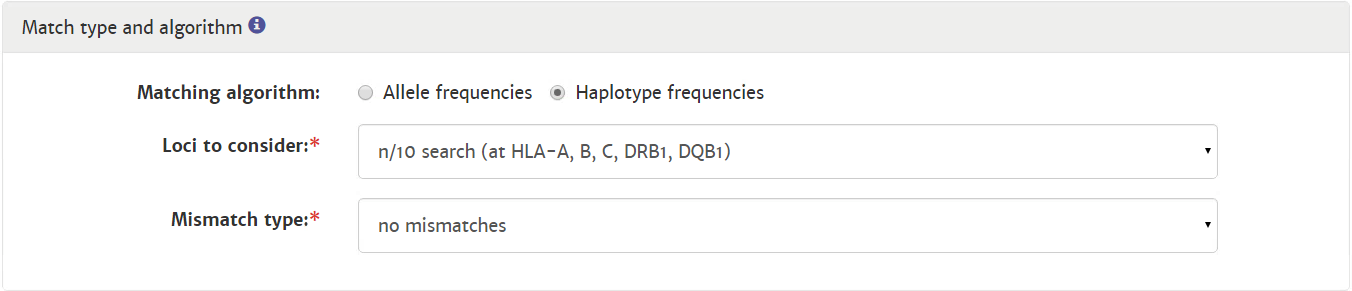
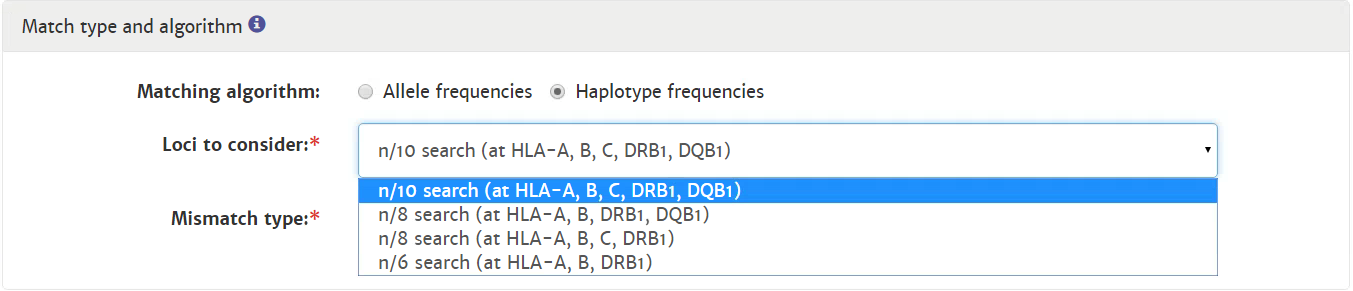
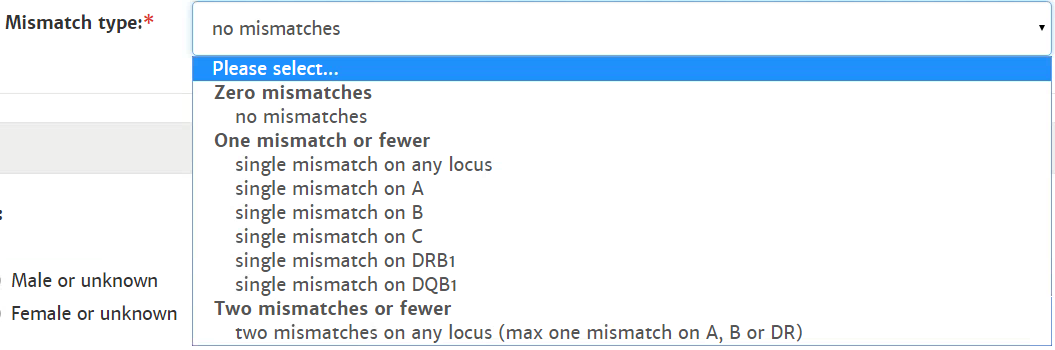
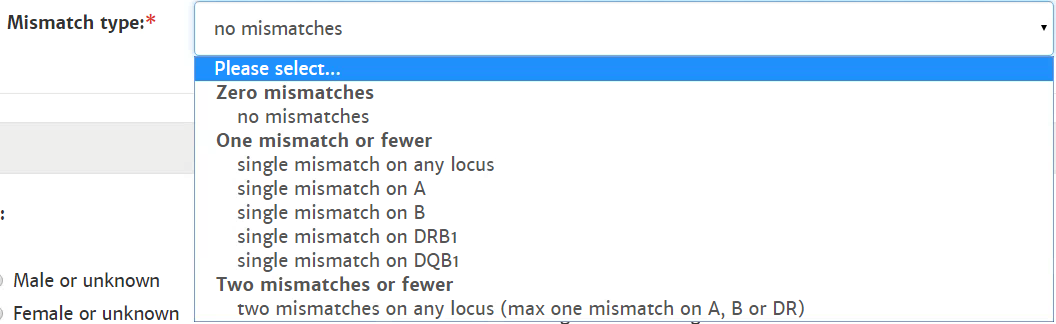
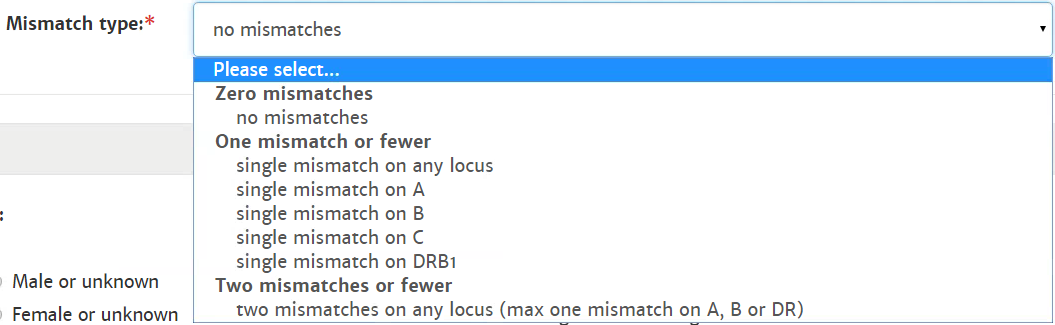
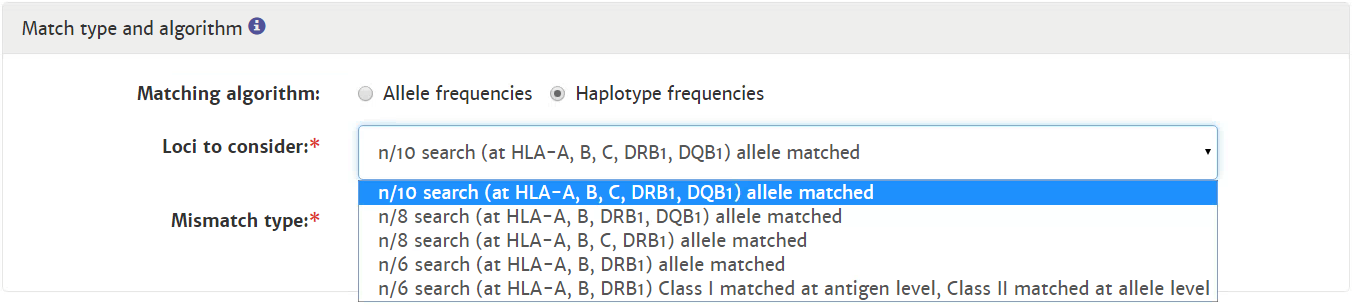
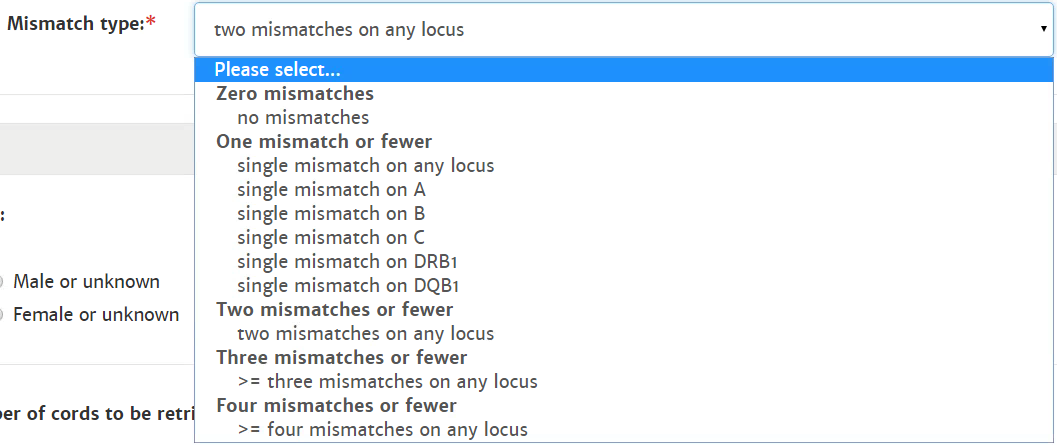
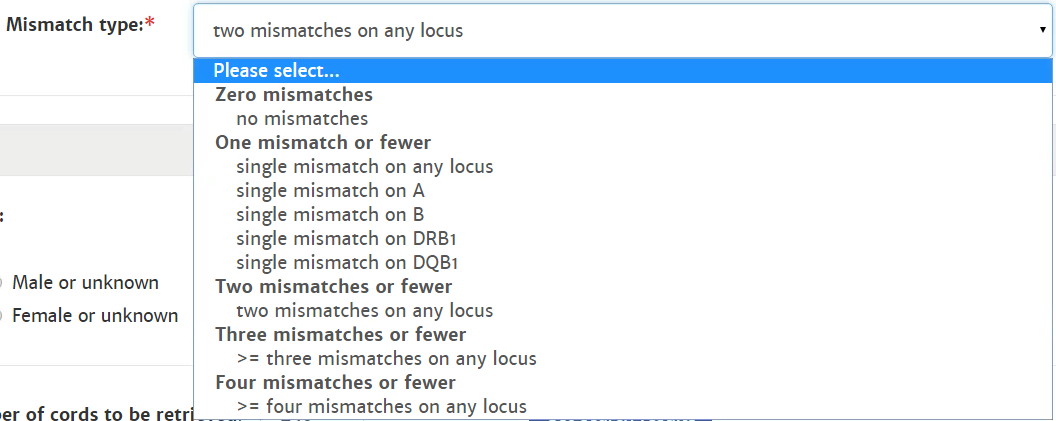
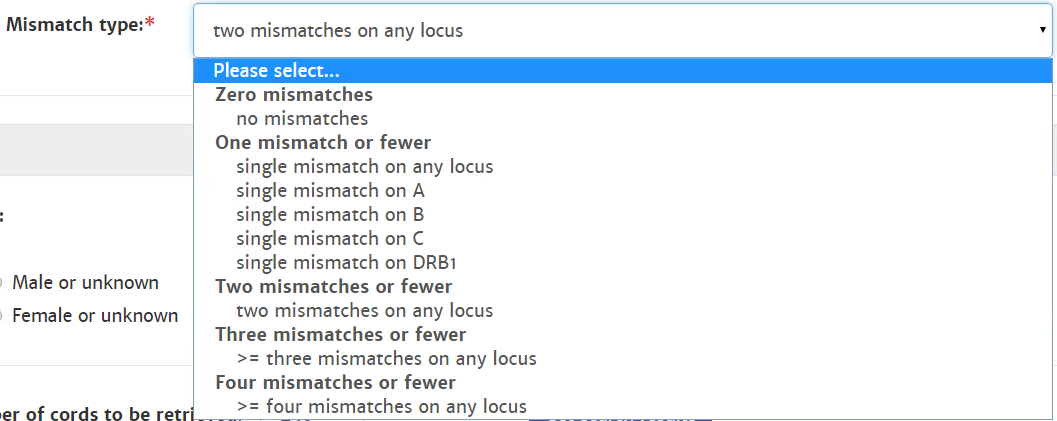
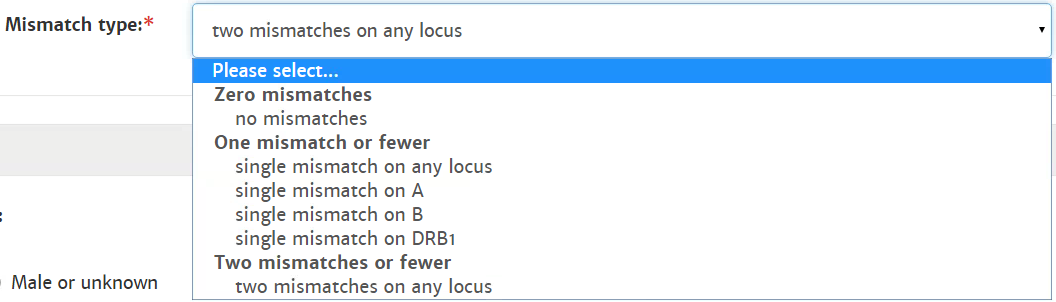
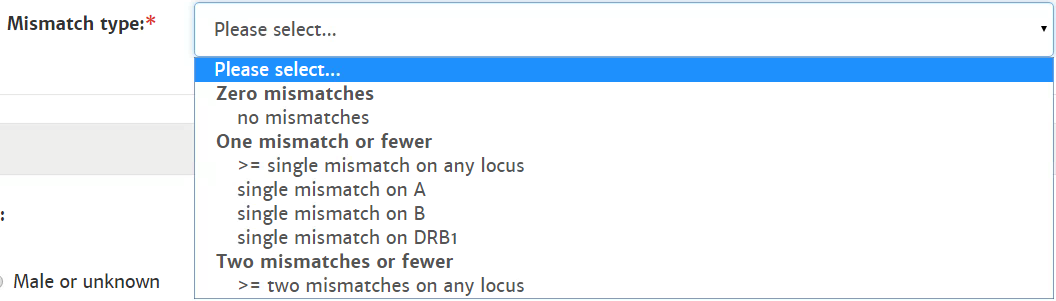
Match type and algorithm
|
|
|
|
|
|

Grouping/Sorting
|
|
|

 |


Filter
At the search settings box you can apply two filters: for CMV and gender. These two filters will not affect the number of search results you get in contrast to on-screen filters, which will be explained later in the match results table.
|
|
|
|
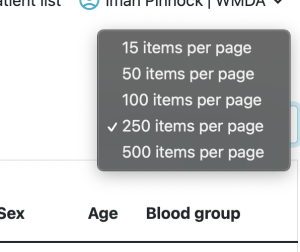
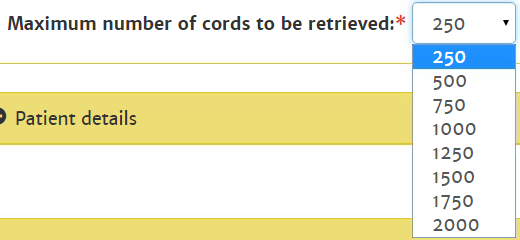
Maximum number of records
Actions | Description |
Change maximum number of records displayed | The system by default shows you 250 search results. You can expand this to either 500 , 750, 1000, 1250, 1500, 1750, or 2000 records.records or reduce it to 14, 50 or 100 records per page.
After you have selected another maximum number, click on the "Get search results" button to retrieve the extra records. PLEASE NOTE: If you do increase the number of results displayed, the search and/or applying of filters will take longer to perform in this case. |
...
| Imagefloat | ||
|---|---|---|
| ||
|
|
|
|
|
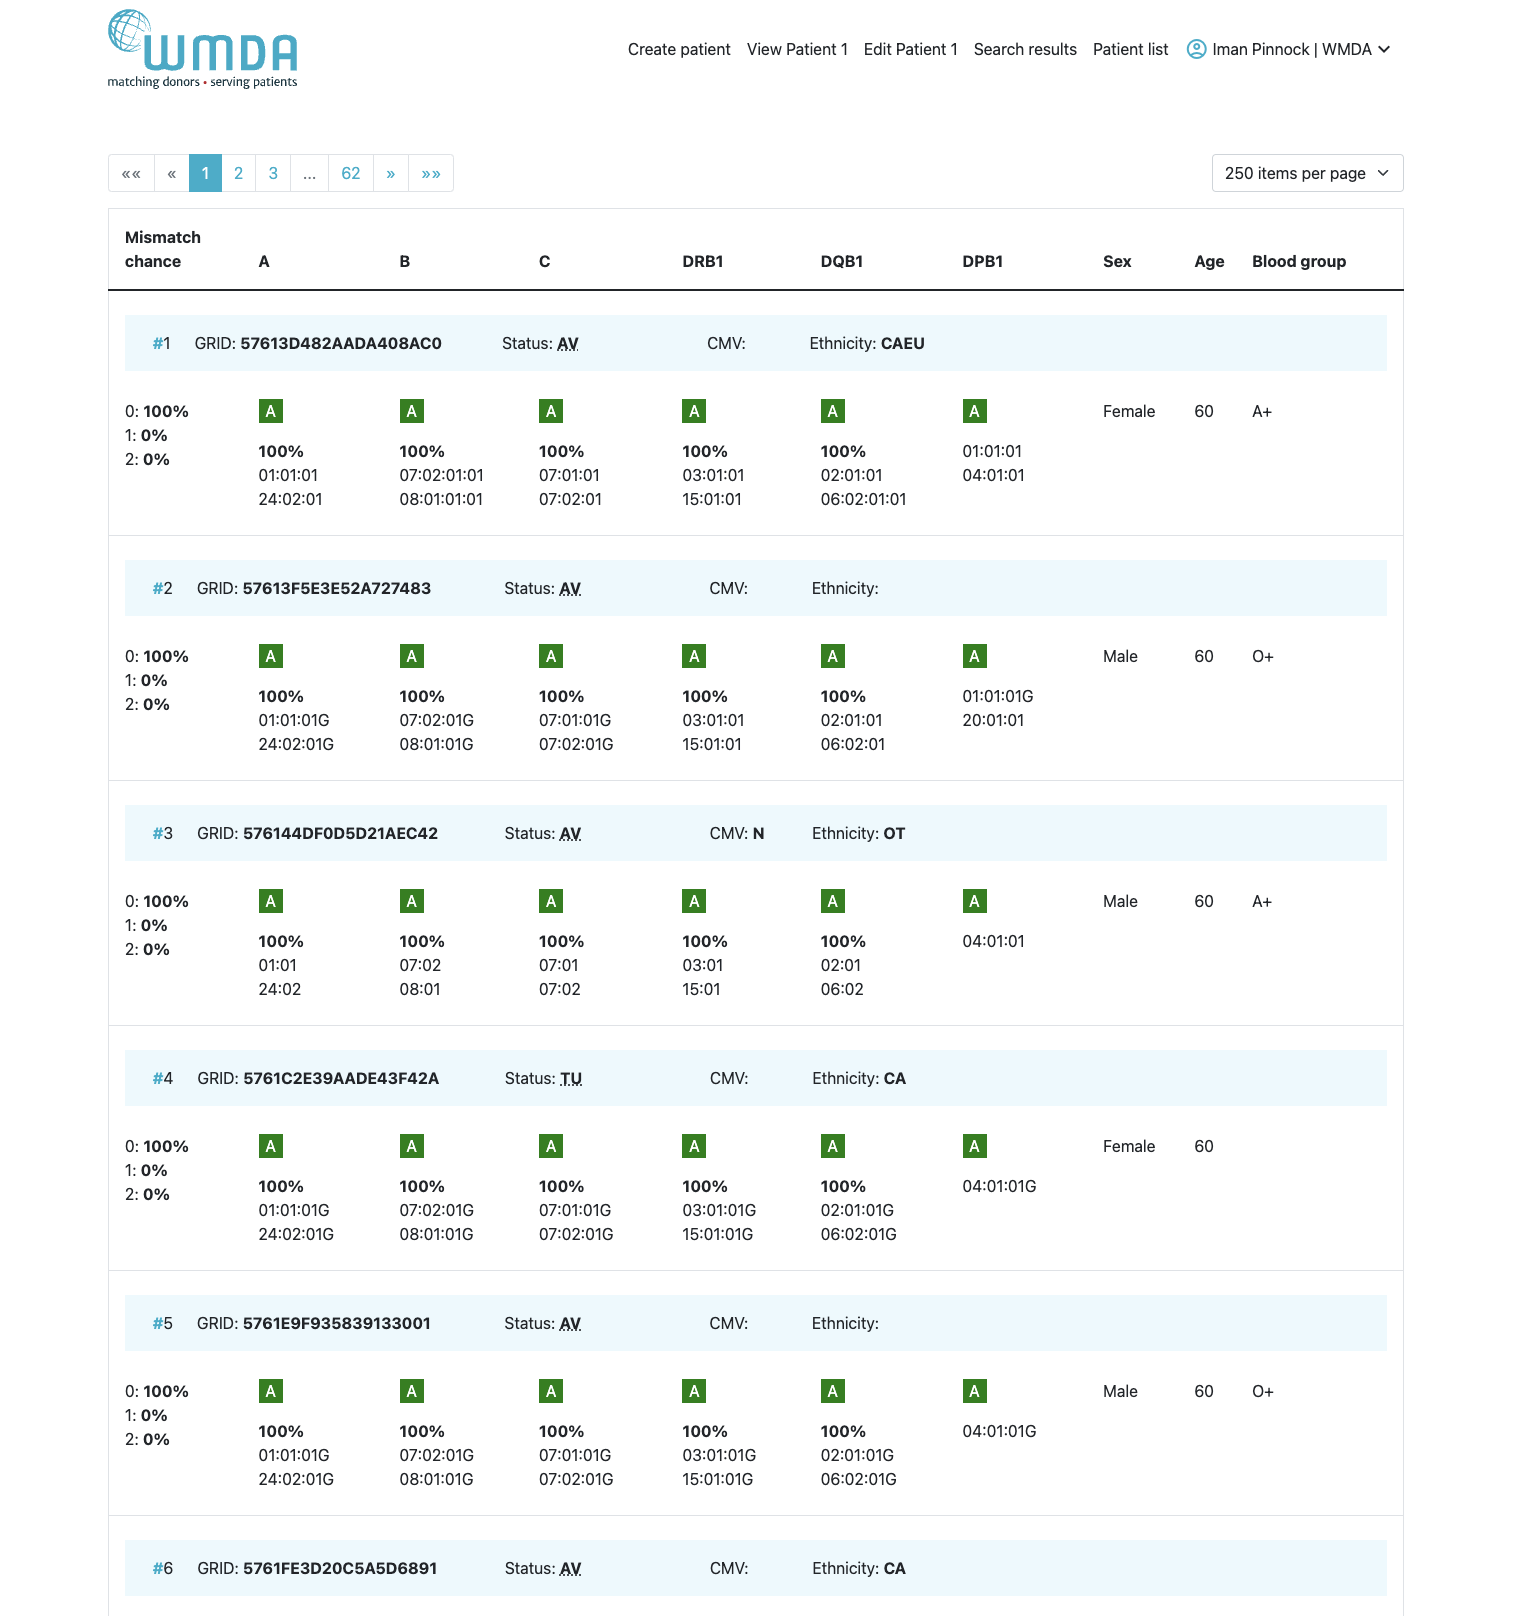
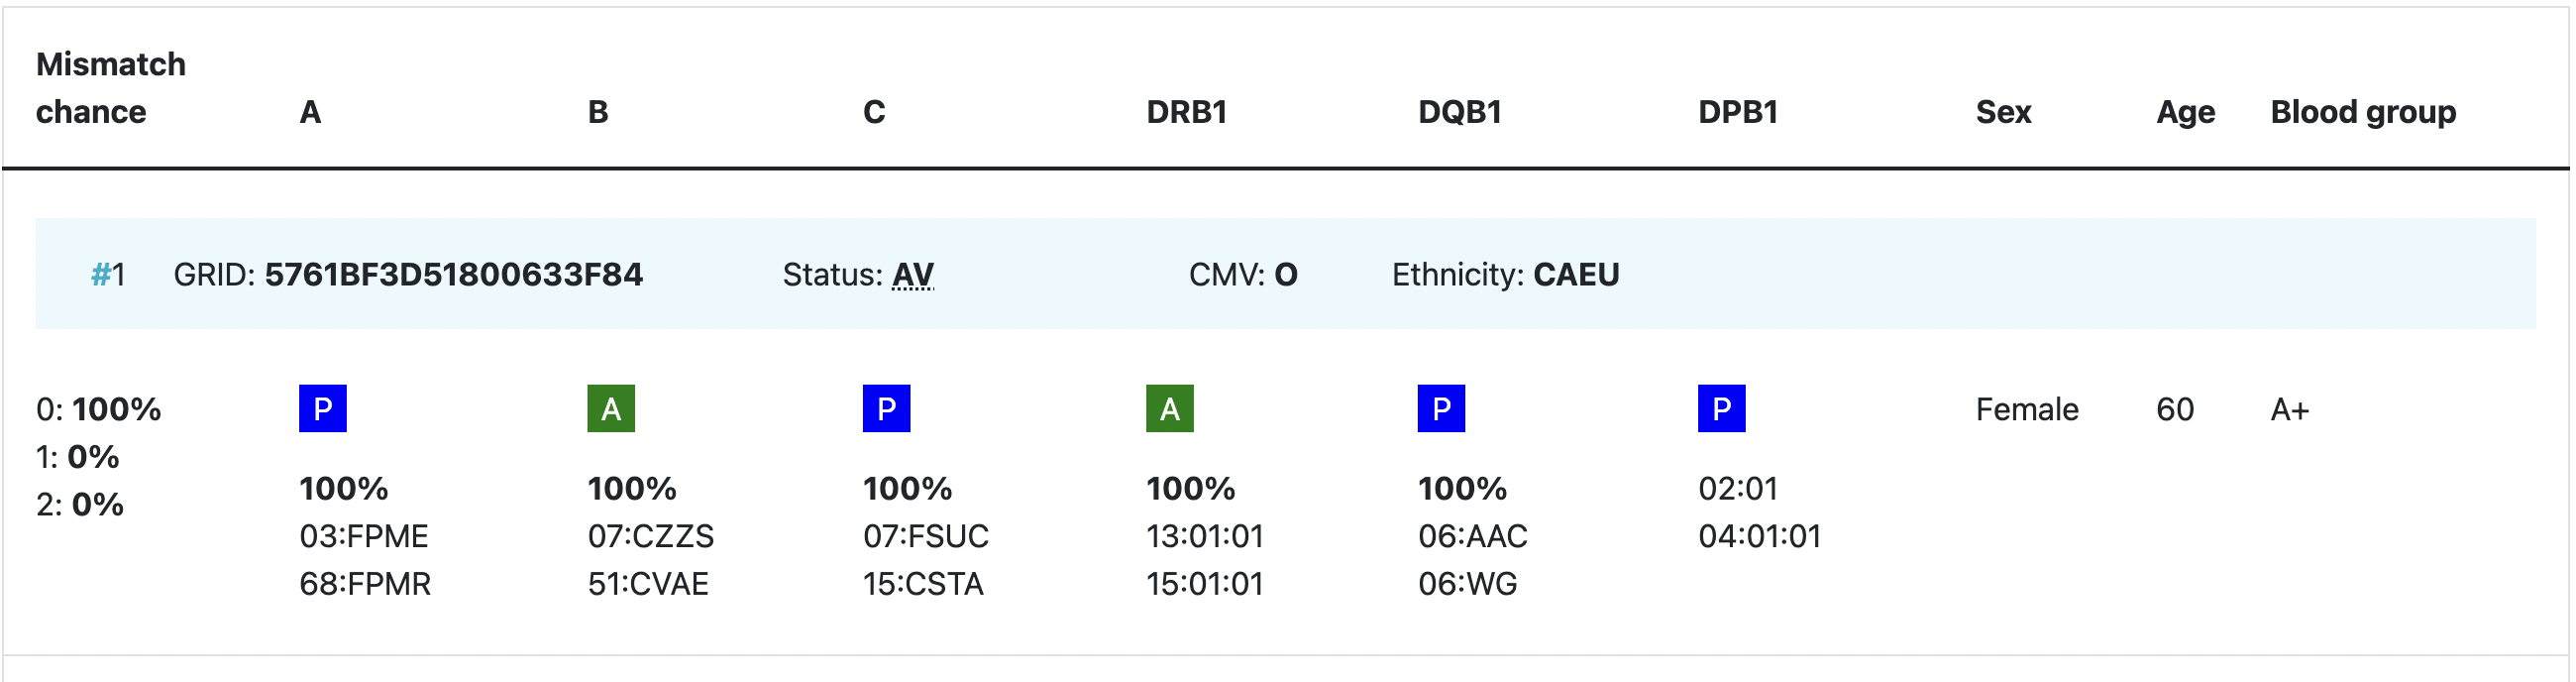
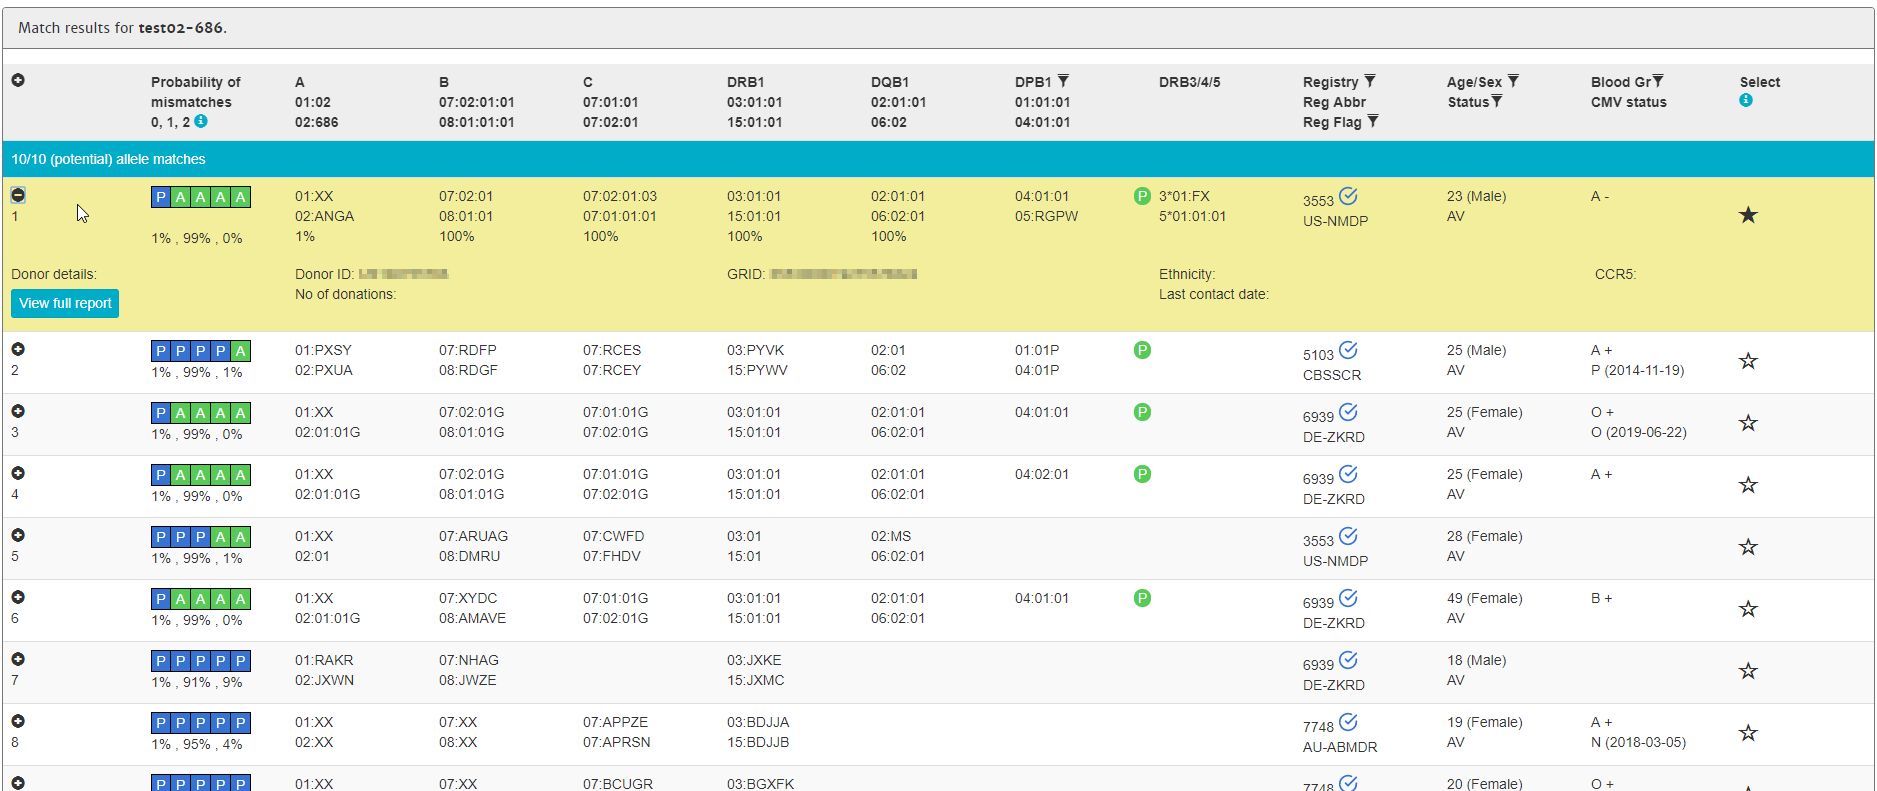
Match results table
An overview of the match results table of donor search results and cord search results are shown in figure 16 and 17. These results are from searches using the haplotype frequency algorithm. When you are using the allele frequency algorithm, the percentages for the probability of mismatches are not shown.
...
| Imagefloat | ||
|---|---|---|
| ||
|
Overview of cords match results
| Imagefloat | ||
|---|---|---|
| ||
|
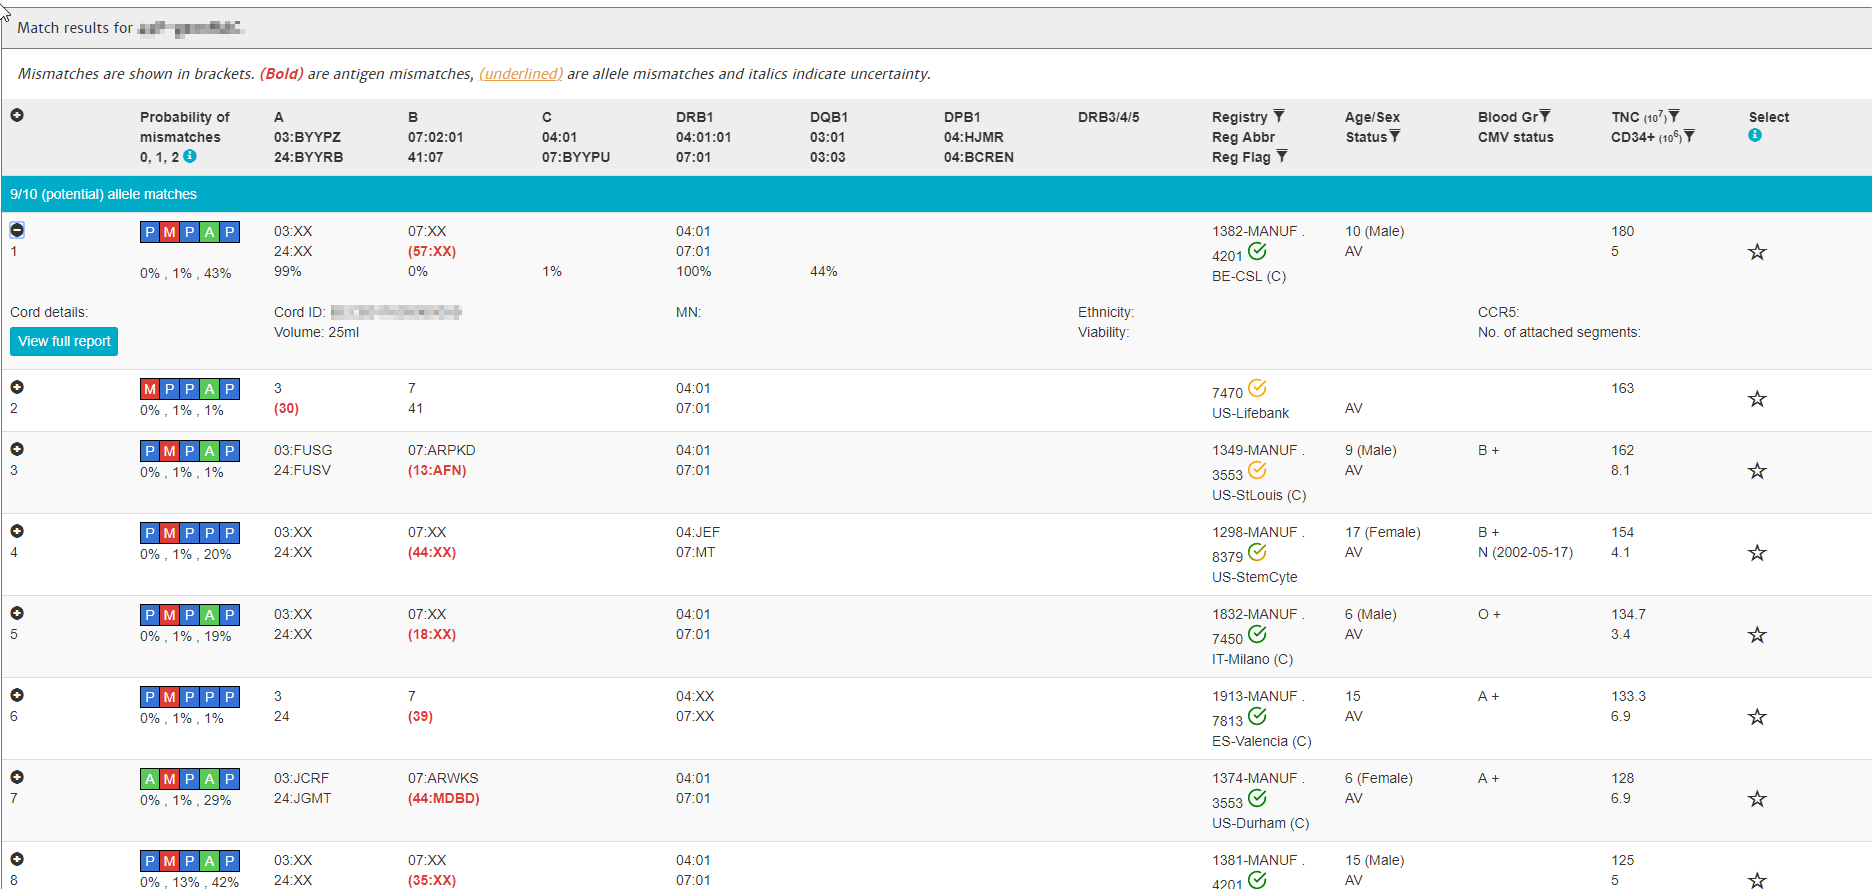
Explanation colours, abbreviations, percentages and codes
Abbreviation / column | Description |
| HLA patient | In the grey bar, you can find the HLA of your patient. This header will move with you when you are looking at results more below.
|
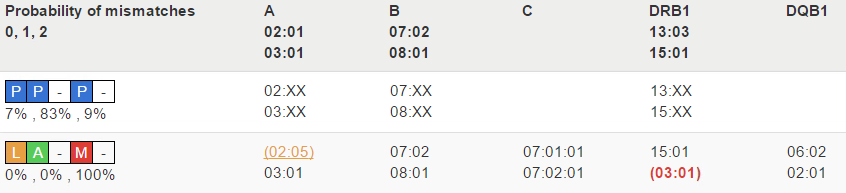
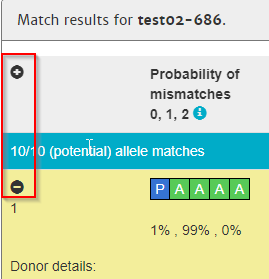
Probability of mismatches 0, 1, 2 | Probability of a mismatch at 0 loci, 1 locus, and 2 loci. The percentages are only shown when you are using the haplotype frequency algorithm and are based on the match type you have been chosen (out of 6 then 6 loci are considered; out of 10 then 10 loci are considered). The five squares above the probability percentages are representing, respectively, locus A, B, C, DRB1, and DQB1. They are showing in letter/colour codes if a certain loci of a donor/cord is likely to match with your patient or not.
NOTE: When you are using for cords the match type ≥4/6 (at HLA-A, B, DRB1), Class I matched at antigen level and Class II matched at allele level, the probabilities are calculated based on allele level match for all loci and not only for DRB1. |
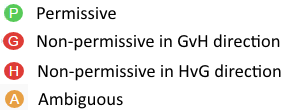
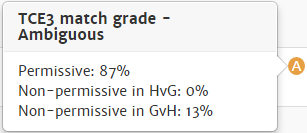
| DPB1 TCE3 grading model | Various studies have shown a potential beneficial effect if the HLA‐DPB1 classification based on T‐Cell Epitopes (TCE) is considered in donor selection. Among the 9/10 and 10/10 donor candidates, those with a permissive DPB1 constellation are preferred over those showing a non‐permissive DPB1 constellation. The implementation in OptiMatch is called "DPB1 TCE3 grading" and is based on the following publications and uses the new score based algorithm that was realised with 3 TCE groups [3].
DPB1 TCE3 evaluation is performed and displayed for A, B, DR typed donors under the following conditions:
The results of the DPB1 TCE3 grading is shown below the donor’s DPB1 values by using the following symbols:
The explanation of the symbols is also provided when hovering the symbols.
|
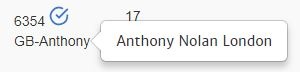
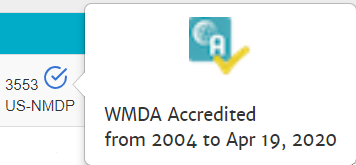
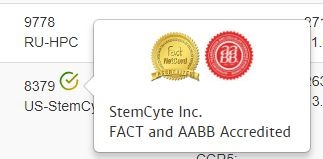
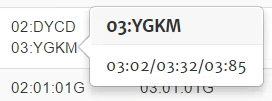
Registry Reg Abbr | This column shows you the ION code of the registry or cord blood bank where the donor or cord is registered followed by the abbreviated name. When you hover over the abbreviated name, the full name becomes visible. This column may also shows you an icon that indicates that the registry is either WMDA accredited or WMDA qualified. If no icon is present next to the ION code, then the registry is not WMDA qualified or accredited.
When you hover over the icon, the icon indicates whether the registry has been WMDA qualified or whether the registry has been fully accredited. Also the validity period of the qualification/accreditation is visible.
When viewing a CBU search report you can also determine from the icon whether or not the cord bank is accredited and what accreditation they have.
When you hover over the icon, it displays the accreditation status the bank has. |
Age | Age of donor/cord |
Gender | Sex: M = male, F = female |
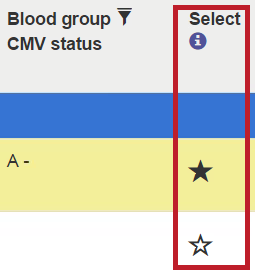
Blood group | Blood group, e.g. A+ = blood group A, rhesus positive, B- = blood group B, rhesus negative |
|
|
|
|
|
|
| |
|
|
| |
|


|
|
|
|
| |
| |
| |
|


Registry Code information
The box with registry code information shows all the ION codes with their registry name and abbreviated name. By clicking on  before the registry name, you are redirected to the organisational information (like addresses, phone numbers etc) of the registry on WMDA Share.
All columns in this box can be sorted.
In the match table itself, you can also hover over the ION code to see the name of a registry.
| Imagefloat | ||
|---|---|---|
| ||
 |
G/P-Code information
The box with G/P- Code information shows you which alleles are included in G or P codes that are used in the match results table. In the match table itself, you can also hover over the G or P code to see which alleles are included.
| Imagefloat | ||
|---|---|---|
| ||
|

NMDP Code information
The box with "NMDP Code information" shows you which alleles are included in the NMDP codes that are used in the match results table. In the match table itself, you can also hover over the NMDP code to see which alleles are included.
| Imagefloat | ||
|---|---|---|
| ||
|

Print report
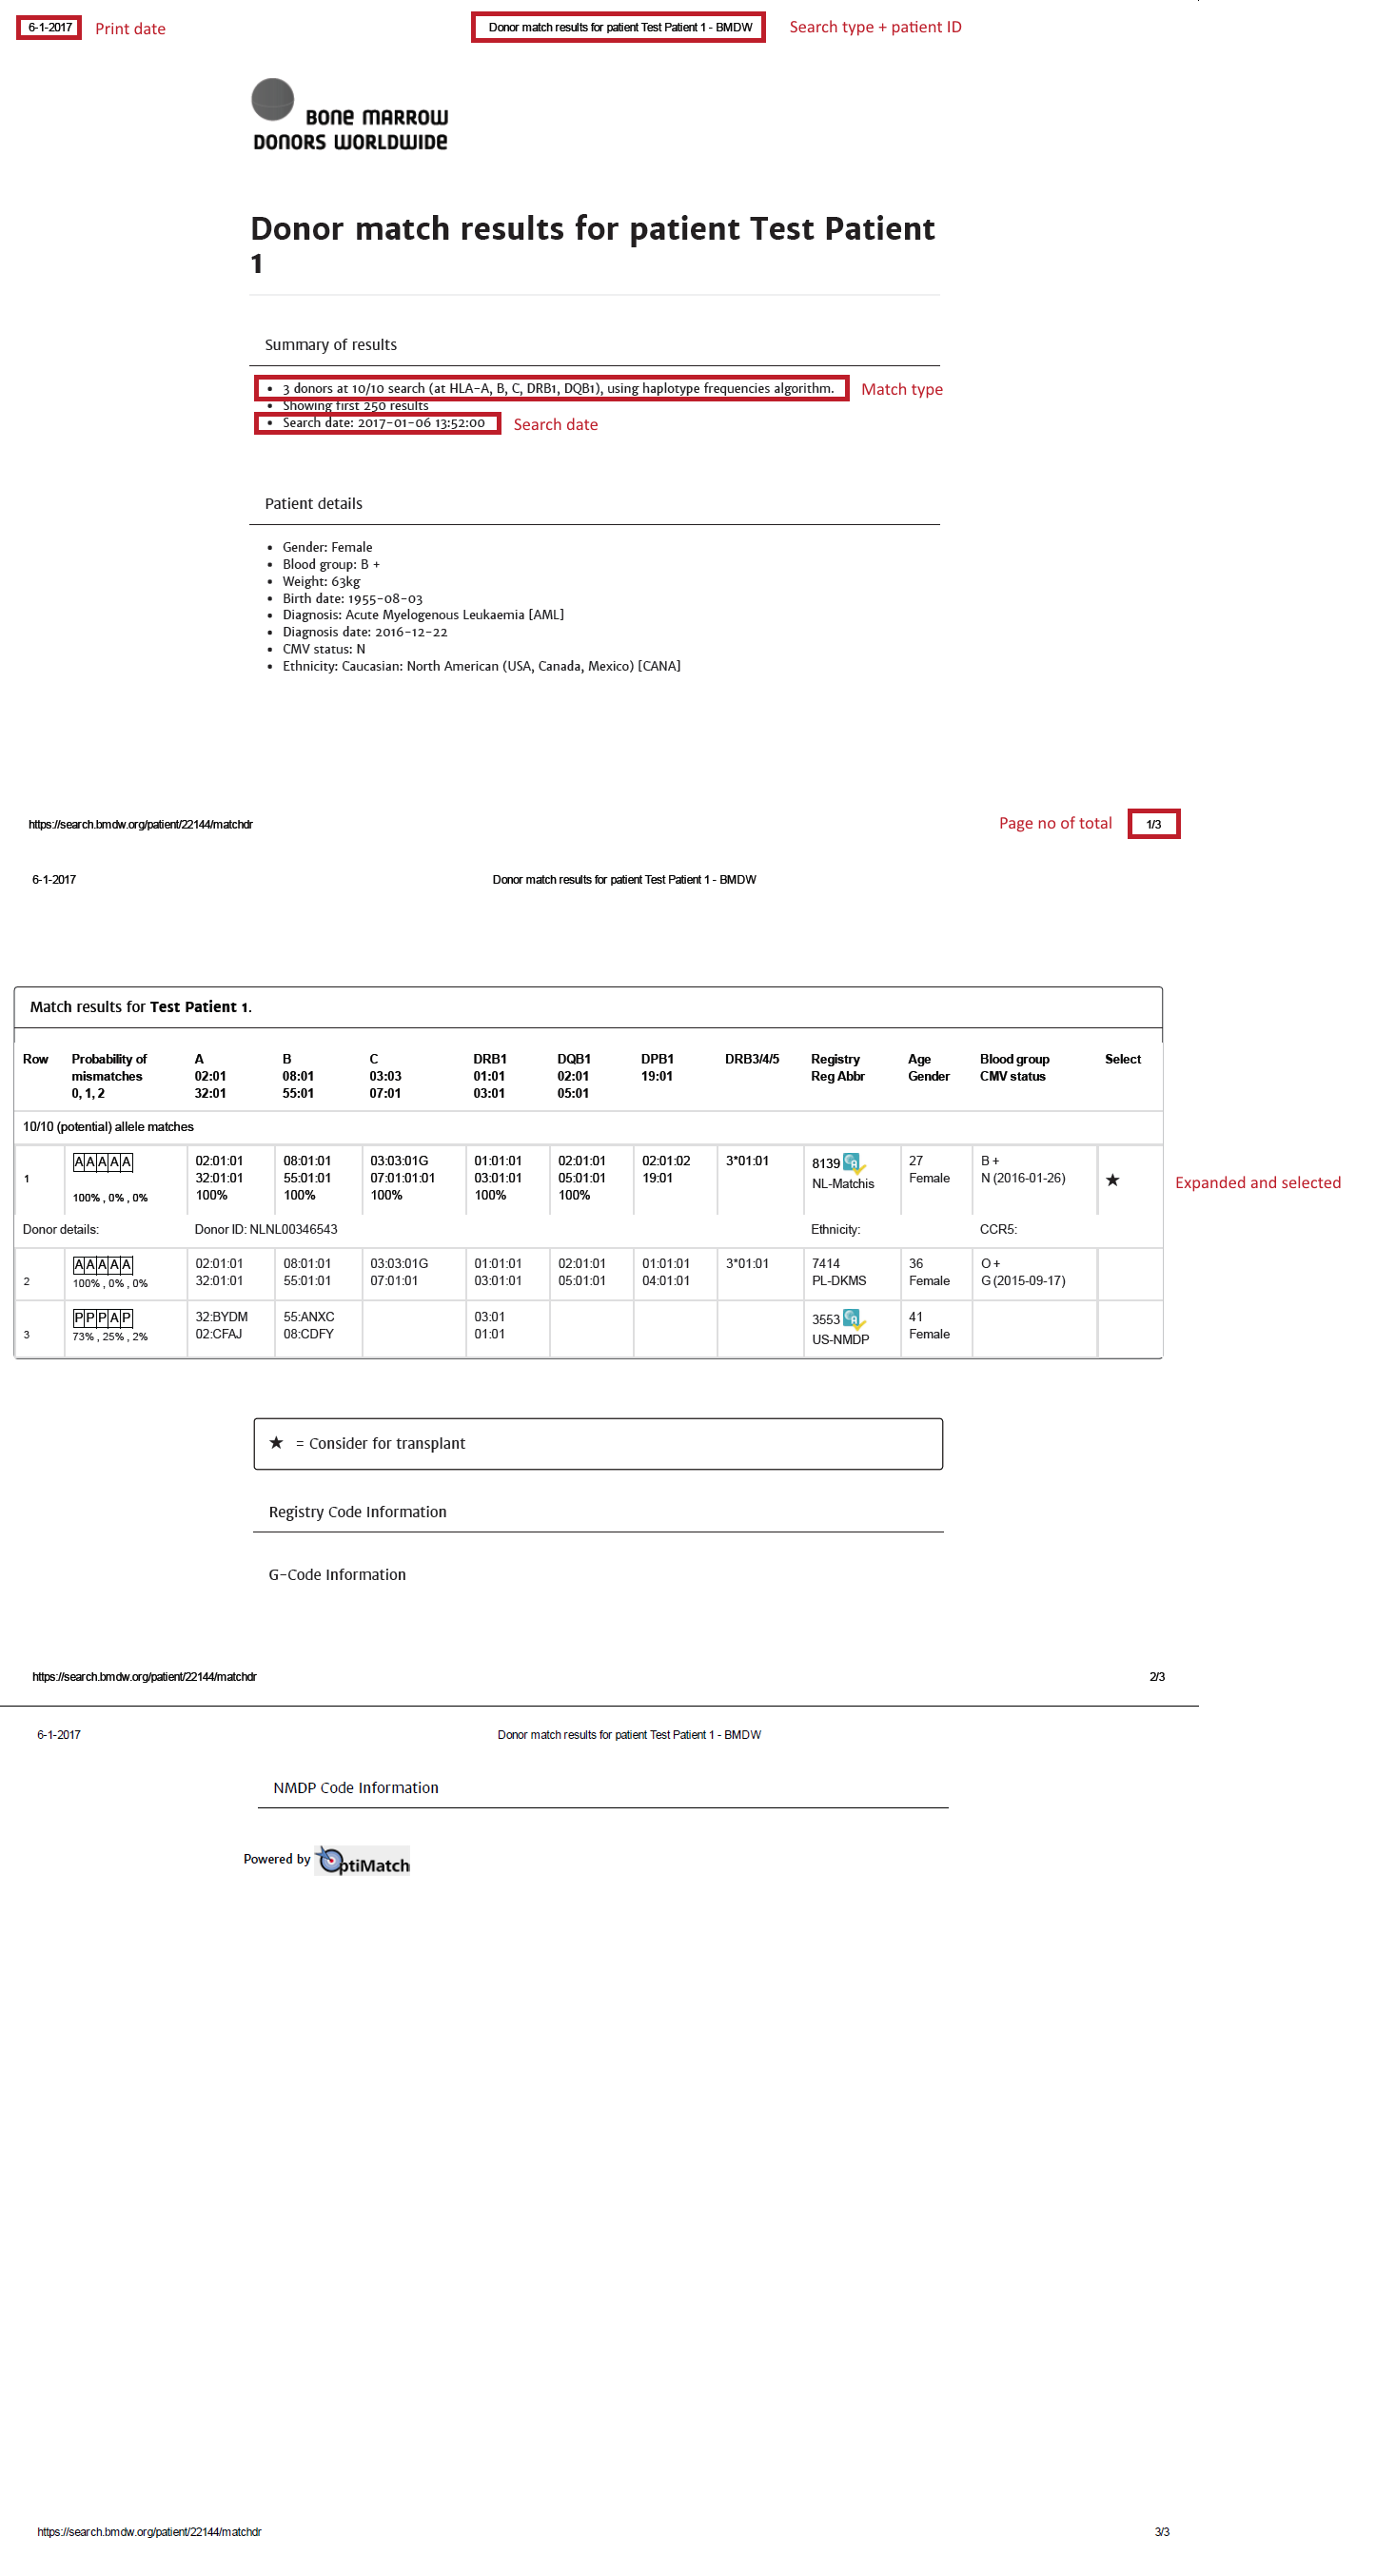
The print report button is located in the box with the summary of results at the search results page.
When you click on one of these buttons, a print job will be generated and you can either print it directly to a local printer or you can print it to pdf to save the results. The layout of the print report should be set to landscape to provide you the most optimal print.
The print report is currently only available in black and white.
The print report contains the following expanded boxes from the Search results page:
Search type with the patients IDSummary of resultsPatient detailsMatch results table
The following sections are only expanded in your print if you have expanded them on your screen:
Registry code informationG/P code information (if shown on screen)NMDP code information (if shown on screen)
NOTES:
Do NOT use the print functionality of your browser (e.g. ctrl+p); you will not get the appropriate layout.
If you are experiencing problems with printing, please first check if your browser is updated to the newest version.
| |
| |
|
NOTES:
Sometimes the front page is divided over 2 pages, depending on the amount of patient details and the size of the summary of results (can be larger when filters are applied).
The search date can be different from the print date. The search date should be leading if you need to determine if you have to repeat a match run for new donors/cords.
| Imagefloat | ||
|---|---|---|
| ||
|
Footer
The footer section of the website contains links to various other useful information for you as a user (figure 23). All links with the icon , link out to another website, WMDA Share. Links with a icon, will open up an e-mail message. The report a problem link is only visible when you are logged into the website.
| Imagefloat | ||
|---|---|---|
| ||
|

Listed below are the links and a short description:
|
|
|
|
|
|
|
|
| |
Links to assist you in your searches
...
| Date | Version | Description | Author |
|---|---|---|---|
| 2016-11-09 | 1.0 | First version for launch | JK |
| 2016-12-05 | 1.1 | Updated due to improvements system | JK |
| 2017-01-06 | 1.2 | Updated due to last release of 2017-01-06 | JK |
| 2017-10-13 | 1.3 | Updated due to last release of 2017-10-13 | JK |
| 2020-02-25 | 1.4 | Updated screenshots and added useful links | LF/MM |
| 2022-04-08 | 1.5 | Updated screenshots and descriptions | IP |