Haga clic aquí para la versión en español de esta página
Version 2.5
Introduction
The WMDA Search & Match Service is a web-based software application that can be accessed through the internet. This service provides authorized users with a single, comprehensive application that can be used to search for and find matches for donors and cords. The WMDA team is constantly working on developing the Search & Match Service in response to user requests. If you require any information or want to send us a request, please send an email to support@wmda.info
About this document
This document is designed to act as a reference guide covering the most important aspects of the Search & Match Service.
Content
This guide is organized to help you understand the different parts of the Search & Match Service, with each chapter covering a different aspect of the service. It's important to know that the instructions in this document assume that you have already logged into the service as a user with the right access permissions. To learn how to set up and log into the Search & Match Service, you can refer to the MFA User Guide. This guide explains how to log in for the first time and set up Multi-Factor Authentication verification, which is necessary to use the service.
Please be aware that while we have tried to make this guide as accurate as possible, there may be some differences between the current version of the guide and the software. If you notice any missing information or significant differences, please let the WMDA office know, and we will try to update the guide quickly as the software changes.
We are confident that this user guide will provide you with valuable information to help you use the software effectively and gain a good understanding of the basic concepts.
Further Sources of Help
This guide aims to help users of the Search & Match Service to effectively perform specific aspects of the process and to manage record information. If you encounter any technical difficulties in using the system and cannot resolve them by reference to this user guide, please contact the WMDA office at support@wmda.info.
Data Handling Procedures
Users of the Search & Match Service must comply with the data security and handling requirements. Access to the Search & Match service is only allowed when your organisation has signed the Data Use Agreement (DUA). See Understanding Data Protection Regulation - a guide for WMDA members for more info. Once you extract data from the system, you are responsible for its security in accordance with the DUA signed with the WMDA, your national legislation and your local department data handling policies and procedures.
Generic Principles
This user guide provides you with instructions on how to use the Search & Match Service with the use of figures, data and examples. It is designed to assist you with searching for donors or cords and provide you the best potential match to your patient.
Important information:
- The Search & Match Service uses the Hap-E Search and ATLAS matching algorithms that help to provide probability matching using haplotype frequencies. For more information about haplotype frequencies, visit this web page.
- The Search & Match Service uses asynchronous matching, meaning that your searches will keep running even when you are using other features in the system or after you have logged out.
- The Search & Match Service is browser agnostic, therefore it has been programmed and optimised for use with the latest versions of a few browsers like Mozilla Firefox, Microsoft Edge, Safari and Google Chrome. The Search & Match Service is also compatible with laptops, PCs, tablets and mobile devices; the service loads on a phone/tablet, but the search results do not work well as the web service has not been optimised for smaller screens due to the large amount of data.
- As the Search & Match Service is a web-based application, it may be subject to delays depending on the speed of the internet connection and server load. If you are not able to access the login screen of the application, please check that your internet connection is in proper working order.
- In certain instances, if you close your browser, the browser window or the tab in which the Search & Match Service is running, new entries or modified data will be lost unless you have clicked Search beforehand. It is therefore select the 'search' button after every change is made!
- WMDA collects the data from donors and cords on behalf of the listing organisations, and Hap-E Search and ATLAS are connected to this database to perform the probability matching algorithm.
- The Search & Match Service is secured using HTTPS. Because of this all communication between the web browser and server are encrypted, guaranteeing data privacy and security.
- Please always exit the application by clicking on the Logout button. You will then be logged off and the application will close.
- The Search & Match Service is accessible at all times, excluding unavailability due to planned downtime for upgrades or maintenance. Periods for planned downtime will be communicated well in advance so please keep an eye out for these notifications on your dashboard.
- The Search & Match Service is currently only available in the English language; please indicate if you would like to have it available in another language as well.
- Cookies and Java Script need to be enabled to be able to use the Search & Match Service properly.
- Generally you should avoid using browser buttons such as < (”back one page”) or > (”forward one page”), as by going ”back one page” the previous action (saving, etc.) could be performed again.
- Next to some fields or functionalities you can find an
 icon with more explanation.
Supported operating systems and browsers
The Search & Match Service is browser agnostic. The Search & Match Service is compatible with laptops, PCs, tablets and mobile devices; the service loads on a phone/tablet, but the search results do not work well as the web service has not been optimised for smaller screens due to the large amount of data.
For security and maintainability reasons WMDA can only support the following operating systems:
- Windows 10 and later
- MacOS 11 and later
Other modern operating systems and versions may work, but are not supported.
Supported browsers and versions are:
- Google Chrome (latest stable version)
- Firefox (latest stable version)
- Microsoft Edge (latest stable version)
Please note that the use of old versions of operating systems and/or browsers may lead to security issues and the loss of functionality. For security reasons the use of insecure versions of operating systems and browsers is not allowed.
VERY IMPORTANT NOTICE about probability matching
The Search & Match Service performs probability matching by using the Hap-E Search (from now on Hap-E) and ATLAS algorithm. Both Hap-E and ATLAS differ from the legacy matching algorithm Optimas. There is a difference in the meaning of the indicated probabilities per locus between Optimas, Hap-E and ATLAS. For more information about the features in Optimas, Hap-E and ATLAS please consult our Feature comparison Matching engines page. For more detailed information about feature differences between Hap-E and ATLAS specifically please consult our 'Features Hap-E and ATLAS' page. Please keep in mind that probability matching will only calculate matching chances. Therefore, you should use it as a tool in combination with your own knowledge of HLA. Do not select donors/cords solely based on the probabilities calculated by the system. You can read more about haplotype frequencies here.
Getting started
Accessing the Search & Match Service
You can access the Search & Match Service via the following web addresses (URL) or by manually entering the addresses:
Sandbox environment (for testing purposes): https://sandbox-search.wmda.info/
Production environment: https://searchmatch.wmda.info/
You can save a bookmark in your browser, e.g. for the Search & Match Service, so that you are immediately directed to the login page.
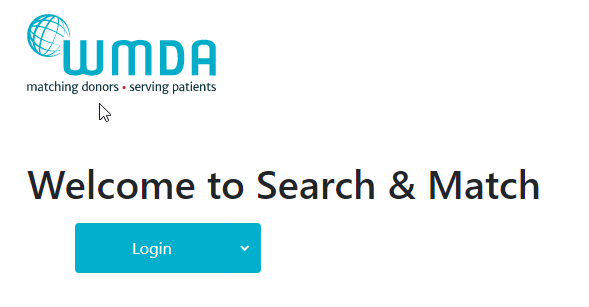
Figure 1: Login screen of the Search & Match Service.
Note: Group accounts are not allowed and with MFA it is also harder to handle for end users since the extra factor should be owned by a single person.
The system defaults to the general dashboard on the Search & Match Service homepage. Here, you can find find information about the match engine load will find your dashboard and some practical information and useful links.
From this landing page, you can navigate to the 'patient list' or 'add patient' section or your personal account settings.
Tip: If you haven’t changed your password for a long time, we recommend that you do so to ensure your profile is secure. We recommend that you change your password every 6 months.
Logging off
To close and exit the application click on your name on the top right part of the page and a Logout button will appear (figure 4), once clicked, it will take you to the log out screen. After logging out of the system, you will be redirected to the login screen.

Figure 2: Logout
Note: Please do not simply close your browser; otherwise your unsaved data may be lost.
Navigational Toolbar
The Navigational Tool bar is displayed across the top of the screen. This toolbar is also referred to as ribbon in some instances. This toolbar displays links that take you to the specific section you wish to view/manage.
Listed below are the links/buttons and a short description:
Button | Description |
Logo | Links to WMDA website. |
| Dashboard | Link to the main page of the service, displaying visual data, quick links for "Add Patient" and "Patient List", some practical information and useful links. |
Add Patient | This opens a form that allows users to register the details for a new patient and initiate a donor search. |
Patient List | This section lists all active and inactive patients. Within this section users are allowed to manage their own or organisational patients. |
User name/profile | This section contains links to the personal preferences page and logout functionality. These buttons become visible once the username/profile is clicked. |
Preferences | Links to a page where you can set your personal preferences. |
Logout | This action will sign you off and return you to the login page. |
Add patient, update patient, view patient
This section allows you to enter and register a patient that you wish to perform a donor/cord search for. You can register a patient manually or automatically through an API.
Register your patient manually
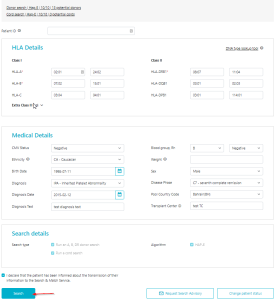
First click the "Create Patient" button. You will then receive a pop-up asking you whether the patient has consented to being entered on the list. When you do not have the patient's consent, please indicate this. You will then not be able to enter a patient ID, but you will still be able to enter HLA and additional details and perform an anonymous search. The first form shown below in figure 3 is only used for entering new patient registrations, the second form is for updating existing patients. When entering data, make sure that the fields marked with a red asterisk (*) are completed as they are mandatory in order to perform a search. In some of the fields (CMV, blood group, ethnicity, diagnosis, sex) values can be selected from a pre-defined drop-down list.
The form is divided into 5 blocks: HLA details, medical details, search type, additional information, and legal terms.
The "update patient" form is accessed by clicking on a patient in the patient list.
When entering a Patient, only the following fields are mandatory:
- Patient ID (ID assigned by your organisation; it is NOT allowed to enter any part of the patient's name anywhere on this page.). Only enter a patient ID when you have the patient's consent for doing this.
- A valid HLA-A, -B, and -DRB1 phenotype
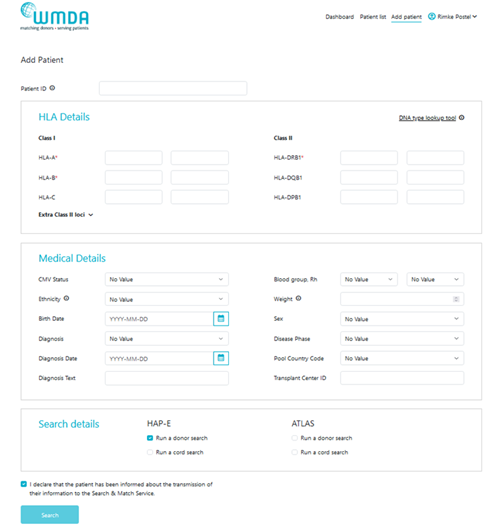
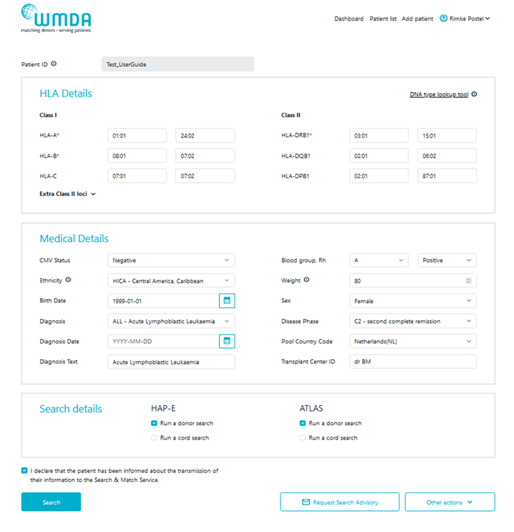
Figure 3: Add patient form and view/update patient form
On saving a record by clicking the 'search' button, your entries will be checked immediately for plausibility and completeness. If a record is not plausible, an error or warning message will be displayed below the relevant field.
As part of capturing all of the patient details we recommend that you add all relevant additional data that will help you make a better judgement for your patient.
Other things to consider when entering patient details:
- The patient ID should be unique and the system will check for duplicates when you validate the data by clicking on the Add patient button.
Please make sure to never include any personal information about the patient in the patient ID, such as first and/or last name - HLA should be entered with a colon (:) as separator.
- HLA strings cannot be entered into the HLA fields; you can use the DNA Type Lookup Tool at the top right corner to lookup the corresponding MAC code.
- During matching the entered HLA values will be converted to one or more g/p groups and all further matching calculations will be done at that level.
- Dates can be entered either by using the calendar or just by typing. When you enter the date manually, please ensure they conform to the ISO date format of YYYY-MM-DD which is also shown in light grey (mask) in the date fields. Date of birth can also be in the future.
- Use the tab key to move from field to field. When using the tab key on the HLA fields, the cursor will move as such that you can first enter both locus values, before moving to the next locus.
- After you are finished entering the patient's details, please click on the "Search" button at the bottom of the page. This will trigger a validation of the entered data.
- If the system finds any issues it will highlight the errors in RED at the top of the form stating the reasons for it not saving the data, and will also display warnings in AMBER.
- If the system detects no problems, then the details entered are stored in the database and the selected match run is automatically triggered for the patient.
- When a search type and Algorithm are selected, the system will attempt to start to run a 10/10 matched search by default.
However, this is dependent on the number of HLA loci completed for the patient. If only HLA-A, B and DRB1 are entered for a patient, then the search will default to a 6/6 search and if only HLA-A, B, C and DRB1 are provided it will default to an 8/8 search. - If you only want to register your patient, make sure that all the check boxes for donor/cord search for both search engines are unchecked. This prevents the triggering of a search.
- If you did not enter HLA from your patient for all 5 loci; A, B, C, DRB1, DQB1, the system will not perform a 10/10 match run, but will downscale the match run to either 8/8 or 6/6 depending on the amount of HLA loci available from your patient.
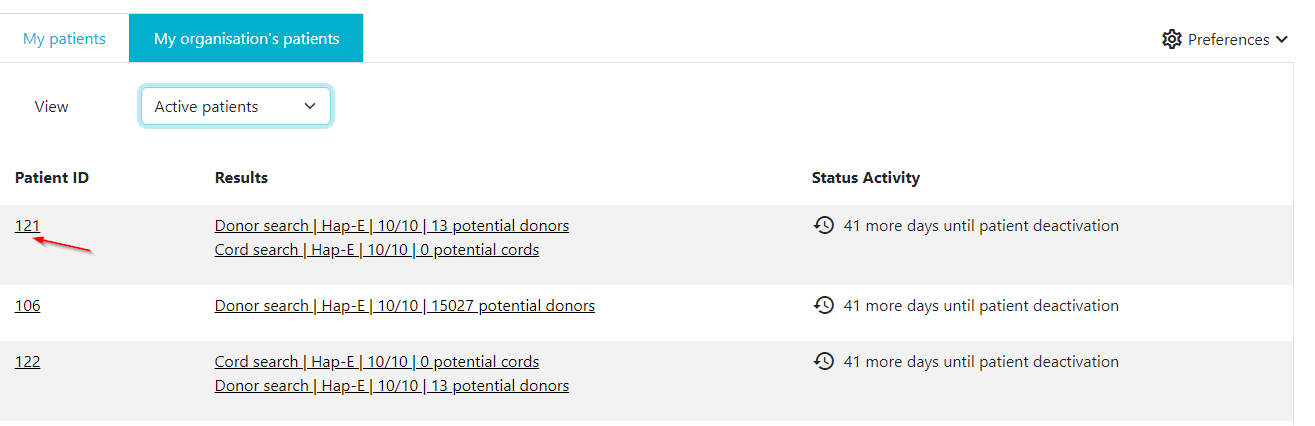
Patient List
Within each category you can view a list of your own patients or a list of all patients from your organisation:
- All patients
This section displays all patients: patients in 'NEW', 'ACT', 'PRE', 'SUS' and 'STP' state - Automatic refresh patients
This section displays all patients that are not inactivated for which searches will be automatically refreshed 3 times every week: patients in 'ACT' state - Static patients
This section displays all patients that are not inactivated for which searches will not be refreshed automatically: patients in 'NEW', 'PRE' and 'SUS' state - Available patients
This section displays all patients that are not inactivated: patients in 'NEW', 'ACT', 'PRE' and 'SUS' state - Inactive patients
This sections display all inactivated patients: patients in 'STP' state
Figure 4a shows the patient list sections
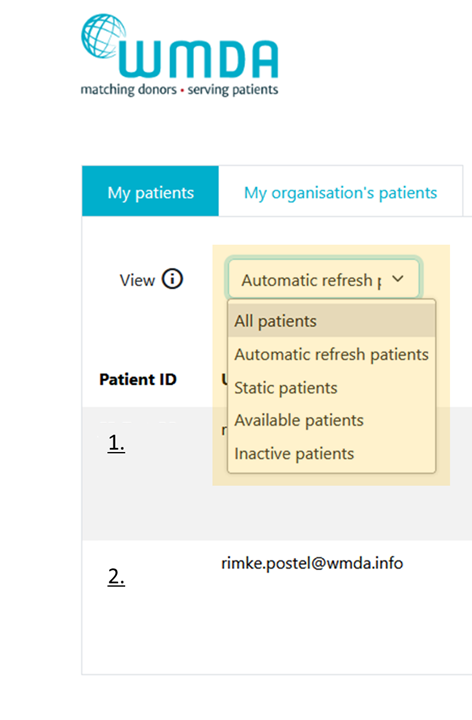
Figure 4a: Patient list sections
Figure 4b shows the patient list as displayed in every section
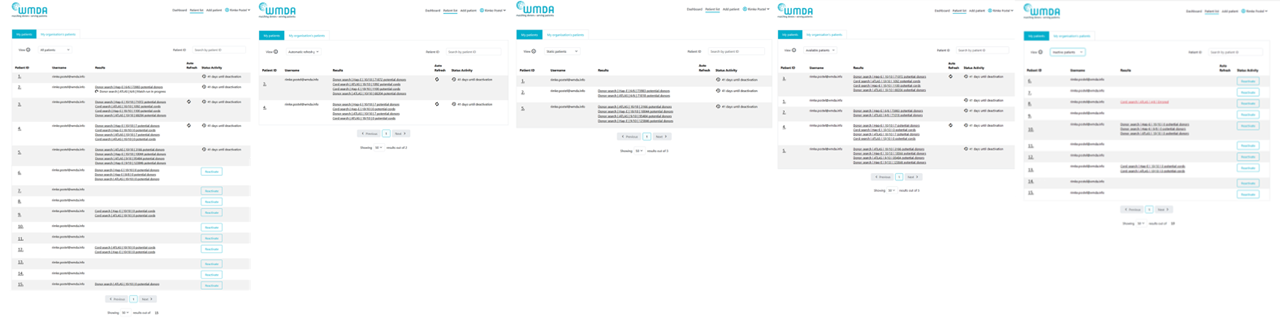
Figure 4b: Patient list as displayed in every section
Within the table of listed Active patients you can manage your patients by performing the following actions listed below:
Actions | Description |
Patient ID Link | Clicking on the Patient ID link will open the update patient form to allow users to perform the following functions:
Edit/Update patient details: Modify any details for the given patient, except the Patient ID.
PLEASE NOTE: Update of any of the patients details such as HLA, will automatically trigger a new match run. This might change previous search results. Only if you remove all ticks in the search type block, no new match run is triggered, but any previous search results will be lost as well. |
Search results
Once the match process is completed, the number of matched donors/cords and short summary of the search will be presented in the column "Results" in the patient list. This link redirects you to the search results details. When a user clicks on the search results they are presented with a search results page consisting of the following parts:
- Patient ID
- Summary of search settings used
- Type of search
- Matching engine used
- Loci considered and number of mismatches allowed
- Number of inexplicable donors
- Frequently used filters
- Search results
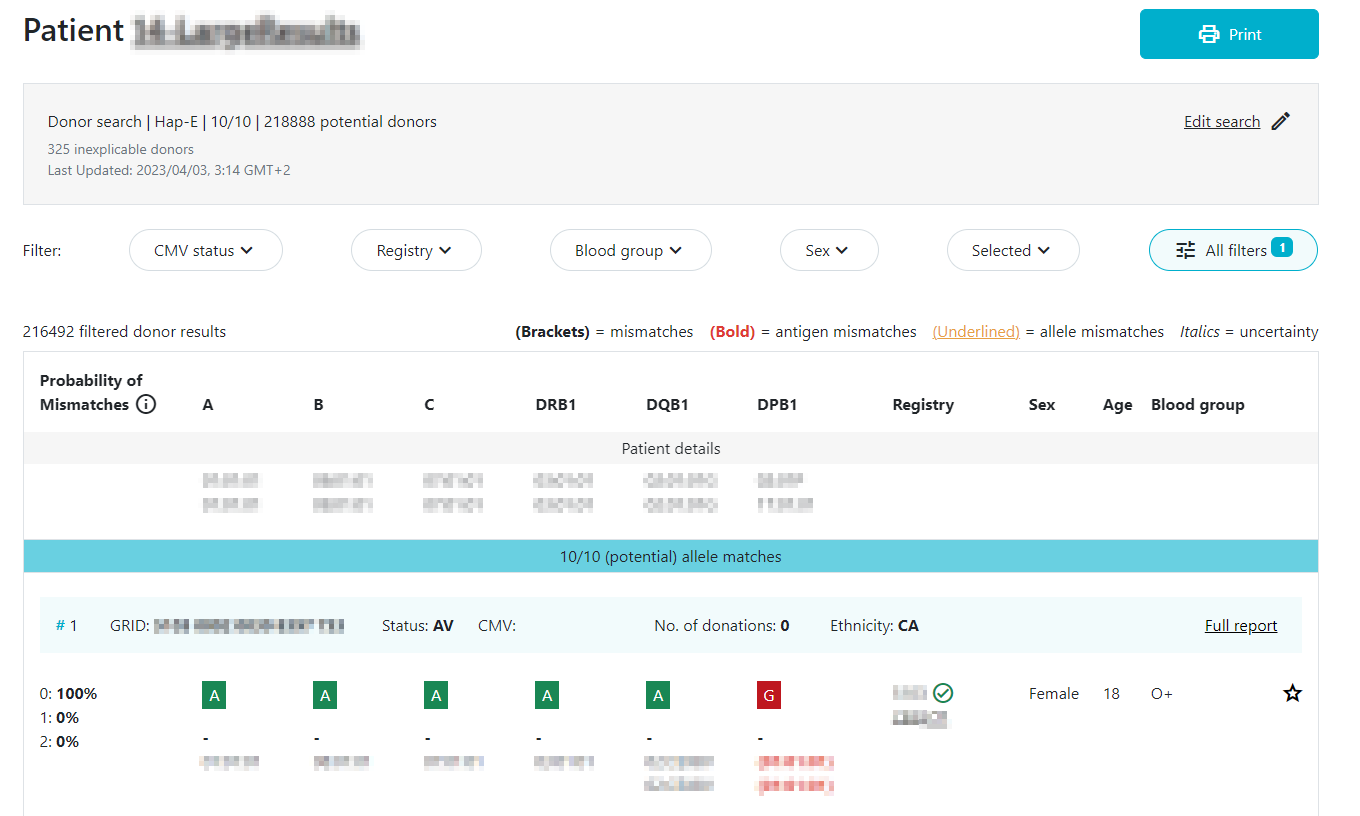
Figure 5: Search results
Inexplicable donors
Inexplicable donors or CBUs are records that have HLA that cannot be explained by a combination of two haplotypes in the haplotype frequency (HF) set for the population that the donor or CBU is part of.
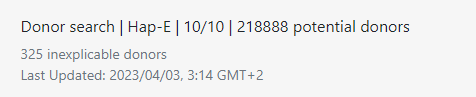
Because the HLA typing of this donor/CBU cannot be explained, the matching algorithm is unable to calculate match probabilities. If these donors/CBU's have any ambiguity in their typing, these records appear on the bottom of the match class that they are part of (e.g. 10/10, 9/10, 7/8). The number of inexplicable donors/CBUs mentioned therefore serves as a reminder that there are potentially relevant search results available that can be found at the bottom of the match class. When there is no ambiguity then the donor will appear at the top of its match class.
What to do when all results do not show any overall probability
When none of the results display an overall probability, it's likely that all outcomes are labeled as "inexplicable." You can identify this by comparing the total number of results with the count of inexplicable donors/CBUs.
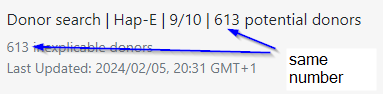
In such instances, it indicates that the patient's HLA makeup cannot be adequately explained by the combination of two haplotypes in the applied haplotype frequency (HF) set. If no specific "Pool Country Code" is designated, the global HF set is utilized. However, if a pool is specified, the corresponding HF set for the given country code is employed.
Resolving the Issue
To render the patient's HLA profile explicable, there are two potential solutions:
Option 1:
Adjust the "Pool Country Code" of the patient to "No Value." This ensures the application of the global HF set, which is more likely to encompass a combination of haplotypes explaining the patient's typing. If this doesn't suffice, setting the "Pool Country Code" to the patient's country of genetic background may be beneficial in some cases.
Option 2:
Retype the patient at high resolution to eliminate any ambiguity in the HLA typing. With all uncertainties removed from the patient's side, the matching engine can calculate matching probabilities.
Upon implementation, the results may display:
- Low and intermediate resolution donors with an overall match probability of 0%. This occurs because there isn't a combination of two haplotypes in the donor's HF set matching the patient's genotype. Note that despite the 0% probability, some of these donors might still be viable matches, particularly if they share the same genetic background as the patient. In the ATLAS matching engine, such donors may not be returned.
- A high-resolution typed donor with a 100% match, although this is improbable considering the patient's highly unique genotype, it remains a possibility.
Maximum number of records
Actions | Description |
Change maximum number of records displayed | The system by default shows you 250 search results. You can expand this to 500 records or reduce it to 15, 50 or 100 records per page. You can do this on the bottom of the search results page. 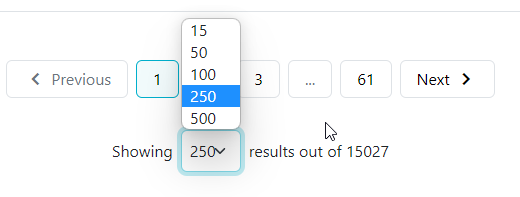
Figure 6: Maximum number of records displayed |
Match results table
An overview of the match results table of donor search results and cord search results are shown in figure 16 and 17.
Donor search
By default the donor match results is as follows:
- HLA match grade (e.g. first 8/8 then 7/8, 6/8)
- Match probability in 10% intervals (descending)
- Donor age (ascending)
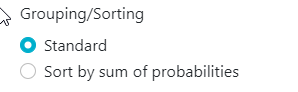
For 1 and 2 mismatch searches, the sorting method can be changed to "Sum of probabilities sorting". You can do this by clicking on the "all filters" button and selecting "Sort by sum of probabilities" under "Grouping/Sorting".
CBU search
By default the cord match results are sorted as follows:
- HLA match grade (e.g. first 8/8 then 7/8, 6/8)
- Match probability in 10% intervals (descending)
- Number of total nucleated cells (TNC, descending)
For 1 and 2 mismatch searches, the sorting method can be changed to "Sum of probabilities sorting". You can do this by clicking on the "all filters" button and selecting "Sort by sum of probabilities" under "Grouping/Sorting".
Overview of donor search match results
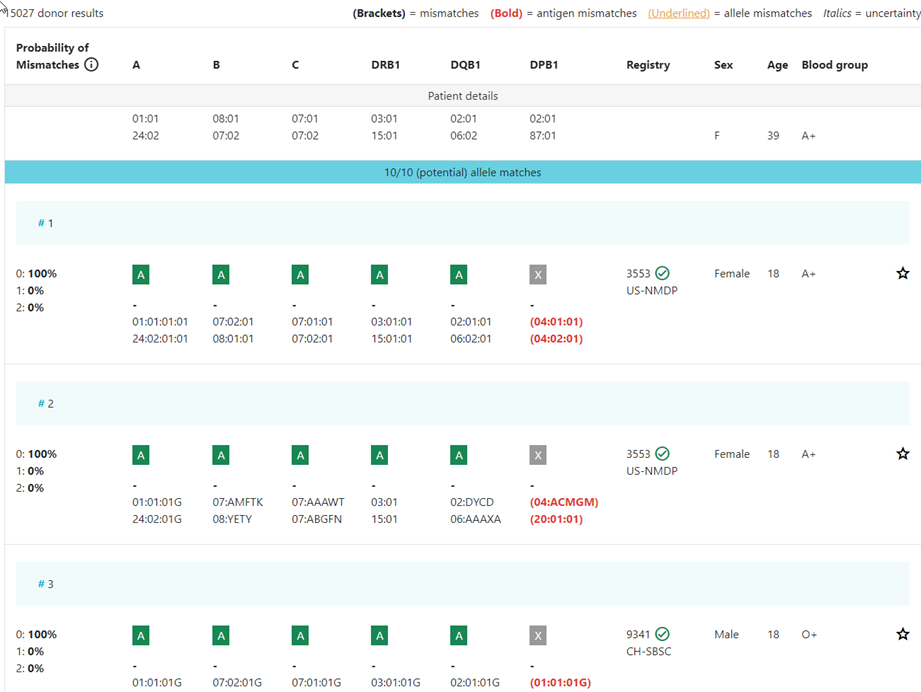
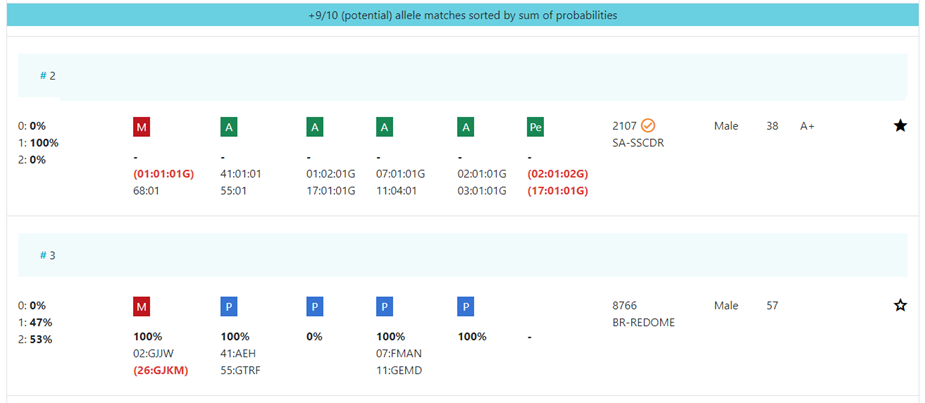
Figure 7: Donor match results table ("standard" and "sum of probabilities" sorting)
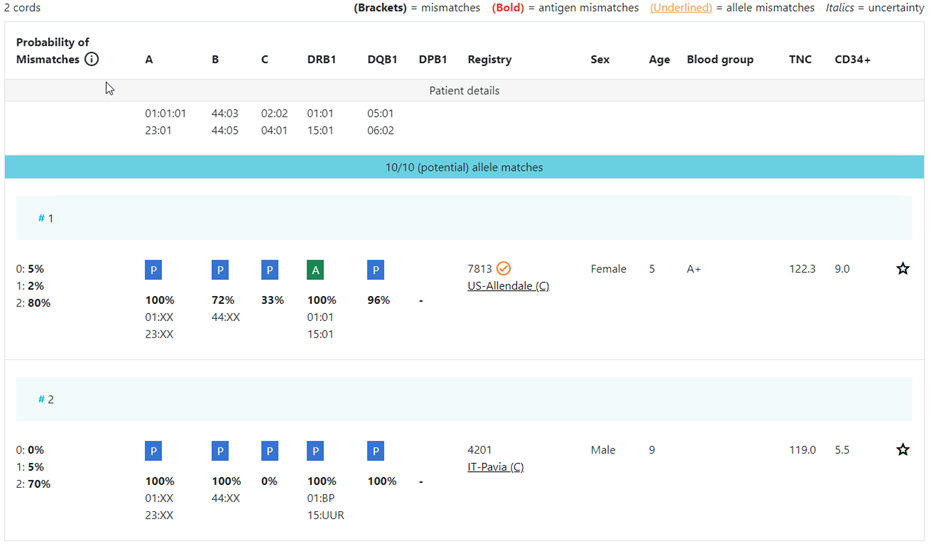
Figure 8: Cord match results table
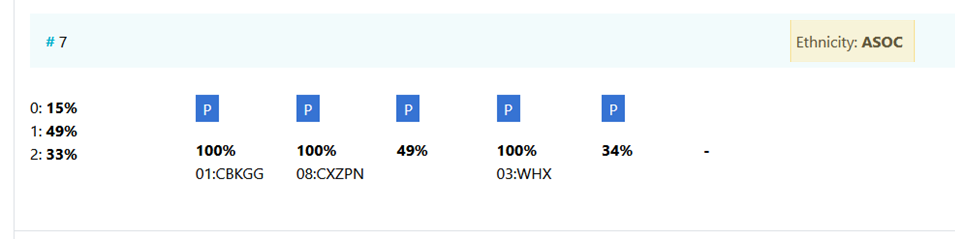
Explanation of colours, abbreviations, percentages and codes
Abbreviation / column | Description |
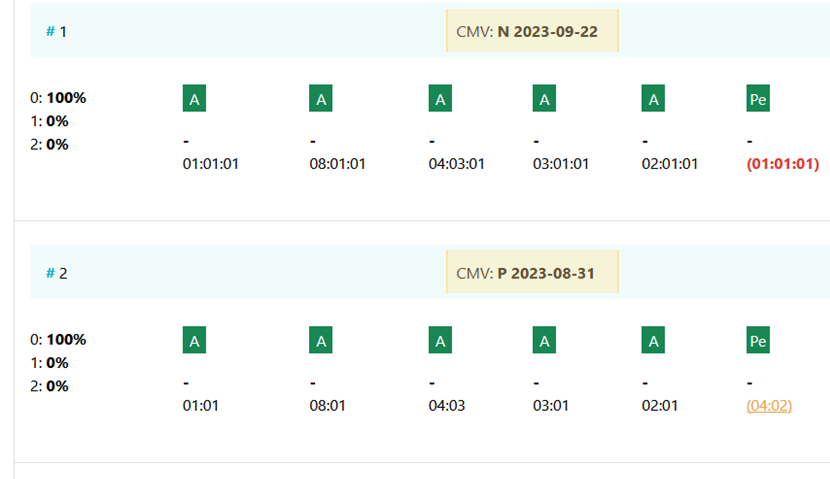
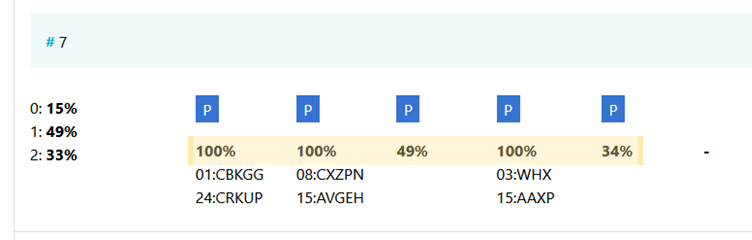
| HLA patient | In between two grey bars, in a white space, you can find the HLA of your patient. This sticky header will move with you when you are looking at results more below. |
Probability of mismatches 0, 1, 2 | Probability of a mismatch at 0 loci, 1 locus, and 2 loci. The percentages are based on the match type you have been chosen (out of 6 then 3 loci are considered; out of 10 then 5 loci are considered).
The five squares above the probability percentages are representing, respectively, locus A, B, C, DRB1, and DQB1. They are showing in letter/colour codes if a certain locus of a donor/cord is likely to match with your patient or not.
|
| DPB1 TCE3 grading model | The sixth square indicates the DPB1 match grade. DPB1 TCE3 evaluation is performed and displayed for potential donors under the following conditions:
The results of the DPB1 TCE3 grading is shown below the donor’s DPB1 values by using the following symbols above the DPB1 alleles of the donor:
The explanation of the symbols is also provided when hovering the symbols.
|
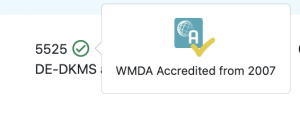
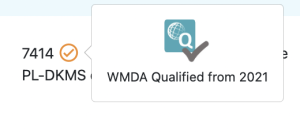
Registry Reg Abbr | This column shows you the ION code of the registry or cord blood bank where the donor or cord is registered followed by the abbreviated name.
This column may also shows you an icon that indicates that the registry is either WMDA accredited or WMDA qualified. If no icon is present next to the ION code, then the registry is not WMDA qualified or accredited.
When you hover over the icon, the icon indicates whether the registry has been WMDA qualified or whether the registry has been fully accredited. Also the validity period of the qualification/accreditation is visible. The orange ticks have verification WMDA Qualified
|
Age | Current age of donor (in case of donor search)/ Time since cryopreservation of cord blood unit (in case of cord search) |
Gender | Sex: M = male, F = female |
Blood group | Blood group, e.g. A+ = blood group A, rhesus positive, B- = blood group B, rhesus negative |
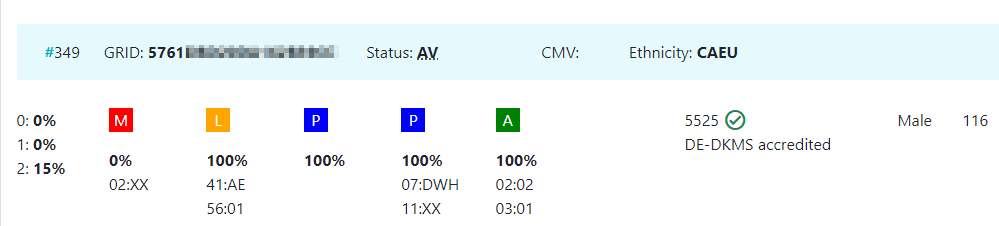
CMV | CMV status Possible values: A value for the CMV status may not always be available.
NOTE: A tooltip for information on the values can be used to aid in understanding their meaning. |
| Probability of match per locus | Within the donor/ cord details, the probability of a match per locus is displayed:
This also correspondents with the match grade that is indicated by the letter/colour above the column with the match probability per locus. These probabilities are only calculated for the 5 loci A, B, C, DRB1, and DQB1. For more information on the differences between the matching engines please see the chapters: "Features Hap-E and ATLAS" and "Feature comparison Matching engines". |
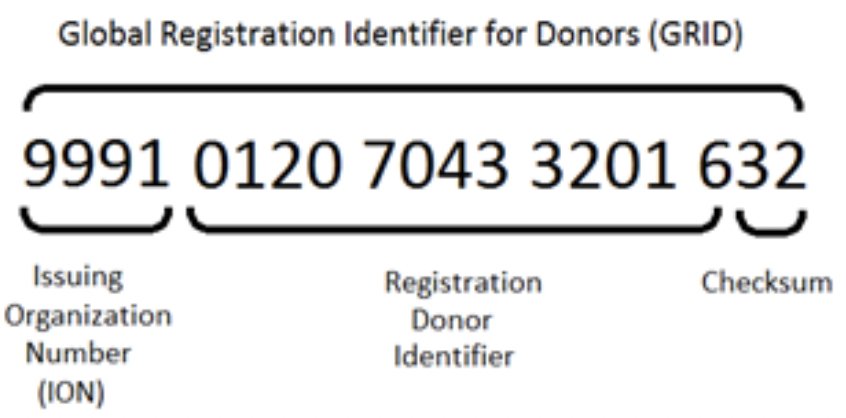
| GRID | GRID, Global Registration Identifier for Donors, is an ID for donors (not for CBUs) that is globally unique. The number is split into 3 sections;
Once a GRID is assigned it cannot and will not be reassigned - it is completely unique.
For more information on the GRID number please refer to Global Registration Identifier for Donors - WMDA. |
Ethnicity | Ethnic group: The system uses the same ethnic groups as defined for the EMDIS system:
The ethnic groups are as follows: |
| Status | Status of a donor or CBU. For donors, the status can be available (AV), reserved for a patient (RS), or temporarily unavailable (TU) |


How to print search results or store as PDF
Google Chrome:
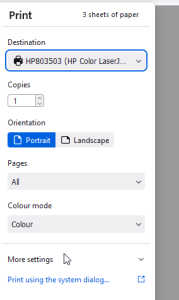
- Click on the print button:

- Click on more settings:

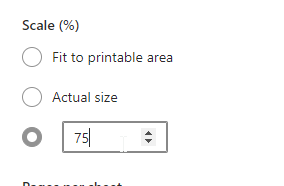
- Click on Scale:

- Select "Custom"

- Change the scale to 75%
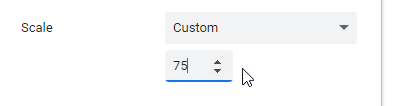
- Save as PDF or print the page as normal
Now it should fit:
Paper size: A4
- 9 results on page 1
- 12 on the following pages
Paper size: Letter
- 9 results on page 1
- 12 on the following pages
Microsoft Edge
- Click on the print button:
- Click on more settings:
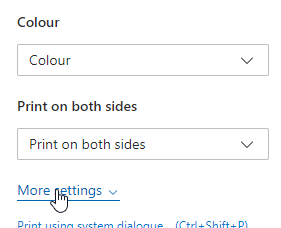
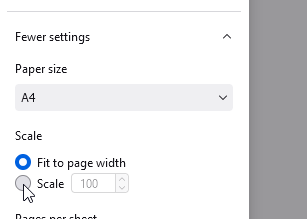
- Change the scale to 75%
- Save as PDF or print the page as normal
Now it should fit:
Paper size: A4
- 9 results on page 1
- 12 on the following pages
Paper size: Letter
- 9 results on page 1
- 12 on the following pages
Mozilla Firefox
- Click on the print button:
- Click on more settings:
- Click on "Scale"
- Change the scale to 52%

- Save as PDF or print the page as normal
Now it should fit:
Paper size: A4
- 9 results on page 1
- 12 on the following pages
Paper size: Letter
- 9 results on page 1
- 12 on the following pages
How to refresh search results for a patient
Automatically
Once it is on, 3 times every week the relevant matching engine will be queried for changes to the search and the search will be updated accordingly.
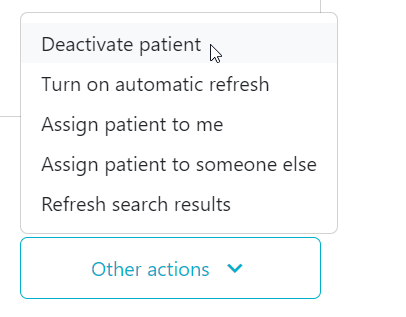
To enable automatic refresh/updates, do the following:
- Open the patient you would like to turn automatic updates on for. This can be done from the patient list or from a search results by clicking on the patient id.
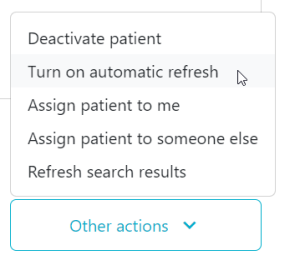
- Scroll to the bottom and click "other actions"
- Click on "Deactivate patient"
- You are then redirected to the "Patient list". You can confirm whether automatic refresh/updates are turned on by checking whether your patient has the
 icon.
icon.

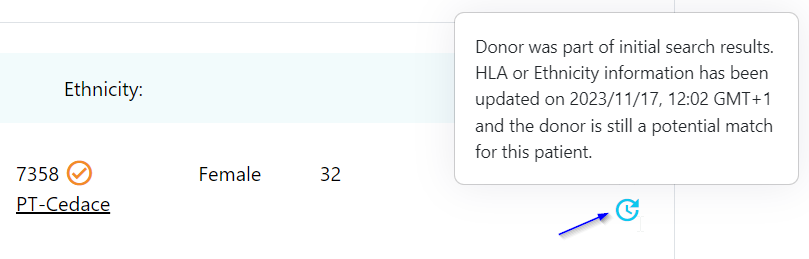
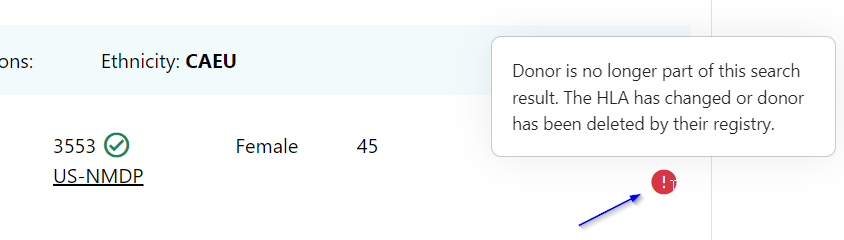
When "auto refresh" is turned on, you may see changed records in the search results. These look like this:
New results for the search:
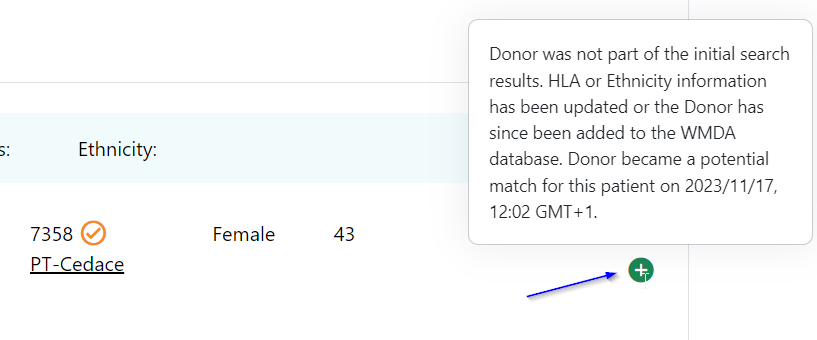
Donor Existed in the search results, but has been updated and is still a potential match for the patient. It may have moved within the ranking of the search results.
Deleted from the search results
To learn how to view donor records that have been updated since a specific date/time, please visit this page.
For a full diagram on the logic of patient states and their effect on automatic updating of search results see Patient states and their effect on automatic updating of search results (full logic)
Manual full refresh
- Open the patient you would like to refresh the searches for. This can be done from the patient list or from a search results by clicking on the patient id.
- Scroll to the bottom and click "other actions"
- Click on "refresh search results
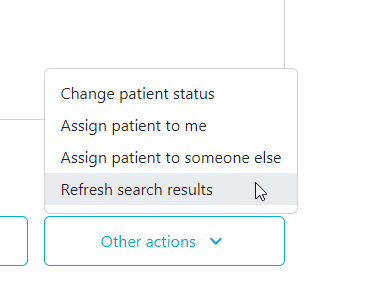
- You are automatically redirected to the patient list.
- Wait for the searches to be finished. When finished they will contain the latest search results. This can be confirmed by checking the "last updated" date and time when looking at search results
![]()
How to assign a user to a patient
- A patient was automatically transferred from the legacy system to the new and does not have a user assigned or has the wrong patient assigned
- The user that created the patient is on leave and somebody else at the same organisation may want to have this patient appear in their "my patients" list
- A patient was created by your registry's software using the API and no user was assigned by your software.
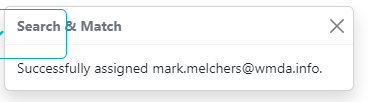
Assigning a patient to yourself
The following steps let you assign a patient to yourself no matter whether it is not assigned to any person or to another person:
- Open the patient you would like to refresh the searches for. This can be done from the patient list or from a search results by clicking on the patient id.
- Scroll to the bottom and click "other actions"
- Click on "Assign patient to me"
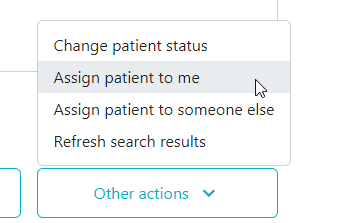
- You'll see a pop up appear on the bottom right of the screen indicating that the patient was reassigned
Assigning a patient to somebody else
The following steps let you assign a patient to somebody else no matter whether it is not assigned to any person or to another person:
- Open the patient you would like to refresh the searches for. This can be done from the patient list or from a search results by clicking on the patient id.
- Scroll to the bottom and click "other actions"
- Click on "Assign patient to someone else"
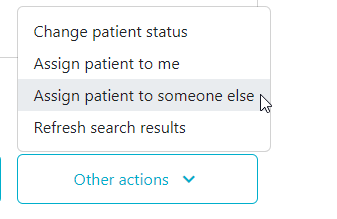
- Enter the e-mail address of the user that you would like to assign to this patient
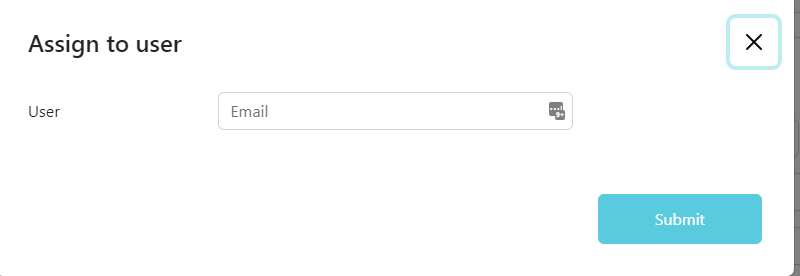
- Click "Submit"
- You'll see a pop up appear on the bottom right of the screen indicating that the patient was reassigned

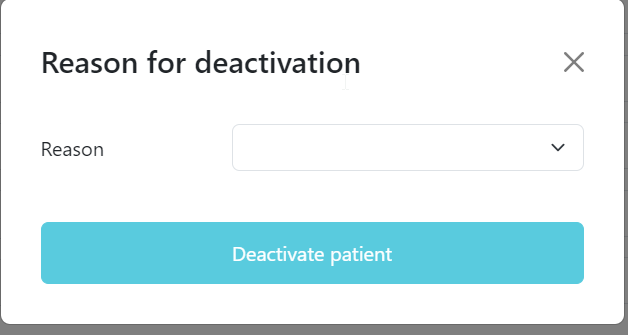
How to deactivate a patient
To do that, do the following:
- Open the patient you would like to deactivate. This can be done from the patient list or from a search results by clicking on the patient id.
- Scroll to the bottom and click "other actions"
- Click on "Deactivate patient"
- You will then be asked to select the reason for the deactivation. Select a value and click "Deactivate patient"
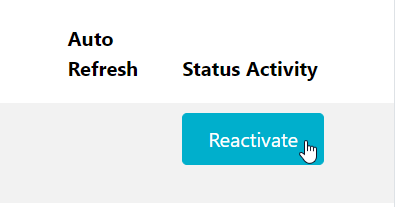
How to activate a patient again
To do that, do the following:
- Go to the patient list and select the "Inactive patients" view
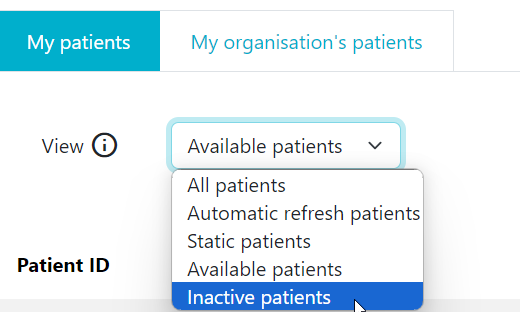
- Click on the "Reactivate" button to make the patient appear in the list of patients again.
Differences between Hap-E & ATLAS regarding locus specific match probabilities
For more information on the differences between the matching engines please see the chapters: "Features Hap-E and ATLAS" and "Feature comparison Matching engines", or please see the following slides and video.
Links to assist you in your searches
The following list contains useful links to assist in finding a potentially matched donor:
- WHO HLA Nomenclature
- Immuno Polymorphism Database (IMGT/HLA)
- Allele Frequencies in worldwide populations
- Bioinformatics and HLA expertise
- HLA Frequency Maps
- The Common and Well-Documented (CWD) allele catalogue 3.0.0
- Be the Match Haplostats
International professional organisations
In the field of HLA a few professional organisations are active in order to provide information on immunogenetics and histocompatibility.
- World Marrow Donor Association (WMDA)
- Worldwide Network for Blood and Marrow Transplantation (WBMT)
- American Society for Histocompatibility and Immunogenetics (ASHI)
- European Federation For Immunogenetics (EFI)
- British Society for Histocompatibility and Immunogenetics (BSHI)
- European Society for Blood and Marrow transplantation (EBMT)
- Center for International Blood and Marrow Transplant Research (CIBMTR)
- American Cancer Society (ACS)
- American Society for Transplantation and Cellular Therapy (ASTCT)
- International Society for Experimental Hematology (ISEH)
FAQ from Users of the Search & Match Service
Please find the FAQ on this Share page.