Purpose
This document describes the manual upload method of an PGP encrypted XML file. BMDW uses a dedicated platform for file exchange (Pydio). The automatic upload method via a REST API [1] will become available later as well as the corresponding manual.
General concepts:
- Only organisations that have an ION (listing organisations) will be able to upload
- The usernames are your email address
- Every organisation that is listing only donors or only cord blood units is allowed to have two dedicated accounts. If an organisation is listing both donors and cord blood units, they are allowed to have a maximum of four accounts. Multiple accounts of one organisation share one workspace, but every user has its own login details.
- The platform is organised in so called 'workspaces'. This workspace is a private space for each organisation where files can be uploaded and processing reports become available.
- Uploaded files should follow the XML guidelines as described in the BMDW Data submission information on the BMDW public access space.
File requirements:
- Files should following the file naming rules as described in the BMDW Data submission information
- XML files larger than 200Mb should be compressed using ZIP (How to compress your file with ZIP can be found here)
- Only files with the .pgp and .gpg extension will be accepted for upload.
- XML files should be encrypted with the new BMDW public key (How to encrypt a file can be found here)
PLEASE NOTE: A new BMDW private key has been created for uploading XML files through the new data upload service . The old BMDW public key is only valid for encryption of your DOT20 files.
- Uploaded files will be moved out of the directory by the pipeline script for further processing.
- Once the files have been processed there will be automated notifications provided by the system to et you know the status of your file.
Getting started
Accessing the BMDW Data upload service
You can access the BMDW data upload service through the web. You can access the web address (or URL) by entering the address: https://staging-dataupload.wmda.info/.
Please note: This service is currently available on a development server. Also developers are still working here and this might result in changes over time.
Logging in for the first time
Before you can access the data upload service, you need to be an authorized user in our system. Currently, the following users are added to the system:
- All users from the old test upload system
- All people who previously sent a test file by email
- All people who requested access by email
All of these people will receive a welcome email from the BMDW data upload service system with instructions how they can access the service.
If you are not a current user and would like to have access to upload your test XML file, please send us an email to support@bmdw.org
To access the system for the first time
- As a new user, you should have received a welcome email that includes a link to set your password.
- Click on the link and choose your own password, confirm this password and click on the OK button.
- Go to https://staging-dataupload.wmda.info/ to login (Figure 1) If you just have set your password, the system should return you automatically to the login page.
- Within the login page you can optionally change your language by clicking on the flag just besides 'Enter login/password':

- You can also save a bookmark in your browser, e.g. for the BMDW Data upload service, so that you are immediately directed to the login page rather than having to enter the URL.
- Enter your email address and your password.
- The system defaults to your personalized workspace, where you will find your organisation workspace and all other folders like notification and archived folder.
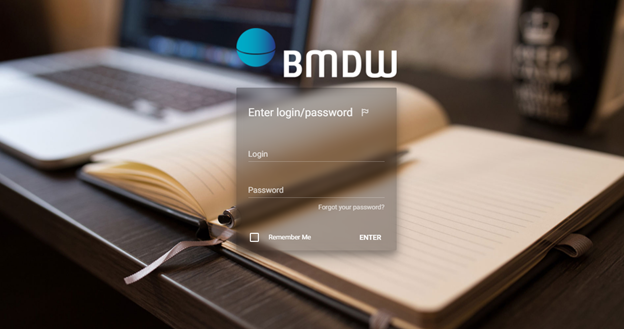
Login screen BMDW data upload service
Change password or forgot password
- Click on the 'Forgot Your Password', fill out your e-mail address on the password reset page (Figure 2) and click on the 'OK' button. You will then receive an e-mail with a link to reset your password.
- Click on the link and choose your own password, confirm this password and click on the OK button.
If you might have forgotten your e-mail address that was registered for your BMDW data upload account, please contact the WMDA office by email via support@bmdw.org
Tip: If you haven’t changed your password for a long time, we recommend that you do so to ensure that your profile is secure. We recommend that you change your password every 6 months.
Please note: If you attempt to login more than 3 times with incorrect credential the system for security reasons will ask you to enter a code that appears in an image as shown in Figure 3.
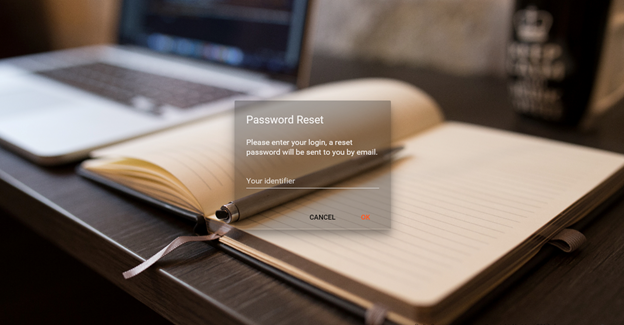
Figure 2: Forgot your password page
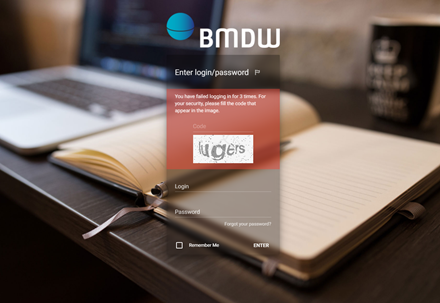
Figure 3: Screen after 3 login attempts
Logging off of the service
To close and exit the data upload service click on the Settings button next to your name on the top left side (Figure 4). This should give you a drop-down menu with 'log out' at the last line. Click on 'Log out' and you will be redirected to the login screen.
Please note: Please do not simply close your browser; otherwise your unsaved data may be lost.
 Settings button

Figure 4: Logging out of the BMDW data upload service: setting button and dropdown menu
Home
After logging in, you get the screen as shown in Figure 5. On the left hand side you can see all of the workspaces where you have access to. Most organisations will have access to just one space.
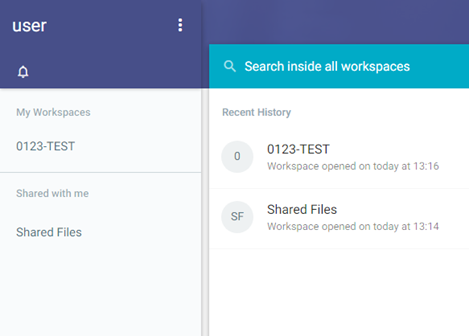
Figure 5: Homepage after logging in
On your home page, you see the following features and functions:
- Your name: On the top left corner. This is the name from the user that logged into the system
- Setting button (Figure 4)
- Search box
- My workspaces: Your own workspace named with the ION of your organisation
- Recent history in the middle main pane
Settings: when you click on the settings button, you can seen a drop-down menu (Figure 4) with
- My account: In this section you can set an avatar (picture) or logo, change email preferences and change your password.
- Shares
- About: Help function from Pydio
- Log out: Exit system
Workspace: Within your Workspace you can find the list of uploaded files
On you first login the Workspace will be empty (Figure 6). Once you have used your workspace, a new block underneath the 'Users' block will appear with your latest Workspace activity.
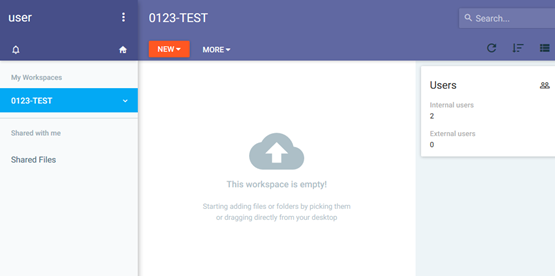
Figure 6: Content of workspace screen
Upload a file
If you wish to upload a new PGP encrypted XML file into your workspace in order for BMDW to process the file, please follow the next steps:
- Click on the Workspace of your organisation.
- Within your Workspace click on the red tab with 'New' and then on the 'Upload' icon at the bottom of the drop-down menu (Figure 7).
- A new screen will open where you can select your file for upload (Figure 8).
- Click on the red button with 'Pick File'.
- A browser window will open and you can select the file on your computer you would like to upload. Click on Open.
- The file becomes then visible in the browser window and when it is the correct file, click on OK to upload the file to your workspace.
An alternative method to upload your file to your Workspace is by dragging your file from your desktop to the main middle pane of your Workspace
- Once the upload of the file is completed, you receive a message.
- The file is now ready to be picked-up by the BMDW system for further processing. When the file is picked-up by the processing pipeline, a copy of the file is stored in your archives folder. All messages concerning the processing of your file can be found in the Reports folder. The copy of the file and the file with messages have a filename related to the name of the original file in combination with the upload time and user
Please note: The time to upload your file to the system depends on the file size and your internet upload speed.
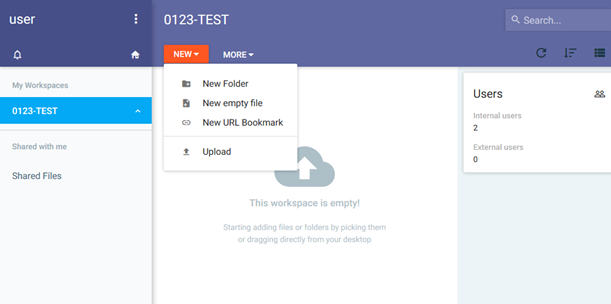
Figure 7: Upload new file
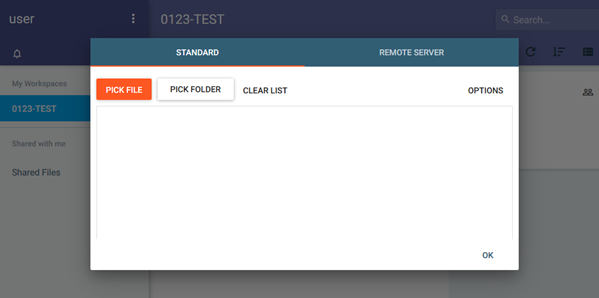
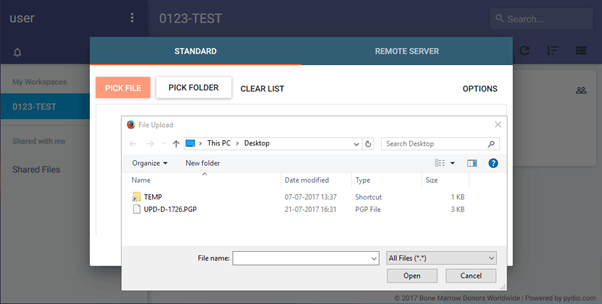
Figure 8: Select file for upload screens
Manage/Update existing uploaded files
After uploading your file, you can still delete the file if it hasn't picked-up by the processing pipeline. Once the file is picked-up, you cannot delete the file anymore or cancel the processing. The system will check for new files every 10 minutes. Therefore, the time that you have left to delete the file can vary.
- Within your Workspace select the file you wish to update/delete and click on the 'Delete' button/tab if you wish to delete file. You can also delete the file by clicking on the file with your right mouse button and select 'Delete' from the drop-down menu.
- The system will warn you to ensure if you really want to delete this file (Figure 9).
- If you click OK the file is deleted and will no longer be processed.
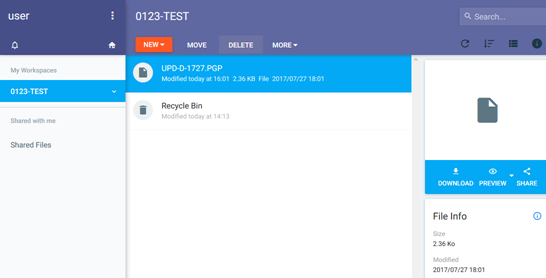
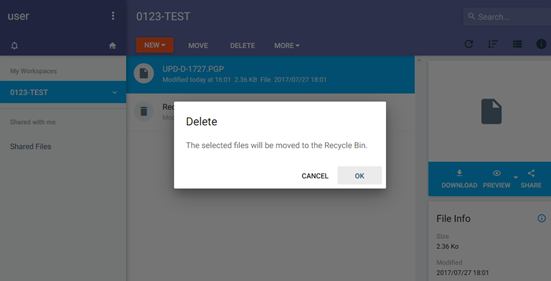
Figure 9: How to delete an uploaded file
Processing reports
Once the processing pipeline picked-up the file, it will start with all kind of validations and checks. Processing messages are generated and stored in a file in your reports folder. All messages are collected in one file for each file you uploaded to the system.
[1] The specification is available at https://pydio.com/en/docs/references/api/v2#!/File/uploadStream
STANDARD OPERATING PROCEDURE | |||
| |||
TITLE: | Data upload protocol to BMDW | ||
VERSION No: | 0.3 | ||
DATE OF ORIGINAL ISSUE: | March 2017 | ||
REVIEW INTERVAL: | 12 months (This includes the testing process of this new upload to BMDW format) | ||
ORIGINAL PREPARED BY: | Manish Kakkar | ||
QM REVIEWED BY: | Quality Team | ||
AUTHORISED BY: | Chief Executive | ||
COPY and LOCATION | Master Copy – WMDA Share – DOCxxx | ||
Document Version History | |||
Version | Author | Changes | |
0.1 | Manish Kakkar | SOP generated | |
0.2 | Beer Holties | Update (Sprint 3/4) | |
0.3 | Jorine Koenderman | Release staging version (28-07-2017) | |