Introduction
The World Marrow Donor Association (WMDA) places great importance on the health and safety of donors. To ensure the continued success of the global donor network, the WMDA asks its members to report and investigate any serious events or adverse reactions (SPEARs).
WMDA hosts an online reporting service for SPEARs related to stem cell donation by unrelated and related donors or affecting product quality, this reporting system has been operational since 2003. Reporting of such incidents is a requirement of donor registries and cord blood banks seeking WMDA certification. Organisations in full compliance with WMDA Standards are required to report:
- Any adverse event or reaction in connection with a donation affecting the donor, recipient, or product quality. (Well-known side effects and quality deviations do not have to be reported if mild and no serious consequences).
- Any malignancy, severe autoimmune disease, or donor death (unless definitely not related) within 10 years of stem cell donation (“WBMT Minimal Data Set A”).
Reporters are asked to categorise reports as:
- Harm to donor: an adverse reaction in a donor during or after a donation procedure, including unnecessary procedures.
- Harm to recipient: an adverse reaction in a recipient during or after the infusion of a cell therapy product including any harm as a consequence of product quality issues, delay in delivery etc.
- Risk of harm (an adverse event): any problem or incident that could have had (but did not have) negative consequences for the donor or recipient or the system as a whole.
A committee of registry and cord blood bank experts assess the reports and evaluate imputability and impact. A rapid alert system is used for rapid dissemination of information to members of the international stem cell donor community in cases of critical importance. Annual reviews are prepared to share awareness of adverse events and reactions related to donation.
You can find answers to common questions on the SPEAR reporting service in the user guide below.
Contact
If you have technical difficulties and cannot find a solution in the user guide, please use the question box at the bottom of this page or reach out to the WMDA SPEAR team at sear-spear@wmda.info. You can access the SPEAR online reporting service by clicking here.
Useful Documentation and External Links
Content of this guide
This user guide is designed to assist new and existing users in navigating and utilizing the SPEAR reporting service effectively. Its coverage of the most important features and functions of the platform will help you get the most out of SPEAR, making it easier for you create, submit and edit reports. Whether you are a beginner or an advanced user, this guide will provide you with a complete understanding of the SPEAR reporting service, ensuring that you have the information you need to use it to its fullest potential.
List of content
Important to remember
- If you have an incident that requires quick dissemination as a rapid alert to the international community, you must contact the WMDA office directly by sending an e-mail at sear-spear@wmda.info and by phone on: +31 (0)88 505 7900.
- Data submitted via the SPEAR reporting service must be limited to only the required data elements, omitting any identifiable data that is not necessary for reporting, and recognizing the importance of protecting donor and patient privacy.
- When using the service, you agree to the WMDA Terms of Use and Privacy Policy.
Becoming a SPEAR reporter
If you are not yet a SPEAR reporter and would like to be, please send an email to sear-spear@wmda.info. Include the following information:
- Your full name (mandatory)
- Your title(s) (optional)
- The organisation you will be reporting for (mandatory)
- If known: if your organisation reports directly to WMDA or via a parent organisation (optional)
Once your request is received, WDMA will verify your details directly with your organisation before granting access to the SPEAR reporting service. Once your account is active, you will receive a welcome email with all login details.
If you are a designated individual at a parent organisation, you can request an account for a new user at a child organisation. Please include the same details as listed above, and if applicable, include the IONs as well.
1. Getting started
You can go to https://spear.wmda.info and use your email address to log in. Below more details on accessing the service.
If this is your first time accessing the SPEAR service, you will need to ensure you have multi-factor authentication (MFA) set up with WMDA.
Step 1: verify your existing MFA access
- Do you already have an active Search & Match user account with MFA access set up? Then you do not need to take any action and can access SPEAR immediately.
- Do you not have an account set up with WMDA (e.g. for Search & Match) that uses MFA? Please setup your new user account including MFA following the steps below:
- Click on the link: WMDA Service password reset
- Confirm your e-mail address and set your password
- When you are done with setting up your password go to: https://portal.wmda.info/
- Click on “Partner Sign in” in top right corner
- Enter your email address as username
- Enter the password you set up earlier
- Click “sign in”
- Follow the steps to add this account to your authentication app on your mobile device
- Once complete, confirm that your MFA credentials allows you access to https://spear.wmda.info/
Difficulties with MFA Login
If you find an empty 'role selector' panel after logging in, it might mean that your account setup is still in progress. Please try again after 2 hours. If the issue persists, contact the WMDA support team by sending an email to support@wmda.info.
If you get stuck, please consult the MFA user guide (https://share.wmda.info/x/yAl6G). If you can’t resolve the issue, you can contact the WMDA support team by sending an email to support@wmda.info. Please include the URL, what you are trying to do and a screenshot of the error.
Step 2: logging in
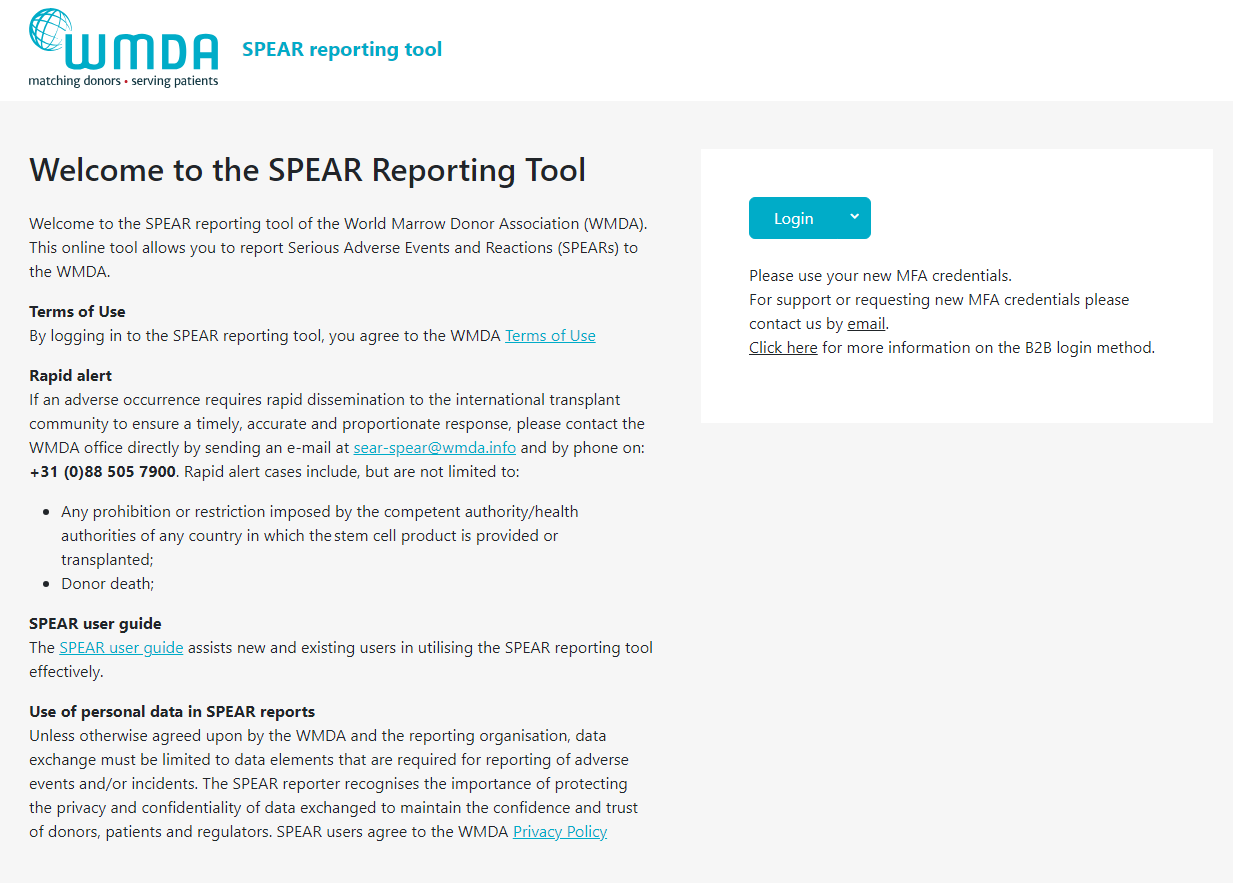
Now that your MFA is set up correctly, you can log in with your email address (user name) and password by clicking the blue Login button on the home page.
Note: only if you or your organisation has specifically chosen the B2B login method, use the arrow next to the blue Login button on the home page to access B2B MFA login. Click here for more information on the B2B login method.
Figure 1: Login Panel
Step 3: selecting a role
One or more roles
Many users will only have 1 role (reporter) assigned to them. If this is you, you will not see the role selection panel after login, but instead you will automatically be directed to your report overview. You can skip the below section of the user guide on selecting roles.
- Step 1: Login to the SPEAR reporting with your MFA (see above).
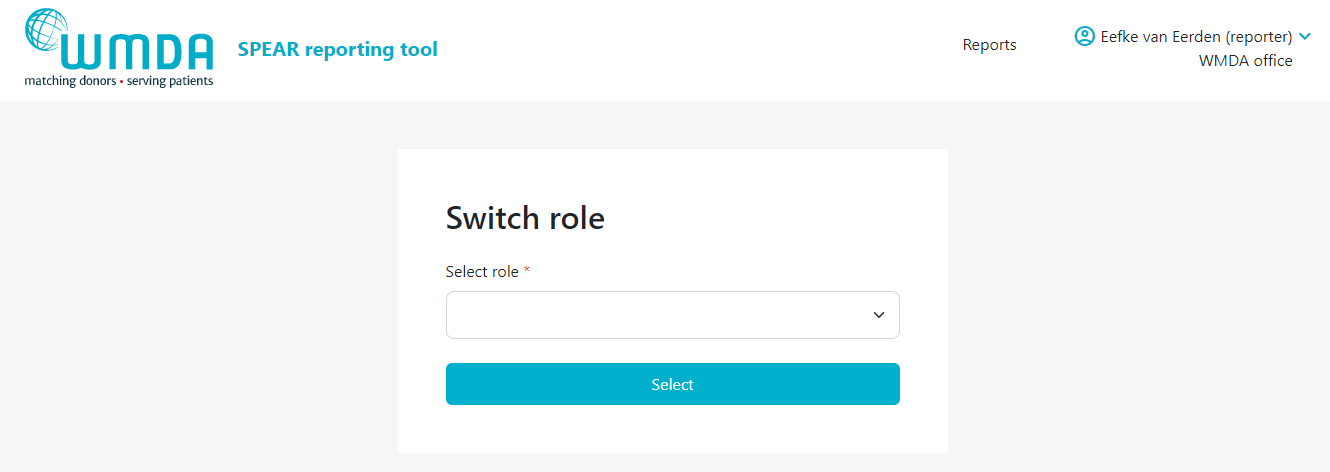
- Step 2: If you have multiple roles available to you, you will now see a "role selector" panel (figure 2)
- Step 3: Click on the role you wish to log in with at this time and click select. You are now directed to the report overview available to that role.
Figure 2: Switch roles
1.3 Switching between roles (when logged in)
If you have multiple roles available to you, you can easily switch roles without logging out. The steps below explain how.
- Step 1: At the top of the page, on the right, you find your personal menu (figure 3). Click on your name to expand it.
- Step 2: Click this Switch Role option (figure 4) and you will be redirected to a new page where you can select the roles available to you.
- Step 3: Confirm the selection of the role you want by clicking the Select button (figure 5). You will be automatically re-directed to the report overview where a message appears: "Successfully switched role to XX at YY". You can now use the SPEAR reporting service in the role you selected.
Figure 3: Personal menu
Figure 4: Select switch roles
Figure 5: Panel to select role
1.4 Logging out
To close and exit the application click on your personal menu at the top of the page (figure 3). A menu will appear that has the Logout option (figure 6). After logging out of the system, you will be redirected to the login screen.
Figure 6: Logging off
2. Actions within the SPEAR reporting service
The SPEAR reporting service is used for three main goals: 1) as a platform for reporters to submit incident reports, 2) as a tool for the SPEAR committee to assess and review reports that are submitted and 3) to provide a central current database of adverse events and reactions for data analysis and research purposes. This is why there are a variety of roles available within the platform, each with different rights and responsibilities. The role you have (selected) determines the amount of data and detail of data you can view and/or edit.
2.1 Drafting a report (reporter)
- Step 1: Login to the SPEAR online reporting service with your username and password (see chapter 1).
- Step 2: Choose the role of reporter with the correct organisation when you login to create reports (see chapter 1, step 3)
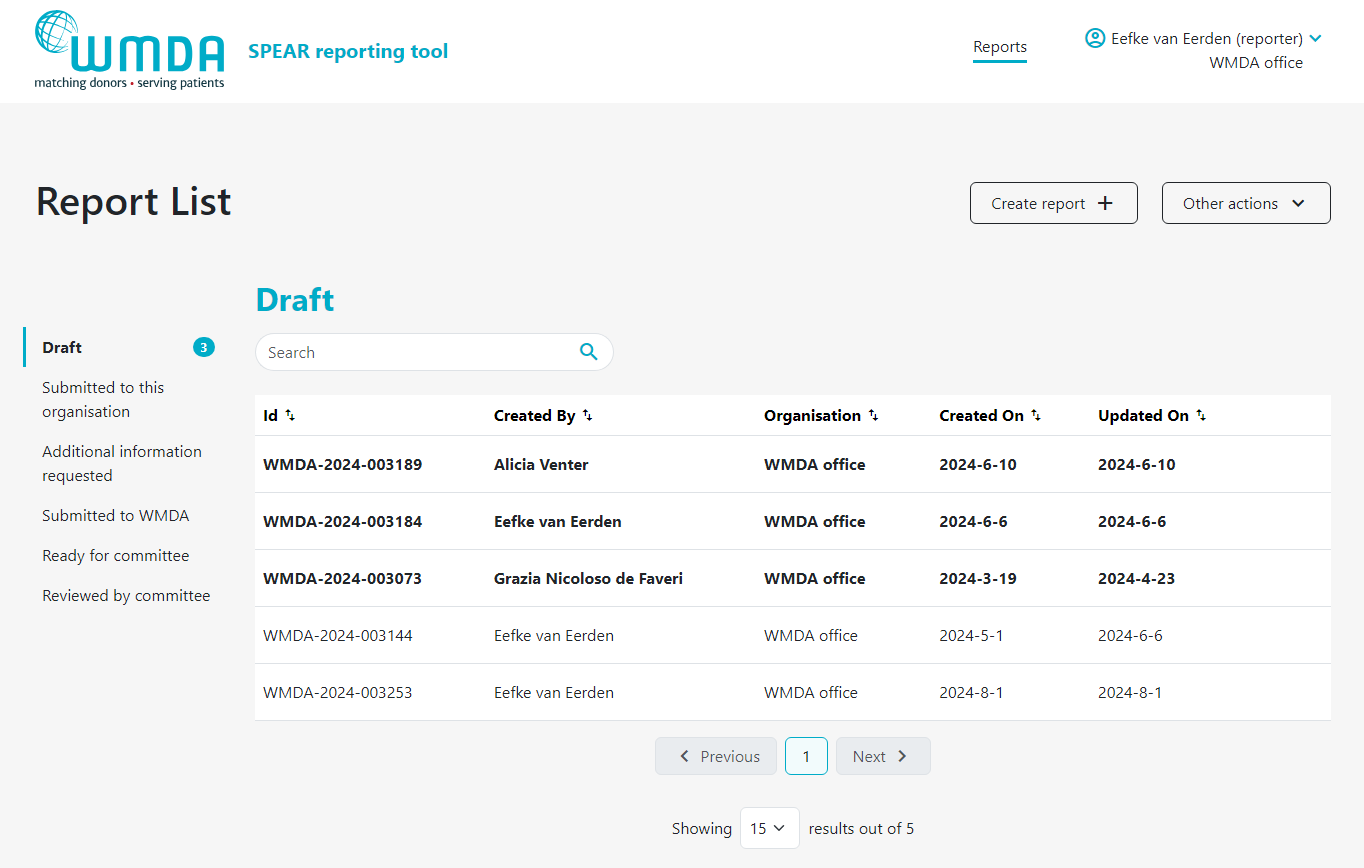
- Step 3: Click the Create report button at the top of the page to start a new draft (figure 7).
- Step 4: Start your new draft report by entering the Type of report first. Once you've selected the correct type of report, the rest of the form fields (or tabs) will be filled with questions based on the type of report you selected. Depending on the type of report selected, fields are available or not and can be mandatory (or not).
Tips & tricks
- No time to finish a report in one go? Click the blue Next button on the bottom of the page you were working on to save the data up to that point and leave the page. Unfinished reports are saved as a Draft Report.
- You can always change the Type of report by going back to the first tab (Type of report). If you change the type of report selected, different follow-up questions might appear. Answers previously given can be automatically erased if they no longer are part of the question list belonging to the new Type of report you selected.
Figure 7: Creating a report
2.2 Adding an attachment (reporter)
- Step 1: Open the report you want to attach the file to by 1) opening an existing report or 2) creating a new draft report.
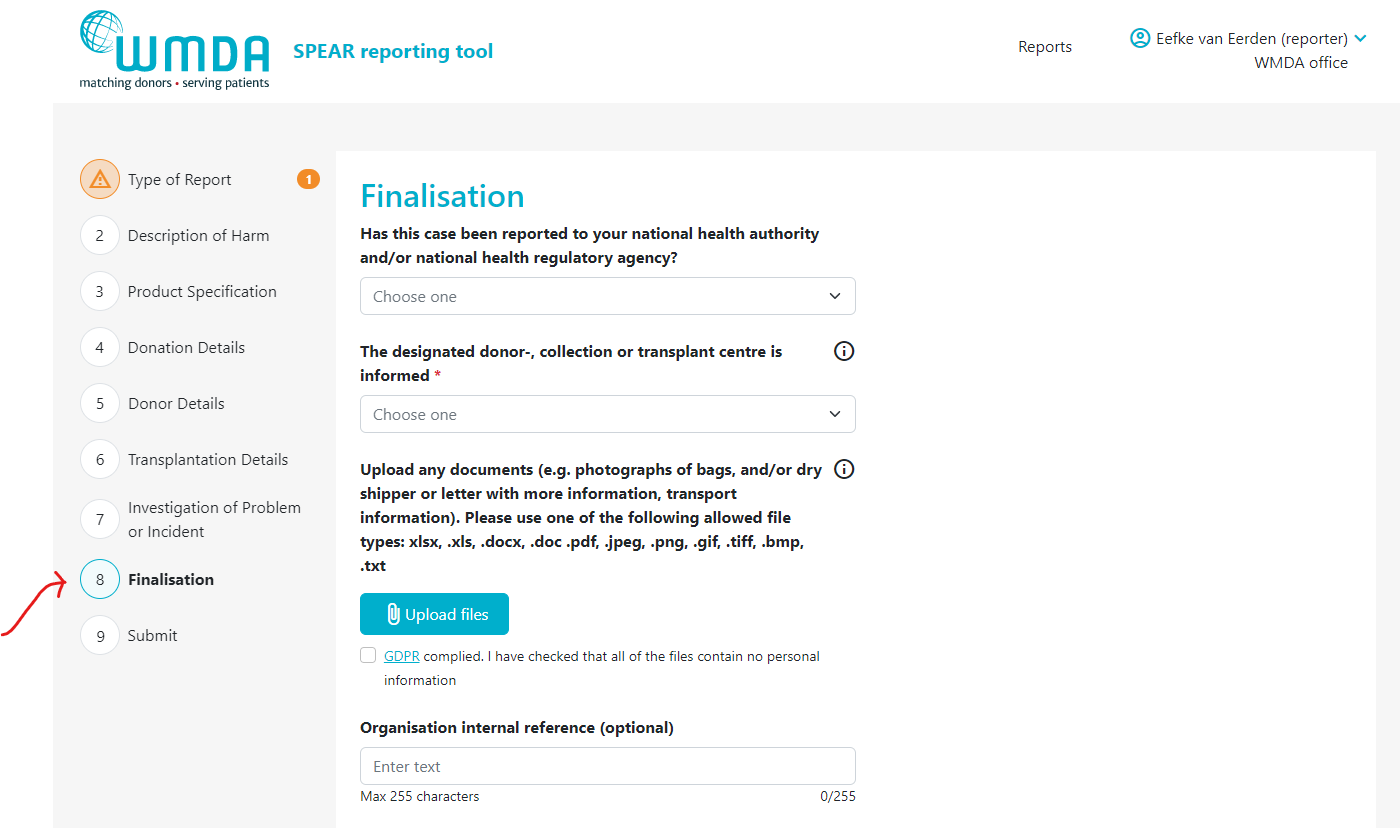
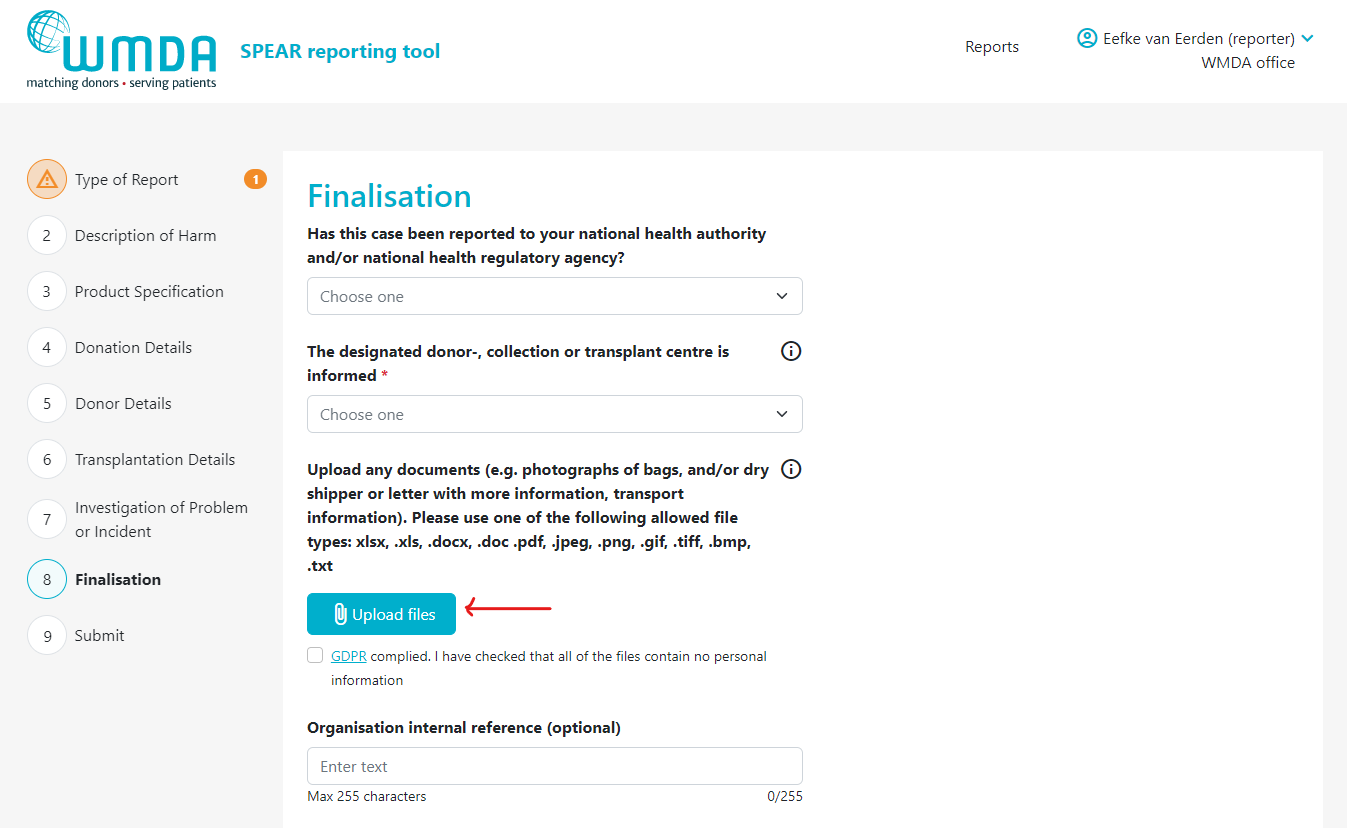
- Step 2: Go to the Finalisation tab (figure 8)
- Step 3: Locate the text "Upload any documents...." (figure 9)
Step 4: Click the Upload Files button to select the files to upload from your computer. You can select multiple files from the same folder at once by using CTRL + click or by dragging your cursor
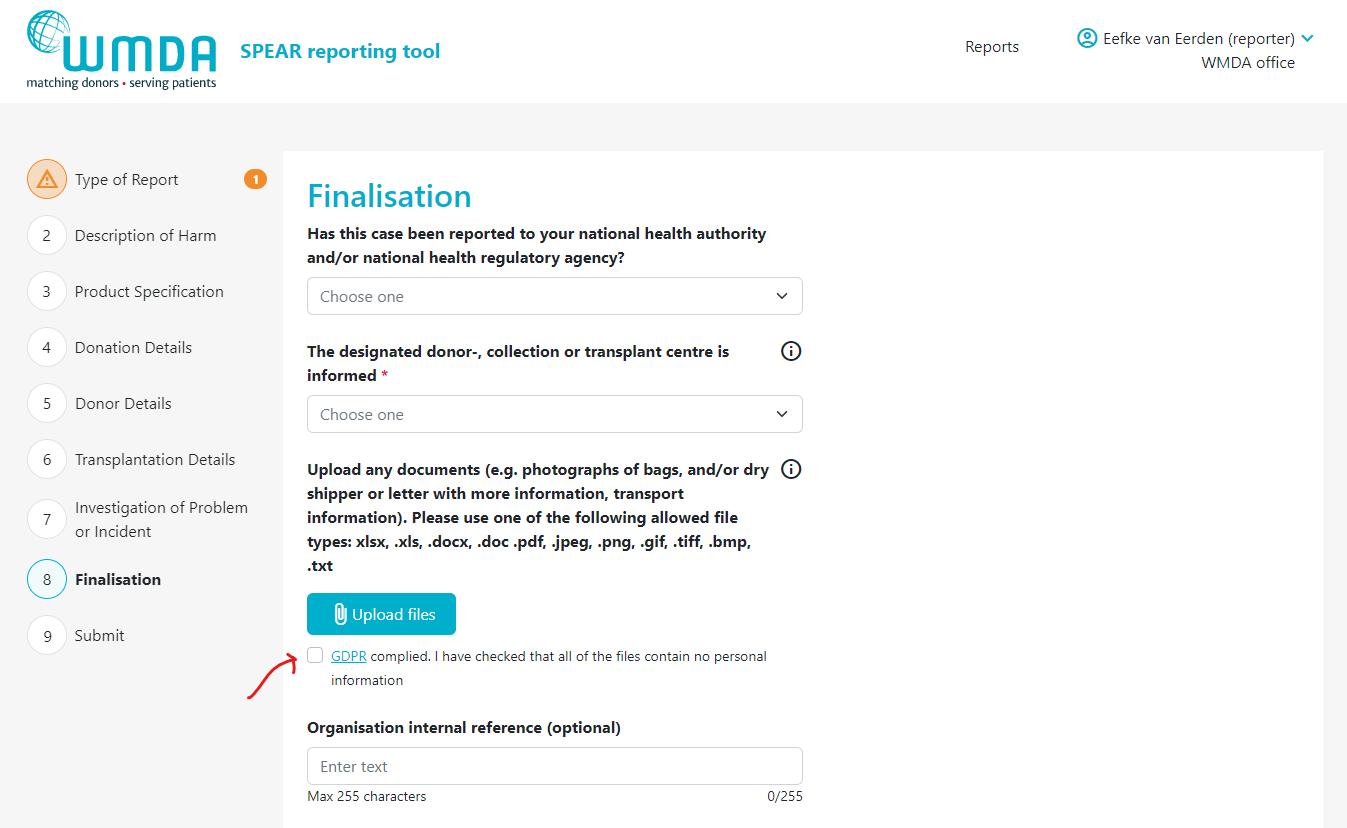
Step 5: After selecting the files to upload, you must check the checkbox (figure 10) underneath the file overview to confirm that you are not uploading any identifying personal information, such as names or any other identifying information belonging to donors, patients or staff.
Before completing the upload, you must check the box confirming that the files you are uploading do not contain any personal information. Personal data refers to any information related to an identified or identifiable natural person. A data subject is considered identifiable if they can be directly or indirectly recognized, particularly through identifiers such as a name, location data, or other specific details. In practice, this includes any data that can be linked to a person in any way. Examples of personal data include telephone numbers, staff, donor or recipient names, and addresses. For more information on personal data according to the GDPR, please click here.
Figure 8: the finalisation tab
Figure 9: the Upload files button
Figure 10: GDPR compliance
2.3 Submitting a report (reporter)
Once you've filled out all required information, you are ready to submit the report. Depending on if your organisation is affliated or not with a parent organisation (like a national donor registery), the report either goes directly to the WMDA or is submitted to the affiliated parent organisation first, before it is sent to WMDA.
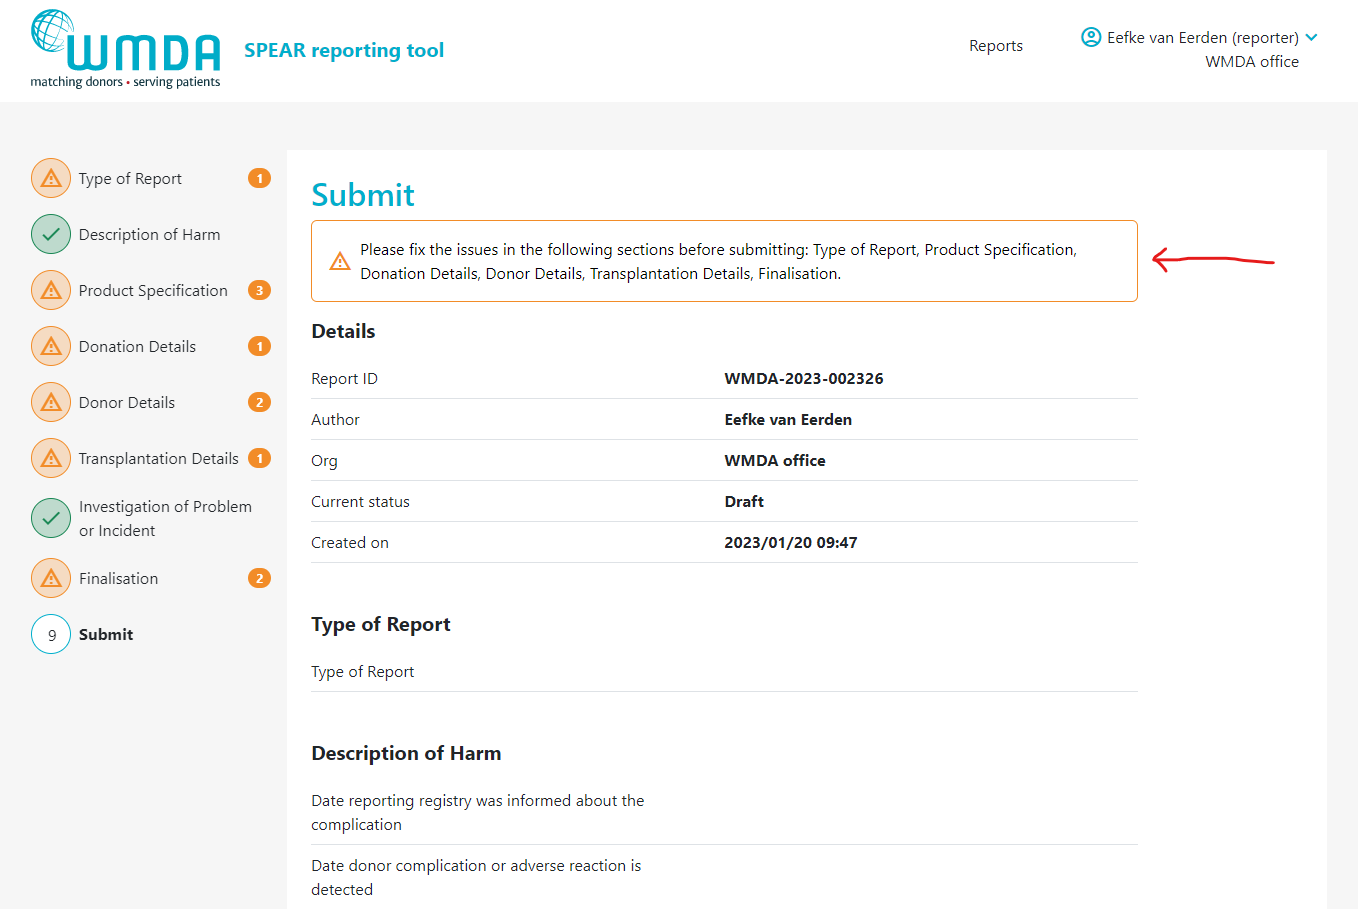
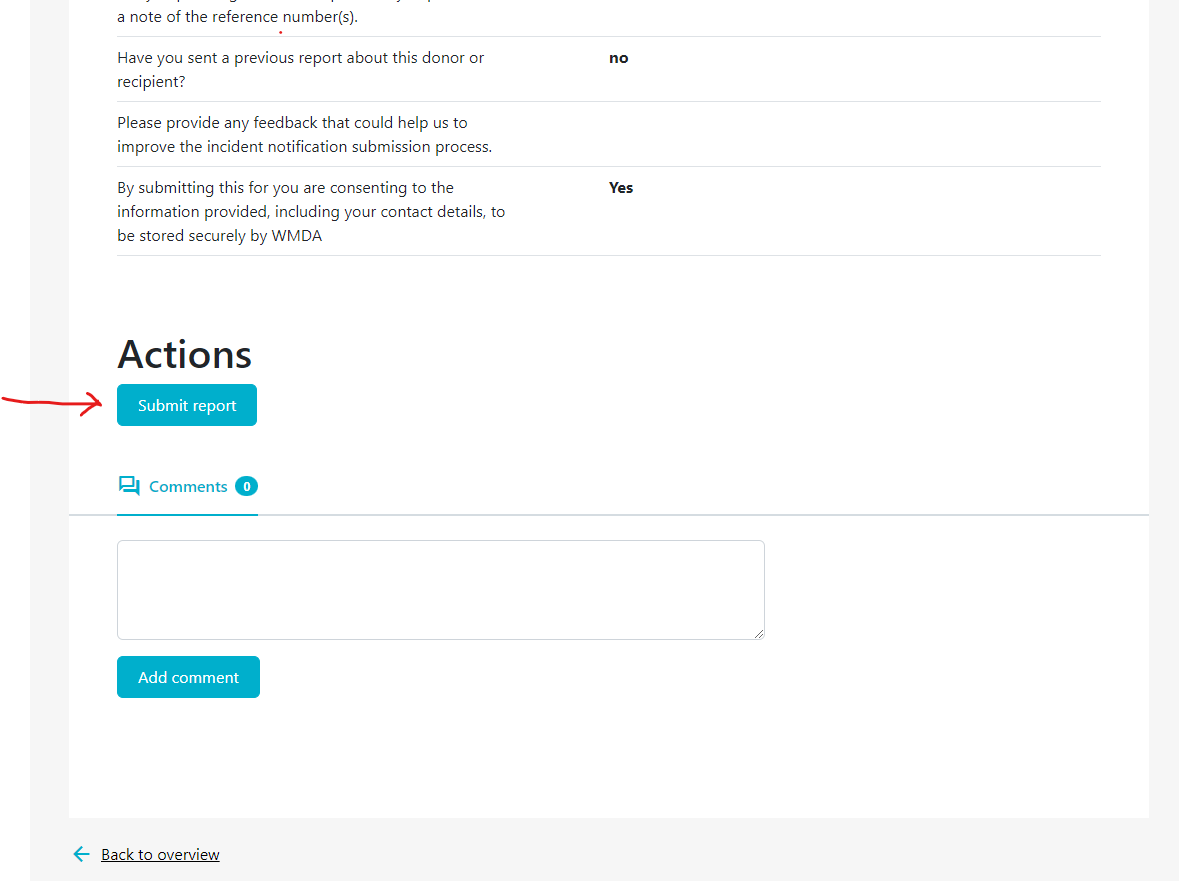
The last tab of the SPEAR report, labeled "Submit", provides a summary of the report details you've entered. In case 1 or more mandatory field(s) is left empty, the report cannot be submitted. The Submit page will then display an error message at the top and request that you supply the missing mandatory details (figure 11). If no mandatory information is missing and you are pleased with the report as is, scroll down to the bottom of the page and click "Submit report."
Figure 11: Missing mandatory information
2.4 Receiving a report from an affiliated (child) organisation (reporter)
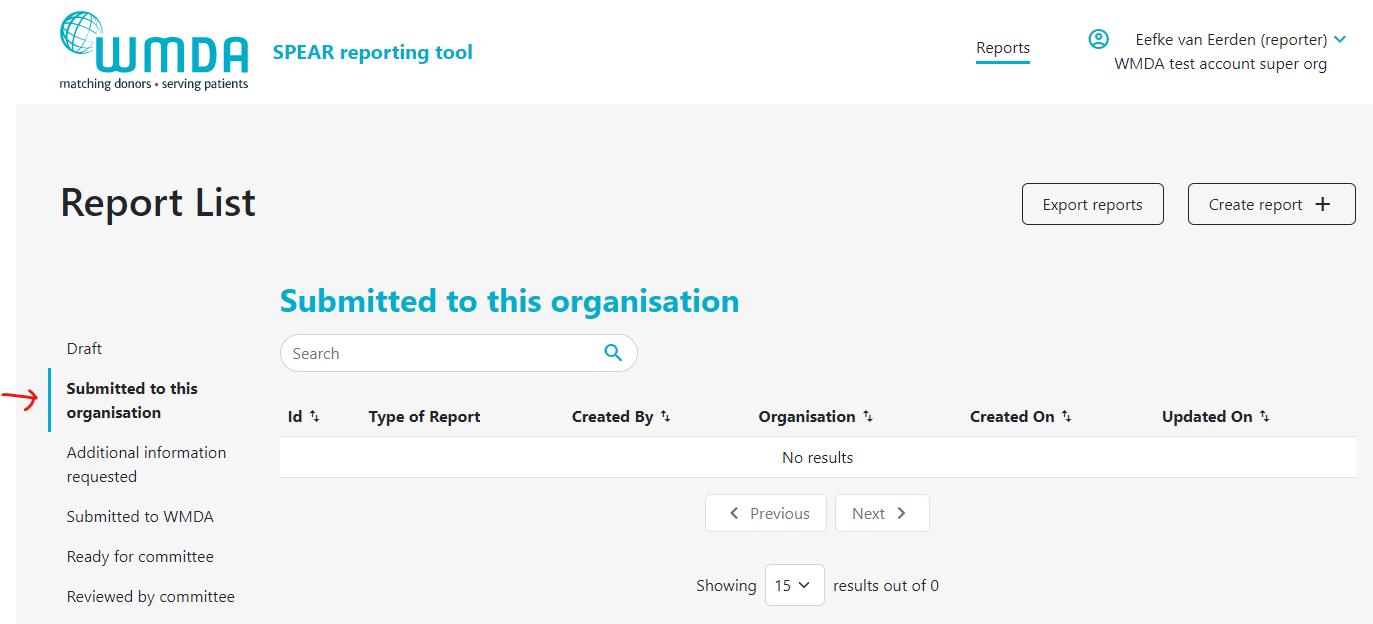
If your organisation has affiliated organisations, eg. a national donor registry with local transplant or collection centres, it could be that you receive reports from these organisations via the SPEAR service. It is then your responsibility to review these reports and to submit them to the WMDA on their behalf. An overview is available in a table on your dashboard named "Submitted to this organisation" (figure 12). Please review the reports there in a timely manner. You can proceed to submit to the WMDA by opening the report to view its content and click the "submit to WMDA" button at the bottom of the page (figure 13).
Figure 12: View reports from affiliated organisations
Figure 13: Submit reports from affiliated organisations
2.5 Adding additional information to a report (reporter)
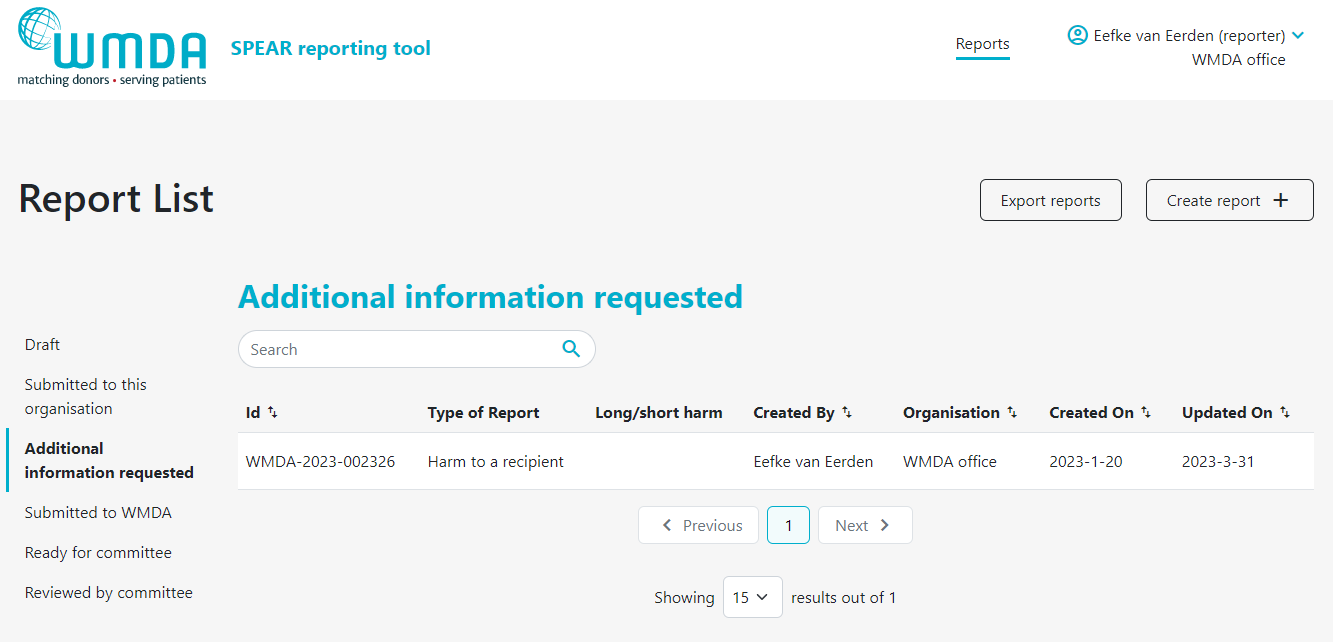
If a report has been submitted, it could be that you wish to add additional information or that the SPEAR Committee has a follow-up question or a request for more details. To add information to an existing report, there are 2 options, 1) you add details via de comments section or 2) you edit the report to add the details to the report overview. Information added directly to the report (by editing) is the preferred to enter data corrections or additional information relevant to the assessment of the report. Comments are best used to communicate with the SPEAR Committee and answer any question that they might have.
- Step 1: Click on the report to open it (figure 14).
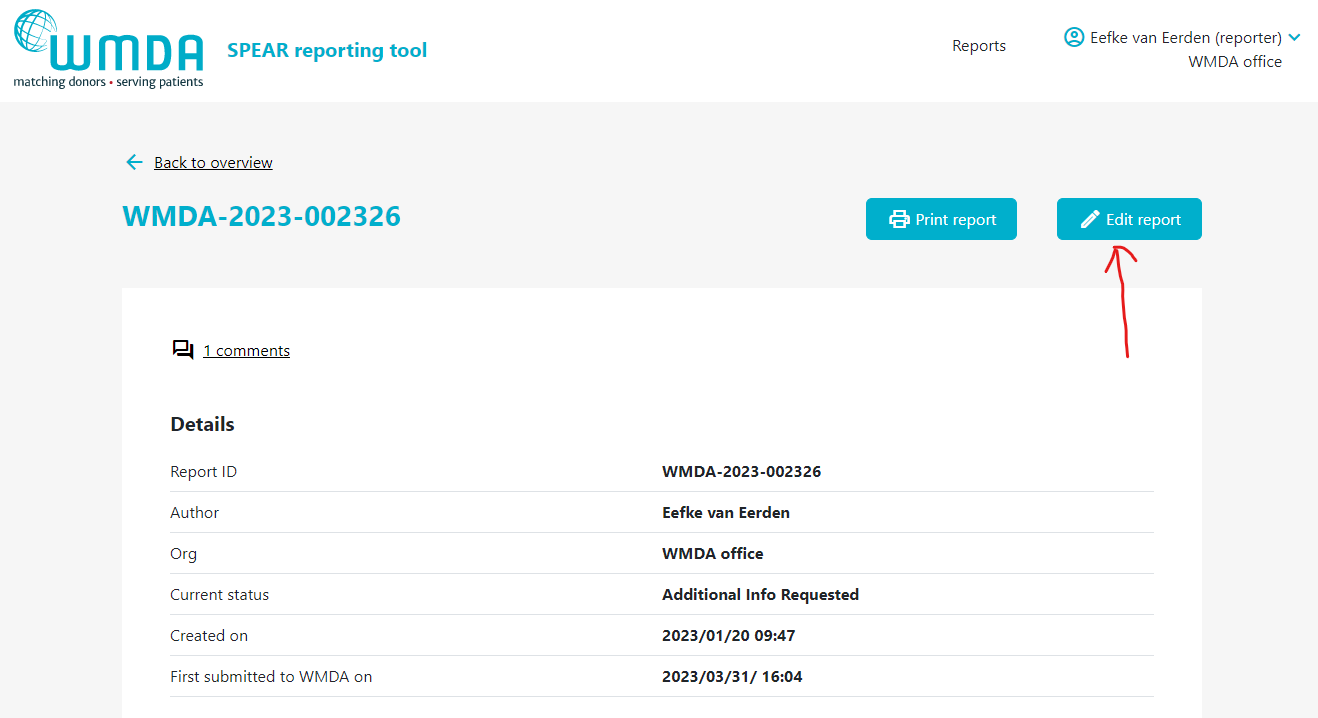
- Step 2: If editing is available, at the top of a page there is a Edit Report button (figure 15).
- Step 3: When finished editing, make sure you click the “Submit Report” Button to resubmit the report.
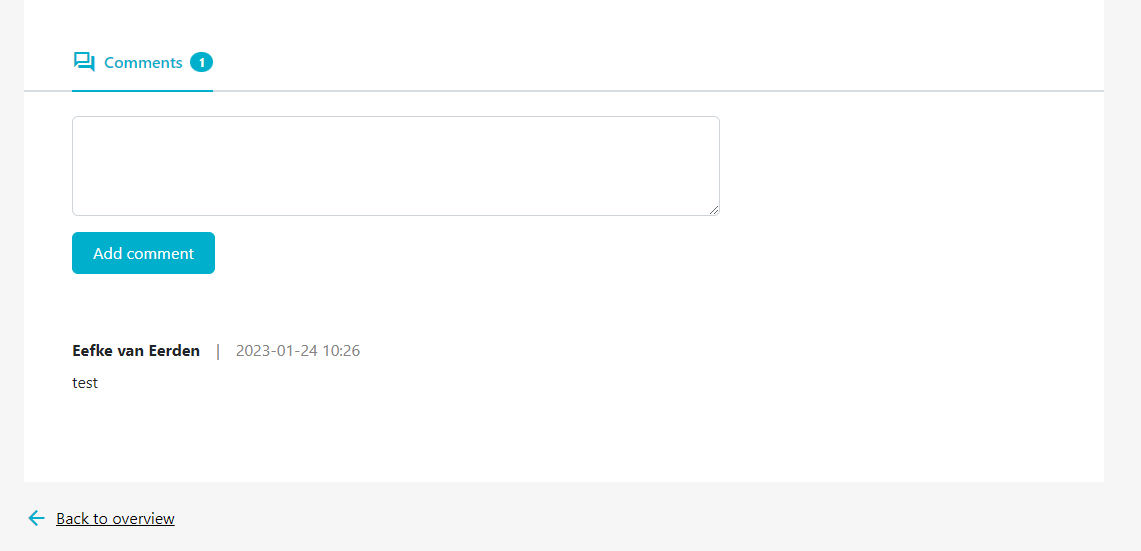
- Step 4: If you want to add a comment, scroll down to the bottom of the report page when viewing the report details to add your comments (figure 16).
- Step 5: Please re-submit the report to WMDA when done, by clicking the Submit Report button. Only then will the report by reviewed again by the Medical Advisor and SPEAR Committee.
2.6 Providing updates to a report that has already been reviewed by the committee (reporter)
As long as a report has not been marked as "reviewed by committee", there is the possibility to add information via the SPEAR service. You can click add comment or edit report to do so. If a report has already been reviewed, or is submitted to WMDA, but you have crucial information to add, please email sear-spear@wmda.info to request to add the details to the report. Each request will be reviewed on an individual basis.
2.7 Review process of the committee (committee member)
The SPEAR committee is a group of medical experts from around the globe that review all notable SPEAR reports submitted to the WMDA. This committee meets on a bi-monthly basis. The committee may decide that a report requires additional information to be able to complete the report assessment or classification of a report. If so, the reporter receives this question via comments on the report. Once a report is complete, the committee reviews reports to determine the necessary follow up (if any). Once a report is reviewed by the committee, the review details are available to the reporter for viewing in the "Reviewed by Committee" table.
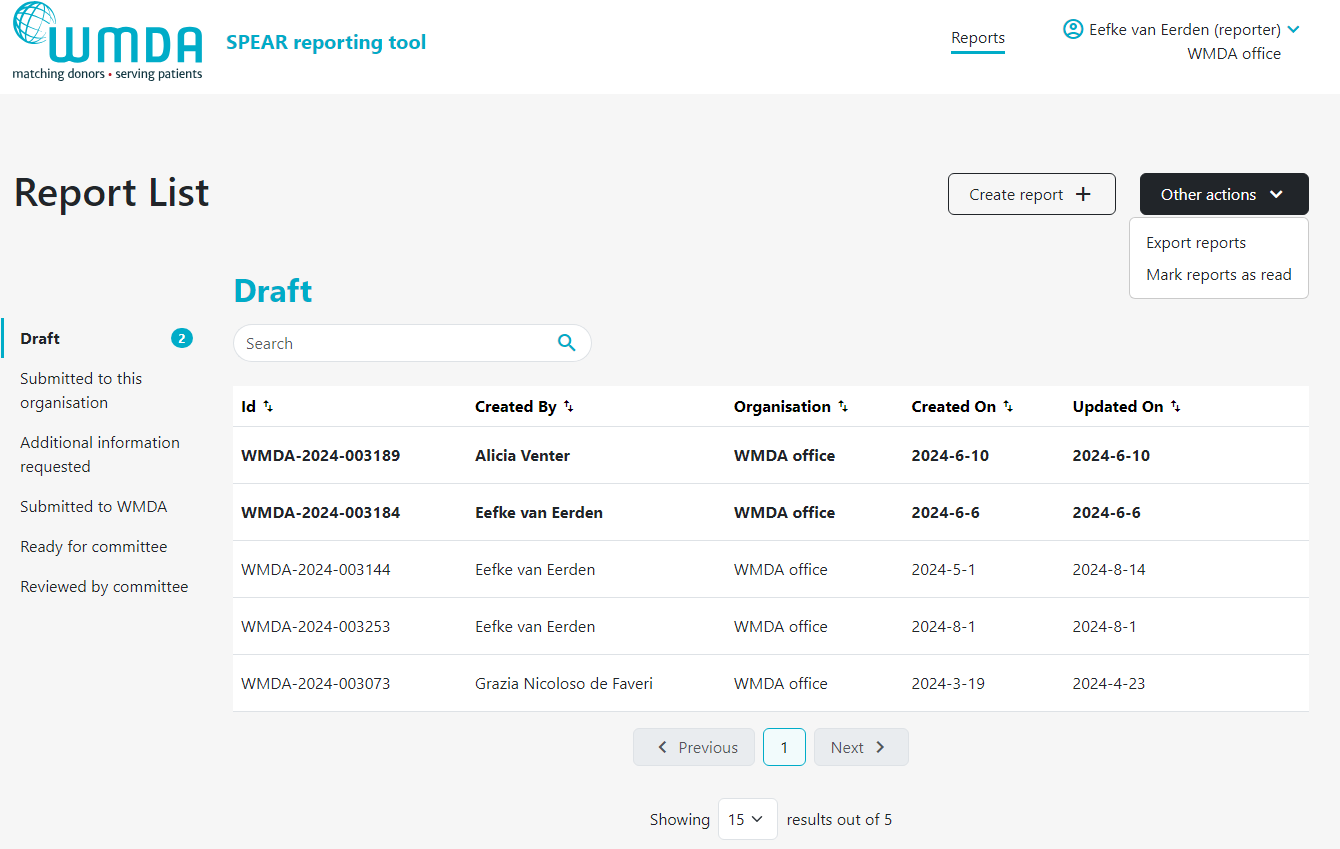
2.8 Download report overview (all users)
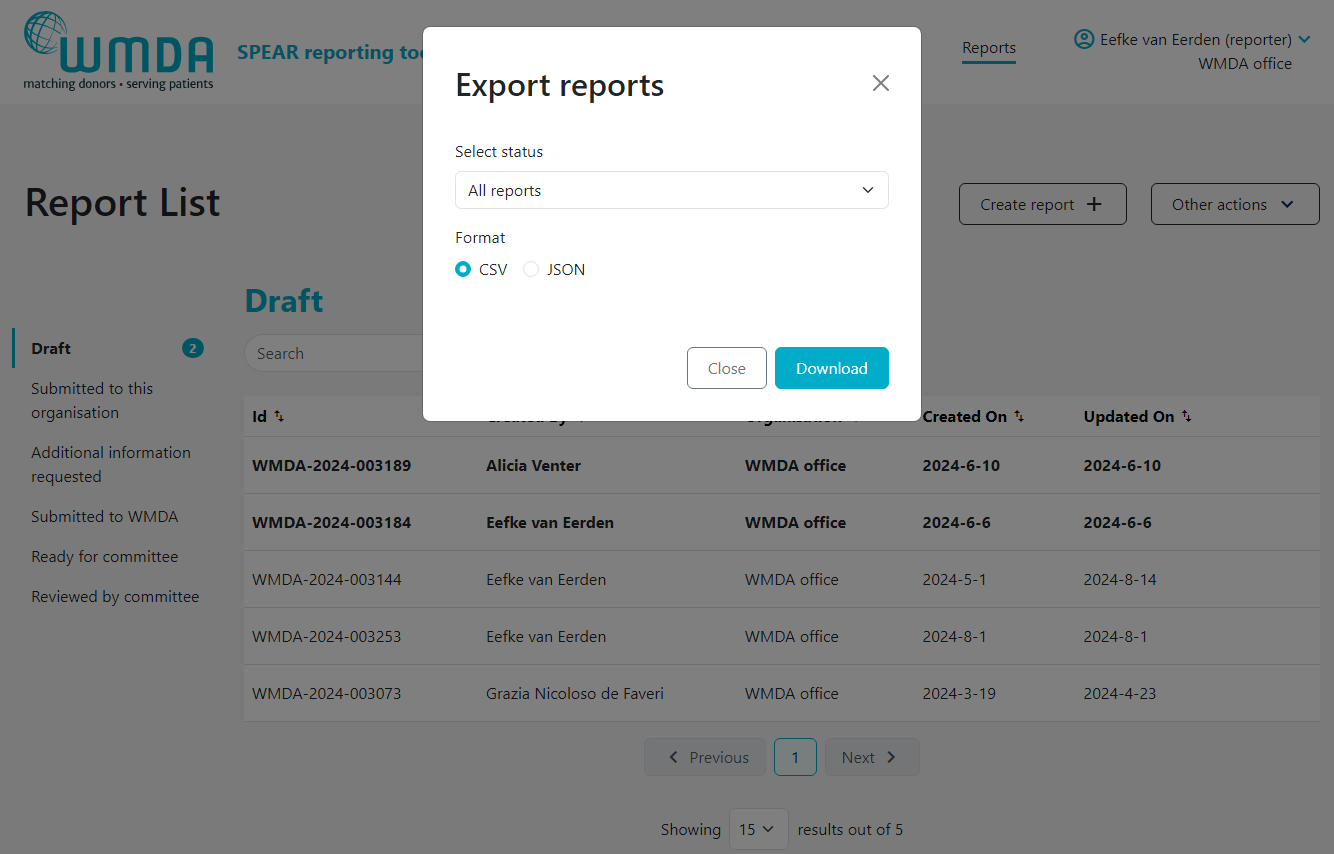
Users can download an overview of reports of their organisation via the SPEAR service. Two file formats are provided for download: .csv (Comma Separated Value) file and .json (Javascript Object Notation) file. For regular use, we recommend choosing the .csv file for download as it is easily converted to an Excel file. In case you want to use the SPEAR data for IT applications: JSON is supported by all the programming languages like Java, Net (C#), PHP, etc.
JSON is a data exchange format that stands for JavaScript Object Notation with the extension .json. JSON is known as a light-weight data format type and is favored for its human readability and nesting features. It is often used in conjunction with APIs and data configuration.
CSV is a data storage format that stands for Comma Separated Values with the extension .csv. CSV files store data values (plain text) in a list format separated by commas. Notably, CSV files tend to be smaller in size and can be opened in text editors.
Please follow the steps below to download an overview of reports:
- Step 1: Click on Other Actions button at the top of the page (figure 17)
- Step 2: In the drop down menu, select Export Reports.
- Step 3: Determine if you want to download all reports or only the reports of a certain status (e.g. reviewed by committee) (figure 18)
- Step 3: In the pop up window, select the file format you'd like to download (figure 18)
- Step 4: Click download. You will be sent back to the report overview where you can see the progress of the download.
Figure 17: Report overview
Figure 18: Select file format
Download might take a long time
Currently, downloading a .csv file will take a long time if you have a lot of reports included in the overview. Once it's done, you will likely find it in your downloads folder on your computer.
Converting a .CSV file to an .xslx (Excel) file:
- This two minute video explains how to open a .csv file in Microsoft Excel so you can use the data as a regular Excel file.
2.9 Print a report (all users)
When you click the View option to open a report and view its details, a button will appear at the top of the page: "Print report".
3. Frequently Asked Questions (FAQ)
GENERAL
USING THE SPEAR REPORTING SERVICE
SPEAR REPORTING 101
CASE STUDIES
to be updated
Ask a question on SPEAR reporting
Do you have questions on how to use the SPEAR reporting service or do you want to report an issue? Please use the button below.
